Maybe this is off topic? But there is machining involved! If it's in the wrong spot, my apologies.
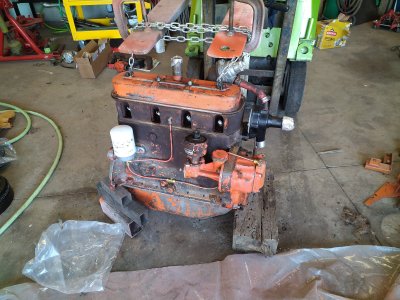
I'm currently restoring the front half of my old WD45. I've been trucking along just fine, but I could use some assistance with the flywheel. The engine was originally pulled to do a rear main (leaked 4 quarts in a 8 hour day{also; yes this old gal still works hard}). Once I got the engine out, I noticed that the fingers on the pressure plate were worn paper thin.

So I went through the faff of ordering a pressure plate, clutch, throw-out bearing, and pilot bearing (amazingly if I was a richer man, all available from the dealer still... can even order a long block if I was nuts). After being shipped all the wrong parts, and paying customs that I'll never get back on said wrong parts (I got an isolation mount for a Case combine instead of a pressure plate.... then the person on the phone tried to tell me that's what I ordered....🙄) I finally got the right parts, so I started disassembly. Now this is where I got a little shock. The flywheel is in desperate need of a resurface, but with the design of this particular one, I'm not sure who can do it. I was thinking of just chucking it up on the lathe, cleaning it up, then, hitting it with a scotch-brite roloc on a die grinder, but is this going to cause more issues than it solves? Any input would be GREATLY appreciated.


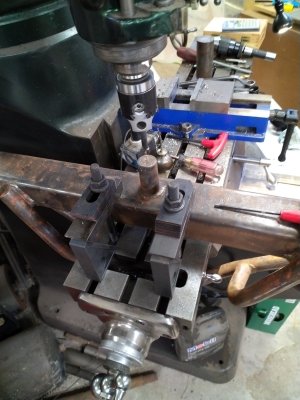
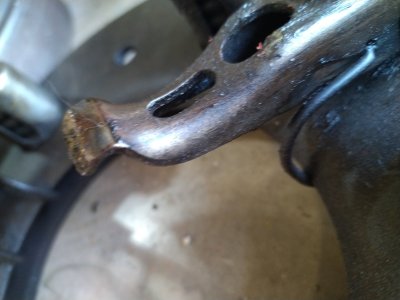
Some other parts that have been reworked on this machine, is the front axle pivots. Originally they were just 1/2" plate, the rear one I bushed with bronze, extended it, and added grease channels and a zerk fitting. The aft pivot on the axle side was just a 7/8" bolt. It was worn right down, so I bought a new grade 8 bolt and my friend came up with a slick jig to keep everything aligned.

The front pivot got a clean up on the mill to make it round again, and will be bushed with bronze when I can find a piece that will work, without wasting too much. The set up for the axle on the Bridgeport was fun and worked out better than I expected. It does have a taper of about 0.005", but for what it is I'll live with it. It was my boring bar flexing, as I used the table Z, not the quill to run up and down.


Here are a few pictures of the progress so far. Now the catch is I need this machine back in two weeks. We've got a few smaller fields that this machine works, along with my friends Farmall 140.


I'm currently restoring the front half of my old WD45. I've been trucking along just fine, but I could use some assistance with the flywheel. The engine was originally pulled to do a rear main (leaked 4 quarts in a 8 hour day{also; yes this old gal still works hard}). Once I got the engine out, I noticed that the fingers on the pressure plate were worn paper thin.
So I went through the faff of ordering a pressure plate, clutch, throw-out bearing, and pilot bearing (amazingly if I was a richer man, all available from the dealer still... can even order a long block if I was nuts). After being shipped all the wrong parts, and paying customs that I'll never get back on said wrong parts (I got an isolation mount for a Case combine instead of a pressure plate.... then the person on the phone tried to tell me that's what I ordered....🙄) I finally got the right parts, so I started disassembly. Now this is where I got a little shock. The flywheel is in desperate need of a resurface, but with the design of this particular one, I'm not sure who can do it. I was thinking of just chucking it up on the lathe, cleaning it up, then, hitting it with a scotch-brite roloc on a die grinder, but is this going to cause more issues than it solves? Any input would be GREATLY appreciated.
Some other parts that have been reworked on this machine, is the front axle pivots. Originally they were just 1/2" plate, the rear one I bushed with bronze, extended it, and added grease channels and a zerk fitting. The aft pivot on the axle side was just a 7/8" bolt. It was worn right down, so I bought a new grade 8 bolt and my friend came up with a slick jig to keep everything aligned.
The front pivot got a clean up on the mill to make it round again, and will be bushed with bronze when I can find a piece that will work, without wasting too much. The set up for the axle on the Bridgeport was fun and worked out better than I expected. It does have a taper of about 0.005", but for what it is I'll live with it. It was my boring bar flexing, as I used the table Z, not the quill to run up and down.
Here are a few pictures of the progress so far. Now the catch is I need this machine back in two weeks. We've got a few smaller fields that this machine works, along with my friends Farmall 140.