• Scam Alert. Members are reminded to NOT send money to buy anything. Don't buy things remote and have it shipped - go get it yourself, pay in person, and take your equipment with you. Scammers have burned people on this forum. Urgency, secrecy, excuses, selling for friend, newish members, FUD, are RED FLAGS. A video conference call is not adequate assurance. Face to face interactions are required. Please report suspicions to the forum admins. Stay Safe - anyone can get scammed.

Tired of crappy rubber/plastic utility tires?

Dan Dubeau

Ultra Member
I am. Almost everything I own that rides on cheap rubber/plastic tires is broken. I finally had enough, and decided to do something about it....
1Jh2R52.jpg

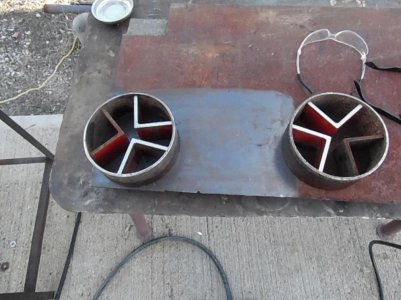
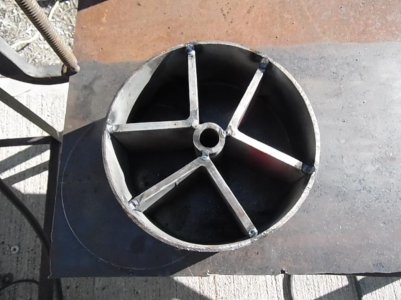
First step was to buy some steel, as I didn't have anything suitable on hand. Let me just get this out of the way right now, this is not a financially motivated decision, this is one born out of frustration and a desire to end the hassle of perpetually flat and broken tires everytime I need to move something.....I will do the math at the end, just to see the true cost of these though. I went with 3/16"x2" flat for the rim, and 3/16"x1.5" for the spokes. I bored some 1/2" pipe out a bit to fit the 5/8" axles.

Next step was to send them through the roller. Was really hoping that this duct roller would be up to the task. I've rolled 1/8"x2" before so I was hopeful. It did, but was a work out, and I don't think it was happy...... None of my drills or impacts would spin it, so it was all by hand with a 24" breaker bar. Wasn't really too bad though, and went pretty quick. I think it was 12 trips through the rollers. I guesstimated on having to burn about 4" on each end that I'd have to chop, but that was too much. Next ones I will only leave about 4" total for waste.
xSD5N6w.jpg

Printed some radius gauges onto some cardstock for 8, 10 and 12" wheels.

3IGbQ61.jpg

I cannot get this roller to roll straight. I spend a good deal of time trying to align the rolls, and the steel, etc, but I think there's just too much flex and slop in it from being pushed beyond it's design purpose that it's just something I'll have to deal with. Hopefully I can straighten them out....

I then cut off a bit from one end, and measured the circumference needed. Went with a nice round 31.5" on these instead of 31.4, but should be close enough......
cRptRrz.jpg
U5Licdi.jpg

Chopped them to length, and manipulated them in a vise to close them up and align the ends. I used a ratchet strap to close them up for tacking, and a kant twist on the seam for alignment. With some twisting and persuading they lined right up pretty easily.
cjmFBQc.jpg
fyj4xpu.jpg
1uVIc3T.jpg

I tacked up the inside, removed the clamps and strap then welded the inside completely. Then I ran a cutting disc down the outside groove, so I could weld that up with some better penetration.
sE2Pdqb.jpg
Bw8khk4.jpg
S61GJEq.jpg

I also chopped up some hubs, and bored them out while they were cooling. Then ground them all smooth.
jIiPXuV.jpg

Next step is to fill in the blanks......
 
For the spokes, I turned to my recently completed welding bend tester. I got the idea to makes spokes like this after doing some test bend and wondering I could used them for. Not one to waste stuff, and always looking to repurpose things.....

I cut some 3/16"x1.5" stock, and bent one according to another cardstock template.
UGNE9TI.jpgTTlk6E4.jpg

First bend went well, so I bent the rest using the first one as a template. I bent until the first one just got a bit snug, then removed it, and gave 4 full pump of the jack to account for spring back. They all came out pretty damn close. Close enough for this job anyway.....
qmqtvJH.jpgrEa3uAS.jpg
a5RuX54.jpg

I thought about making a jig to weld these up, but decided to just eyeball them. I think it worked out fine, and it turns out I didn't get any pics of that process. Next step was to make a jig to cut them all to the correct length based on the axle pivot.
 
I had a bit of a design in mind for this jig, but I let the scrap bin do the talking. I wanted it to be infinitely adjustable based on whatever ID of rim I was fitting. So I grabbed some 1" tube, and stuff a 3/4" inch tube down inside. Then started playing with offcuts....
AUBsNuc.jpg

Then I added a stop for the spoke
PJjOqUq.jpg

With the spokes held on I could get a look at the areas that needed "filling in"
5IkZsSo.jpg

So I drilled a plate for the axle and welded it in, then tacked it on the inner tube while everything was clamped up square.
1oH4Zv8.jpg

Next I wanted a good way to measure the length, so I grabbed it in the vise, edgefound the center, and scribed a line down the axle
N1IY4XO.jpg2JSeSjY.jpg

A little bit of black paintstick makes it pretty easy to see and measure the spoke length to the blade.
GthlOj7.jpg
RfmaUpG.jpg

Last was to weld in a nut for a set screw clamp.
bfJSc0z.jpgUWARhPT.jpg

With it all done, it was time to put it to use.
s9IrFxE.jpg
SB5TkeH.jpg912RjjL.jpg

I did the first one with a clamp, but it went much quicker cutting the 2nd without it. Wasn't really needed as the cut is well supported, and the blade pushes it down and into the fence. Only thing to watch out for is to manually hold the saw to prevent it from cutting right through the jig lol. I thought about incorporating a stop, but think I can trust myself enough to go without it.....

Here they are sitting inside the rims
au9fPs3.jpg

And here they are all welded up
AhgshZx.jpg

Next step, paint. I took some time to knock the weld bbs off them, and clean them up a bit, the hit them with 2 coats of tremclad black. Not before I gave them a test fit though....
W6aMJyA.jpg
gK7ZnTX.jpg
qZ4U0W6.jpg


They're drying right now, and should be done by now. Once I finish typing this, I'll go out and mount them and snap some pics. I have a few more to make for other things. An 8" (if I can roll that tight), and 12" pair. Hence the reason for the adjustable spoke jig.
 
Last edited:
Sold! I'll take 4 please!
Yes, I hate these terrible garden wheels.
 
Maybe add some 10” bandsaw urethane tires? Quieter and less slippy
They should be fine for the purpose of what I'm sticking them on. These were for my generator. The next ones are for a garden cart, and hand truck I use outside. Funny you mention bandsaw though, while making these I got wondering if I could roll and fabricate wheels for my bandsaw mill. I have some cast ones, but they are bordering on the too small side, and have always though about making bigger ones. I might experiment with that. I think I'm going to need to build a bigger roller......
 
Here they are mounted and working. They roll great, and it's going to be nice being able to wheel this thing around again easily......
52QJN06.jpg

And for the math on what they cost. Labour for this pair was about 4-5 hours (a bit last night and today) total including jig making, painting and head scratching. A lot of head scratching. Next pair I'm sure I'll get under 2 hours, and maybe under 1.5. I'll find out tomorrow......Or Monday, we'll see how the wind blows.
cost.png

The cost of never having to fuss or F*&K with flat or broken tires again......Priceless.

Now, to clean that generator up, and get it running again (carb clean).....
 
Last edited:
Nice job on those run flat tires.
Here's a couple ideas to save you some work and time. Use a section of 8" pipe from the scrappy's. These
used some 3" angle iron for the spokes and a 2 1/2" long piece of 1" round for the hub. Drilled out the round to 5/8" ID to fit the axle.
 

Attachments

  • steel wheels.jpg
    steel wheels.jpg
    89 KB · Views: 2
  • don't need air.jpg
    don't need air.jpg
    76.8 KB · Views: 2
Princess Auto sells a pretty big range of run flat tires pretty cheap.


I have a pair of these on my deer cart. Work great for getting a big deer out of the woods without breaking a sweat.

Screenshot_20240714_085522_Chrome.jpg
 
Nice job on those run flat tires.
Here's a couple ideas to save you some work and time. Use a section of 8" pipe from the scrappy's. These
used some 3" angle iron for the spokes and a 2 1/2" long piece of 1" round for the hub. Drilled out the round to 5/8" ID to fit the axle.
Nice. I like the pipe idea. I might have to do that for the smaller ones I need as I don't think I'm rolling 8" with my rollers. Maybe if I downsize them to 1/8" flat.
 
Princess Auto sells a pretty big range of run flat tires pretty cheap.


I have a pair of these on my deer cart. Work great for getting a big deer out of the woods without breaking a sweat.

View attachment 49769

I have one of those on a garden cart. I have only one, because the other one broke the spokes. Tire never went flat though, I'll give it that.......

Just finishing my coffee, and will head out to make another pair. I want to see how quick I can make them now that I have the recipe. I tried those on the hand truck and they were perfect too. Also thought of a few more things that need some so another trip to the steel yard is in order this week. I need to build a powered roller that can also do tubing.......
 
I have one of those on a garden cart. I have only one, because the other one broke the spokes. Tire never went flat though, I'll give it that.......

Ya, those are only good to 75 pounds each - more in the forest because the forest floor mulch litter supports more of the wheel circumference.

There are much stronger ones depending on your needs. I have a bigger better pair that I plan to put on my RV Honey Wagon cuz I don't like the little ones it came with.
 
Another pair of 10" done. Tried so hard to get it under 1:30 but just missed it. Put a good tribute concert on for Justin Townes Earle on the shop tv that was 1:44 long, and felt like the Hudson Hawk as I just finished them up as the last song played.....Pic taken as soon as I finished the last weld and got my glove of to snap the pic. 1:38.....a bit longer if you count the painting.....
qBX9WMQ.jpg


Anyway, here's some more pics, because everybody love pictures. Pretty much the same as yesterday lol

Starting point. No stock is precut.
zGZWLSE.jpg

Ironically I took almost ZERO time trying to align these rolls and parts as I hustled through them this time, and they came out pretty much bang on the money straight.....go figure..... I also rough cut them at 36" instead of 40" and they came out great leaving me plenty of end to burn.
VyFRKHy.jpg

Marked circumference of 31.5", and cut both ends square.
cqeoVnF.jpg

Cut and marked center of spokes
4KYpp6Q.jpg


All bent
FnkgLbg.jpg

All parts ready for welding. Hope I don't run out of gas.....
eHOuX6P.jpg

B43WyJW.jpgoGmuyRT.jpg

All welded
KYdvRtN.jpg

Spokes welded to hub, and cutting jig adjusted for rims.....
a9aiPdU.jpg

I tried to cut them a bit tighter this time for a nice tight fit, but ended up fussing with them a bit. Last nights were about a 1/16th undersize and these ones I cut about 1/16th over and it fought me harder than I was hoping for until I just grabbed the grinder and tickled some off the end of each spoke. Probably ate of about 10 minutes futzing around with it.
5YflAVI.jpg

And there they are all welded up. Didn't run out of gas thankfully, but probably wouldn't get another pair.....
95qsJvb.jpg

Hit with a wire brush pretty quick, and then out back to grind the od rim weld (I left the one on the id) for some paint to take advantage of residual heat for painting.....
sDuTxtX.jpg

And that's a wrap
1bipEw8.jpg


Now to clean myself up to go golfing.
 
First job for the hand truck today, moving a couple of new to me steel benches into the blacksmith shop. They worked great, and are so much more stable than the old inflated ones ever were on the ground.
MdQbhggl.jpg

Also picked up some more steel to make some 12" ones for a garden cart, so I might do those tomorrow or later tonight maybe. Today has been a day of side quests so we'll see what happens lol. Wife has also requested a wagon too, so a few more sets to make for that.....
 
Back
Top