I am curious what others are using for determining the depth of cut for various threads, the formulas seemed a bit much for my brain and the level of complexity for all the variables involved is challenging for me. In researching and trying to understand I came across these charts from mitsibishicarbide https://www.mitsubishicarbide.com/a...1/5783/tec_threading_depth_external_en-us.pdf and have been having good luck using these standards. Are others using something like this? I never came across a calculator for doing this either.
You are using an out of date browser. It may not display this or other websites correctly.
You should upgrade or use an alternative browser.
You should upgrade or use an alternative browser.
Threading depths of cut
- Thread starter combustable herbage
- Start date
Simplest where possible is the mating part. That isn't always possible so the go to is thread wires. Cheap and cheerful and you can measure any thread with thread wires - its all based on pitch diameter which you can lookup in Machinery's Handbook. Sans combustible herbage ( ") ) the math isn't too difficult, you just work through the steps. First for choosing the best size wire, then you pick the closest one, secondly, using the wire, to measure and calculate the pitch diameter. As time goes by you pick up some thread mics making it quick and easy, at least for the profile you have the anvils for....... the thread wires still get used for the rest
) the math isn't too difficult, you just work through the steps. First for choosing the best size wire, then you pick the closest one, secondly, using the wire, to measure and calculate the pitch diameter. As time goes by you pick up some thread mics making it quick and easy, at least for the profile you have the anvils for....... the thread wires still get used for the rest
) the math isn't too difficult, you just work through the steps. First for choosing the best size wire, then you pick the closest one, secondly, using the wire, to measure and calculate the pitch diameter. As time goes by you pick up some thread mics making it quick and easy, at least for the profile you have the anvils for....... the thread wires still get used for the rest
Last edited:
I use the Sandvik data, but I'm sure its the same. Those are radial infeed depths of cut. If you use 30° or 29°, you can calculate those dimensions using trigonometry.
A good app is Thread Calculator. When you're at the home page, click on the "Only Thread Tolerances - No NC Output". They have every type of thread.
A good app is Thread Calculator. When you're at the home page, click on the "Only Thread Tolerances - No NC Output". They have every type of thread.
Attachments

That's a good PDF chart. Going to print & put in my shop binder.
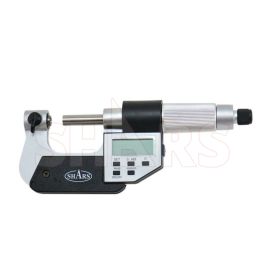
If you want to throw money at the problem, this one is pretty decent (but FX, shipping & customs dingers add to the cost). What I like is you can rather quickly take a series of measurements which for me is faster than wires. Flip from imperial to metric. Or zero on a reference thread & let it tell you how much is remaining. I tried the point style anvil thread mics but I'm not as consistent with them as the wedge & birds mouth type (which require a certain size for thread range). So pros & cons to various methods.
 www.shars.com
If you want to throw money at the problem, this one is pretty decent (but FX, shipping & customs dingers add to the cost). What I like is you can rather quickly take a series of measurements which for me is faster than wires. Flip from imperial to metric. Or zero on a reference thread & let it tell you how much is remaining. I tried the point style anvil thread mics but I'm not as consistent with them as the wedge & birds mouth type (which require a certain size for thread range). So pros & cons to various methods.
0-1" Electronic Screw Thread Micrometer
I am curious what others are using for determining the depth of cut for various threads, the formulas seemed a bit much for my brain and the level of complexity for all the variables involved is challenging for me.
I confess that I am having trouble trying to figure out what you are looking for. You provided a cool reference. But you also said the math was too complicated.
I wrote a reply but got distracted and accidentally deleted it. I even made a drawing for you (which I do still have). But no amount of refreshing, back paging, etc would recover my draft. That's prolly a good thing as I prolly tried too hard to simplify the math for you. On the other hand, I suspect you really didn't need that simplicity so I would have been teaching the wind.
Would you like the simplified math? Or are you happy with charts and on-line resources? How about a dumbed down, works 99% of the time set of guidelines?
The right approach very much depends on what kind of threads you are looking for - Precision (NASA) threads, universally compatible threads, or shop threads for your own needs? These are very diverse goals.
Have a read through this....

 canadianhobbymetalworkers.com
Threading - 29.5/30 vs 90
Since the very beginning of my machining experience on a lathe, I have always done 29.5 degree threading. I thought everyone did it this way. But I recently learned from @gerritv that while this practice is mostly common in North America, the rest of the world normally cuts their threads using a...
Had to look at this thread, (yes, a double wammy there) , even cutting with carbide inserts at 29.5 degrees, I would make the last few passes at a very small advance on the compound and the final pass at no advance. Many times a fine shaving would be removed about 1.5 to 2 turns in along the remainder of the thread. This was set with dial indicators, on the compound and the cross slide. This was mig welded cast iron with Ni-rod 55 material, (yes, above the boundary layer), a very difficult material to machine, to say the least. We had followed specs of the carbide maker in choosing inserts, feeds, depth of cuts, etc. HSS in general would not handle the job, regrind, sharpen after nearly every cut if the tip even survived the first contact.
So with the carbide, about 1/4 of depth on first pass, same on next pass, take a good look at tip, if all appeared good, next cut the same, check the carbide again, last few cuts to finish, watching chips while cutting. The beauty of inserts, once set up, could change insert at anytime and not need to reset things.
We did not have big machines, this threading was on a 16 X 60 lathe, a lot of mill work on a round column mill drill, later added a Bridgeport style mill to the mix. In hand with mix of other machines.
What we did find that was most important was specs were a starting point for using the carbide, if the machine was not big enough, fast enough, ridgeid enough, a compinize could sometimes be found. Sometimes a different maker of carbide would be needed. We had settled on Mitsubishi as they made a certain shaped carbide that fit the bill for another of our milling operations. We had tried a number of other makes, some were too hard to get, some did not like the materials we were working, poor longativety, etc.
A big thing to keep in mind, if carbide breaks off in a cut, remove all pieces from the work piece, before trying to cut over, through, that area!
Long worded again.
Many times a fine shaving would be removed about 1.5 to 2 turns in along the remainder of the thread.
This is the effect we strive to address by taking a so called spring pass or dividing up our cuts to land on the perfect final cut. It's a perfectly normal result of cutting on a lathe whether or not we are just turning or cutting a thread and whether or not our lathe is big or small. It's that old "everything moves when subjected to a force no matter how big the part or small the force - its not if it will move, its only how much.". Spring passes are a devil when using regular carbide inserts. Sharper carbide inserts or hss has less of an effect because they take less force for the same depth of cut.
I appreciate the replies, I am quite happy with my threading and improvement, when I started threading with my craftex, I had to manually change gears so I ended up using taps and dies almost all the time, but now with my SM and qcgb its so fun and easy to setup single point threading and was more curious if others are using something similar. Thanks Craig @YYCHM for pointing to that thread, I had to laugh when the third post was @Susquatch posting the same chart, now that I have more understanding and experience that thread answers some questions and presents opportunities to experiment with some of the ideas there. I did buy the accusize version of the thread mic but it was at the bottom of a drawer so I pulled it out again and was and will experiment with it more and put it more into use. Good results can come from different methods and for me I will always take the easiest simplest way that gives me the result I want and I have no problem being called lazy when it comes to math. My main takeway is that this chart is helpful but more factors in getting the fit required for the particular application.