Repairing the tail wheel on a pewter model airplane?

StevSmar

(Steven)
Premium Member
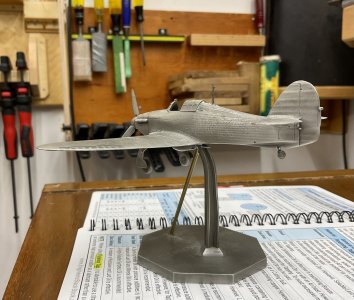
A pewter model which I have of the Hawker Hurricane had it’s tail wheel broken off.

I can either:
- Try to solder it back on with Pewter Solder (maybe $50 CAD by the time it arrives, though I haven’t looked exhaustively for a smaller reel)
- Purchase a white metal tail wheel as part of an undercarriage set and fit that. (maybe $25 to $35 CAD by the time it arrives)

If the replacement tail wheel was correct for this airplane and of good quality, that would probably be the way to go. But it isn’t… So I’m leaning towards trying to solder it and if it gets destroyed then Ill have to purchase the white metal replacement.

Has anyone had experience with soldering pewter where the parts are maybe 1mm in diameter? Do you have an opinion on the probability of success?

Here’s a picture of my model: 9835C94F-FFB8-49E4-A6DB-6557A1E14DE2.jpeg
 

6.5 Fan

Ultra Member
Premium Member
JB weld or epoxy would be my first attempt to repair. Try not to play so rough with your toys.:)
 

Susquatch

Ultra Member
Administrator
Moderator
Premium Member
A pewter model which I have of the Hawker Hurricane had it’s tail wheel broken off.

I can either:
- Try to solder it back on with Pewter Solder (maybe $50 CAD by the time it arrives, though I haven’t looked exhaustively for a smaller reel)
- Purchase a white metal tail wheel as part of an undercarriage set and fit that. (maybe $25 to $35 CAD by the time it arrives)

If the replacement tail wheel was correct for this airplane and of good quality, that would probably be the way to go. But it isn’t… So I’m leaning towards trying to solder it and if it gets destroyed then Ill have to purchase the white metal replacement.

Has anyone had experience with soldering pewter where the parts are maybe 1mm in diameter? Do you have an opinion on the probability of success?

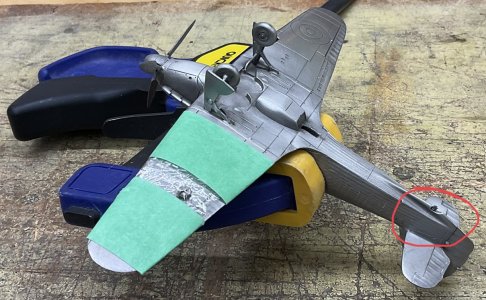
Here’s a picture of my model:View attachment 23397

Just use some more of that teal masking tape that's holding the wing together........ ;)
 

StevSmar

(Steven)
Premium Member
Thanks @DPittman, @6.5 Fan and @Aliva for your suggestions. Maybe I should just call it quits and use JB weld. When it broke before I’d used epoxy and that held until recently.

I’m loathe to try regular solder since it has a fairly high melting point. I could practise on the underside of the stand though?
Try not to play so rough with your toys.:)
Well… this time it was not my damage. My wife is not too keen on “boy hobbies” being displayed in the main living area, so I think that this was why she wasn’t as gentle as I‘d requested previously. Mind you, in her defence the pewter is so delicate that just walking by with some exuberant flatulence is enough to bend some of the parts.

Just use some more of that teal masking tape that's holding the wing together........ ;)
Ugg…(I think that’s Canadian/Ukrainian for head slap… or is that Ock…)
 

YotaBota

Mike
Premium Member
Is there enough meat in the tailwheel to drill and insert a new stub? Or drill both pieces (if enough material is there) and insert a pin to hold the two pieces together. 1mm is in the .040 range so a #60 could make the hole and the bit could even be used as the pin.
There are also low temp solders on the market, less than 200 degrees but you still need to be quick. The model railroad types use a lot of the low temp stuff.
 
Last edited:

Brent H

Ultra Member
@StevSmar: "Well… this time it was not my damage. My wife is not too keen on “boy hobbies” being displayed in the main living area, so I think that this was why she wasn’t as gentle as I‘d requested previously. Mind you, in her defence the pewter is so delicate that just walking by with some exuberant flatulence is enough to bend some of the parts."

"I won I won....Its Italian... look Fragilee......" reminds me of "the lamp" in "A Christmas Story" only you took it much better...LOL
 

Susquatch

Ultra Member
Administrator
Moderator
Premium Member
Maybe I should just call it quits and use JB weld. When it broke before I’d used epoxy and that held until recently.

You could try looking at the devcon epoxy products. I personally think they are the gold standard. But regardless, they carry many different types for different metals. You could also call them or send an email. I find them pretty responsive.

And I totally endorse the pin or pins idea. Just don't try pressing it in. Leave lots of slop for the epoxy and do it in two stages. Pin one or the other first, let that cure and then do the other.
 

Dan Dubeau

Ultra Member
I don't have any pics, but a few years ago I managed to build up the broken off pin on a pewter belt buckle again with a soldering iron, some flux, and a pewter hat pin for some filler stock. I tried braking it off when done, and with more force than it would see in service was unable to. Some filing to shape and it was a job done.
 

StevSmar

(Steven)
Premium Member
Is there enough meat in the tailwheel to drill and insert a new stub?
That’s a great idea, I think I’ll try that first! A pin and a bit of Loctite.

An excuse to buy some more spring steel from the local hobby shop (plus I need some more brass tube anyway…)

… with a soldering iron, some flux, and a pewter hat pin for some filler stock…
Ooh, my wife will have a reason for a trip to Value Village. Eventually she’s bound to find isomething thats pewter. Might be touch and go to have the hat pin melt before the wheel does
 

StevSmar

(Steven)
Premium Member
Is there enough meat in the tailwheel to drill and insert a new stub? …so a [drill] could make the hole and the bit could even be used as the pin.
Thanks @YotaBota , your idea worked perfect!!!

I was able to drill both pieces with a 0.025” (0.64mm) drill, locktite it’s end into one piece, cut it off and locktite it into the mating piece.

Hard to tell where the repair was and it’s a lot stronger than it was before:
1E568472-DDD1-4C00-934F-6A698697ED6C.jpeg

I think I better build a case for it, to protect it from my wife’s rough handling. From the close up photo, it looks like it needs a bit of a polish too…
 
Thanks @YotaBota , your idea worked perfect!!!

I was able to drill both pieces with a 0.025” (0.64mm) drill, locktite it’s end into one piece, cut it off and locktite it into the mating piece.

Hard to tell where the repair was and it’s a lot stronger than it was before:
View attachment 23898

I think I better build a case for it, to protect it from my wife’s rough handling. From the close up photo, it looks like it needs a bit of a polish too…
I think that may be the problem rough handling of the wife, might I suggest a more gentle approach, flowers, little wine and dining along with with sweet nothings in the ear.

You may be doing less repairs......

:cool:
 

YotaBota

Mike
Premium Member
Good to hear the repair went well, now get that thing into the man cave where it will be safe. lol
Was the drill bit from the tip cleaner set?
 

StevSmar

(Steven)
Premium Member
Good to hear the repair went well, now get that thing into the man cave where it will be safe. lol
Was the drill bit from the tip cleaner set?
Yes, the model is sitting in my workshop now. I’ll probably hit it with something eventually and all the repair work will be for nought.

The drill bit was from a collection of odd sizes I had for making plastic model planes. I inserted the shank of the drill bit into the tail wheel and then cut it off, so I still have a useable drill if I need it.
 
Top