• Scam Alert. Members are reminded to NOT send money to buy anything. Don't buy things remote and have it shipped - go get it yourself, pay in person, and take your equipment with you. Scammers have burned people on this forum. Urgency, secrecy, excuses, selling for friend, newish members, FUD, are RED FLAGS. A video conference call is not adequate assurance. Face to face interactions are required. Please report suspicions to the forum admins. Stay Safe - anyone can get scammed.

Question about Bambu colour changes

DavidR8

Scrap maker
Administrator
Moderator
Premium Member
I was thinking about colour changes in 3D prints and wondered if there's a way to change the process so that it works more like what happens on a CNC router. I know additive vs. subtractive processes is a big difference.
For a simple 2D print like a name plate, the waste is reduced by the lettering being proud of the surface so the when the colour changes, the new colour is only the lettering.
But if the lettering is flush, does the slicer run all of the base colour and then switch colour when it does the lettering?
I believe it is done by layers. If you print the name plate top side down it will print either the letters or the background first , change filament and then do the rest of the layer. Does the reverse if you print with the top up. Ashley's print shop on Youtube has good tutorials on the Bambu slicer and how to get the most out of it.
 
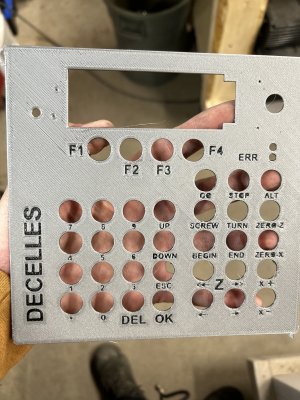
I don’t have a Bambu but I do color changes manually. I did a face plate for an ELS from @jcdammeyer
I modified my print to indent my letters 0.6mm, the printed an entire layer of black. I did it like this because the lid needed to be printed upside down and didn’t know how to isolate just the letters to a color vs the entire layer
 
Pic . With them inset you can feel the letter with your finger . Layers 1-3 were grey, 4 and 5 black and back to grey
 

Attachments

  • IMG_0933.jpeg
    IMG_0933.jpeg
    2.8 MB · Views: 10
Back
Top