• Scam Alert. Members are reminded to NOT send money to buy anything. Don't buy things remote and have it shipped - go get it yourself, pay in person, and take your equipment with you. Scammers have burned people on this forum. Urgency, secrecy, excuses, selling for friend, newish members, FUD, are RED FLAGS. A video conference call is not adequate assurance. Face to face interactions are required. Please report suspicions to the forum admins. Stay Safe - anyone can get scammed.

Project of the day - Tailstock DRO on the cheap

slow-poke

Ultra Member
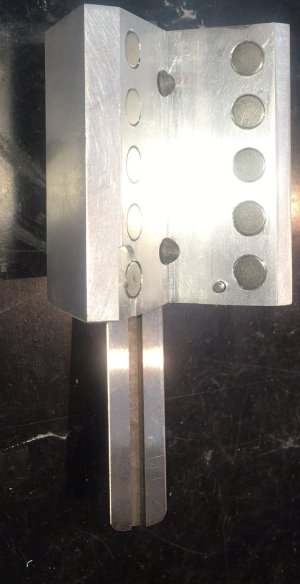
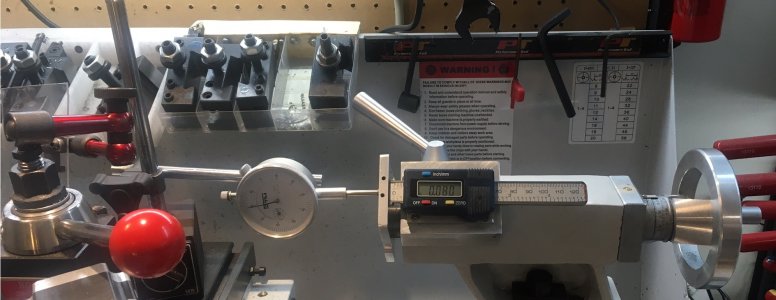
I was tired of doing the mental arithmetic of the never zero tailstock metric gauge on my BB lathe so I decided to use an old unused caliper sitting in the back of my Kennedy box. I was reluctant to drill the tail stock for mounting holes, so I decided to try a magnetic mount with 10 rare earth magnets and one tiny 2.5mm pin that only goes about 2mm deep into the tail-stock.

A little rough around the edges but seems to work well.
 

Attachments

  • IMG_0207.JPG
    IMG_0207.JPG
    153.8 KB · Views: 61
  • IMG_0209.JPG
    IMG_0209.JPG
    369.9 KB · Views: 58
  • IMG_0210.JPG
    IMG_0210.JPG
    290.5 KB · Views: 60

DPittman

Ultra Member
Premium Member
I did a similar thing, however I glued the based of the caliper to the tailstock for the same reasons you stated. I also used an Uber cheap plastic caliper that I figured would be very temporary and it's still going. The only thing I wish I had done differently was not place the caliper on the top of the tailstock but rather made an angle mount on the front. And your version accomplished that too. Well done.
 
Last edited:

Susquatch

Ultra Member
Administrator
Moderator
Premium Member
A little rough around the edges but seems to work well.

What a great idea! The 4Axis DRO that I had planned to order just became 3. I can't see any reason (at least not in my current state of mind) why I would ever want to integrate the readouts.

I love the corner mount system attached with magnets. A stroke of genius!

What the heck is the dial indicator all about? Calibration?

How is the Caliper attached to the corner block?

Does that pin sit in a drilled hole in the tailstock?

Again, I really like that! Very well done!
 

JustaDB

Ultra Member
Nice work.

Last month Princess Auto had some 4" digital composite calipers on clearance, they were around 10 bucks. I snagged one for my tailstock, going to figger out some sort of mount out. Tougher on the SB9, no square corners or flat surfaces.
 

kstrauss

Well-Known Member
That looks great. One thing I'd love to make for my Myford, but have never got around to yet.
On a Myford (at least a S7) one can avoid drilling holes by attaching the scale to extensions for the oil nipples on top of the tailstock. I should take a picture...
 

slow-poke

Ultra Member
What a great idea! The 4Axis DRO that I had planned to order just became 3. I can't see any reason (at least not in my current state of mind) why I would ever want to integrate the readouts.

I love the corner mount system attached with magnets. A stroke of genius!

What the heck is the dial indicator all about? Calibration?

How is the Caliper attached to the corner block?

Does that pin sit in a drilled hole in the tailstock?

Again, I really like that! Very well done!
Yes the dial indicator was just a reality check.

I drilled and tapped two M3 holes in the back of the caliper case and then mounted the caliper to a thin mounting plate, so the assembly could then be mounted to the block, via the plate. In my haste I made the plate shorter than required so that the plate to block mounting screws were actually too close to the caliper body for the screw head to clear the caliper body for the top two screws, oops. So I countersunk all four holes and then drilled two larger holes in the block to provide access to the two M3 screws from the back.

Yes the 2.5mm pin passes through the block and sits in a very shallow (2mm deep) hole in the tailstock. So I did drill one hole but it's tiny and shallow. You can see the pin in the first image.

The funny looking shallow milled slot in the bottom left corner was required to clear a brass oiler that is on the top of the tailstock in that area.
 
Last edited:

historicalarms

Ultra Member
Beauty for any of the forum members that do the odd chambering operation...but I would suggest they use a 6" caliper for longer chambers.
I have used my dial indicator & its magnetic base similarly ( I hose-clamp an angle iron scrap to the tailstock feed barrel for the indicator to read off of) but it can be a pain to set up securely against any movement and if your cutting a 2.5 " chamber with only a 1" indicator....well it ain't the first time I've discovered "it's too short"....this looks far better, well done man.
 

Susquatch

Ultra Member
Administrator
Moderator
Premium Member
Yes the dial indicator was just a reality check.

I drilled and tapped two M3 holes in the back of the caliper case and then mounted the caliper to a thin mounting plate, so the assembly could then be mounted to the block, via the plate. In my haste I made the plate shorter than required so that the plate to block mounting screws were actually too close to the caliper body for the screw head to clear the caliper body for the top two screws, oops. So I countersunk all four holes and then drilled two larger holes in the block to provide access to the two M3 screws from the back.

Yes the 2.5mm pin passes through the block and sits in a very shallow (2mm deep) hole in the tailstock. So I did drill one hole but it's tiny and shallow. You can see the pin in the first image.

The funny looking shallow milled slot in the bottom left corner was required to clear a brass oiler that is on the top of the tailstock in that area.

Very very cool. I love it! I'll try to learn from your improvements too!

THANK YOU for sharing!
 
Top