Hi All,
At it again, giving myself more heartburn. I am egotistical enough that I want to see this locomotive running in my lifetime and not someone else's. And time is not on my side.
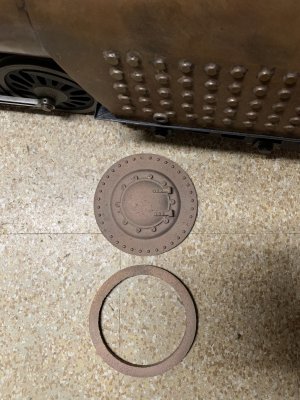
I need to precisely machine these two silicone bronze castings to be a very precise (tap) fit in the locomotive smokebox barrel as the smokebox itself has to be under a slight negative pressure to help draw the combustion gasses through the boiler tubes (it is not the only mechanism used to achieve this but it is an important factor) with absolutely no leaks in or out of the smokebox itself.
So the first operation was to mount the smokebox door mounting ring in the 4 jaw and machine the inner face of the mounting ring and its ID all at one setting. Just make sure to give the casting a good once over with a relatively coarse tooth file to remove any and all casting irregularities first.
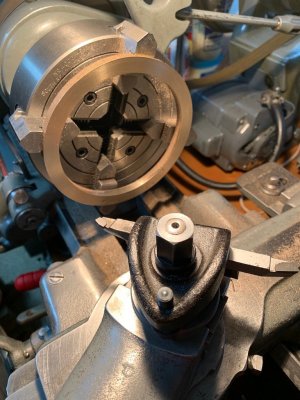
To do the facing/boring operation, one had to set the casting out from the reversed jaws ever so slightly so the boring bar would just clear the backing jaws. I used 1/16" thick packing pieces all SG to be exactly the same thickness (saved by the SG again) as one should not introduce any more wobble than is in the casting itself.
The silicone bronze skin of the casting is very hard and tough on regular HSS unless your HSS tools are kept very sharp so this is one of the few times I go with carbide cutting tools (C2 non ferrous). I kept the cuts light and the 4 jaw clamping pressure low as I did not want to distort the ring. Mount the ring with the backing pieces and centre it as close as possible first.
The setup shown in photo 11 is far from ideal but when space for machining is very tight you do what becomes necessary. I had to sharpen/relieve the carbide blank in order to be able to get into the tight inner corner and this was done on the Quorn using a small diamond wheel by hand. Single point cutting tools are so easy to sharpen so I try and use them wherever possible and in ways they were never intended to be used.
All setup work but it made for a beautiful job.
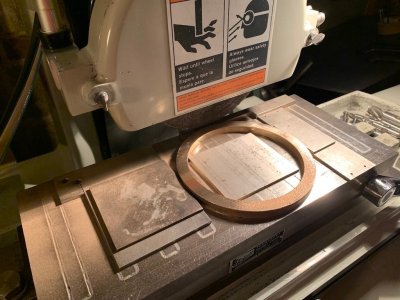
Next was to machine the ring dead parallel on thickness. It could have been done in the lathe but having a SG.... Silicone bronze grinds just like mild steel with a standard aluminum oxide wheel but the part has to be thoroughly blocked first as seen in photo 12. I took very light cuts of 0.0005" per pass as nothing can move . Tedious work but what a finish.
to be continued.
At it again, giving myself more heartburn. I am egotistical enough that I want to see this locomotive running in my lifetime and not someone else's. And time is not on my side.
I need to precisely machine these two silicone bronze castings to be a very precise (tap) fit in the locomotive smokebox barrel as the smokebox itself has to be under a slight negative pressure to help draw the combustion gasses through the boiler tubes (it is not the only mechanism used to achieve this but it is an important factor) with absolutely no leaks in or out of the smokebox itself.
So the first operation was to mount the smokebox door mounting ring in the 4 jaw and machine the inner face of the mounting ring and its ID all at one setting. Just make sure to give the casting a good once over with a relatively coarse tooth file to remove any and all casting irregularities first.
To do the facing/boring operation, one had to set the casting out from the reversed jaws ever so slightly so the boring bar would just clear the backing jaws. I used 1/16" thick packing pieces all SG to be exactly the same thickness (saved by the SG again) as one should not introduce any more wobble than is in the casting itself.
The silicone bronze skin of the casting is very hard and tough on regular HSS unless your HSS tools are kept very sharp so this is one of the few times I go with carbide cutting tools (C2 non ferrous). I kept the cuts light and the 4 jaw clamping pressure low as I did not want to distort the ring. Mount the ring with the backing pieces and centre it as close as possible first.
The setup shown in photo 11 is far from ideal but when space for machining is very tight you do what becomes necessary. I had to sharpen/relieve the carbide blank in order to be able to get into the tight inner corner and this was done on the Quorn using a small diamond wheel by hand. Single point cutting tools are so easy to sharpen so I try and use them wherever possible and in ways they were never intended to be used.
All setup work but it made for a beautiful job.
Next was to machine the ring dead parallel on thickness. It could have been done in the lathe but having a SG.... Silicone bronze grinds just like mild steel with a standard aluminum oxide wheel but the part has to be thoroughly blocked first as seen in photo 12. I took very light cuts of 0.0005" per pass as nothing can move . Tedious work but what a finish.
to be continued.