Fun Stuff first...here's the test run from today (2 videos):
While I don't regret getting rid of my CNC Plasma Table, there is one thing I do miss: being able to cut a perfectly straight line on plate with a consistent edge. This has been talked about in previous threads, as we all seem to have varying degrees of difficulty using our hand held torches to get a clean edge. So for this project I decided to build a motorized plasma cutter. There are lots of designs on YouTube, but I wanted some flexibility to make longer cuts, should the need arise. I also wanted to employ as many pieces of off-cuts I had laying around the shop rather than sink a bunch of money into this. This included channel, angle, tube, etc.

Looking around my shop I noticed most of my plate-based projects involve cuts that are under 36' in length. So I designed for that length of cut, with allowance for overshoot and limit switches. But instead of a welded design I went for a bolt-together design—this allows me to break it down for easy storage; but more importantly I can scale up the length so it can cut up to 96" if needed. (I'd just need to swap out the leadscrew and the tube that the trolley travels on.) For this reason I built my own torch trolley to specifically work with standard 2" square tubing because this is readily available. Another advantage of a bolt together design is that there is no warping from welding. I learned this the hard way from some prototypes—any warpage on the travel axis is transferred to the plasma torch, where millimetres can impact cut quality.

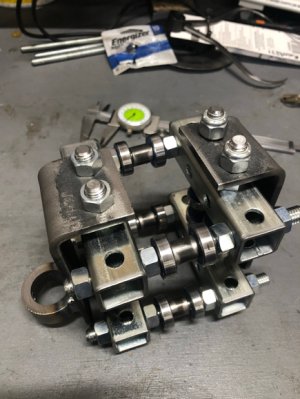
The homemade trolley is flexible in design so that it can be fine tuned to account for the variance in 2" dimensional tubing from different manufacturers. It's basically pre-punched tube, a bunch of bearings, some Allthread and some nuts. The nuts and Allthread let me tweak the fit on the tubing. Some of the YouTube designs online use 1" or even 1.5" tubing; however, with the ability to scale up to cutting 96", I wanted to make sure there would be minimal sag in the tubing, so I chose 2" square tube instead. And because it will be broken down for storage, I know parts will move around. Therefore, almost all critical components such as bearing mounts and drive components fit into punched oval (rather than round) mounting holes. This lets me adjust things when I scale up or reassemble the parts.

I run an older HyperTherm 45 torch. There is no remote trigger plug on this model so to get the torch to fire remotely without a bunch of zip ties on the handle to bypass the safety features takes some internal rewiring. Instead of defeating the safety features inside the torch itself I bypassed them inside the machine and ran wires for a remote plug to the back of the box. This allows me to use the torch manually and still have the safety features, but when I want to use the cut table, I just run an interface cable between the box and my home made controller. The safety features are only bypassed when the table is being used.


The motor is an old cordless driver and I modified an old controller to add a LED digital speed readout so I can dial in the speed for a given plate thickness (in the video the plate is 3/8"). There are limit switches, adjustable stops and directional controls, as well as an emergency stop that kills both the power to the motor as well as the plasma torch. When the limits are reached you must press a limit bypass switch and reverse the motor to reset the trolley.


A Few Lessons Learned:
The drive plate where the nut is welded on MUST float. This allows it to compensate for small irregularities in travel without binding up. I achieved this by punching the holes oversized by 1/8" and using nylon lock nuts on the top of the drive plate—but not fully tightening them down. This gives play in all directions so the leadscrew can wobble a bit rather than binding up. I may experiment with an acetal or Delrin nuts/couplers at some point. But I learned the combination of a stainless steel lead screw and a Grade 5 drive nut may not be the best. Without the float capability the SS leadscrew and the nut attacked each other. The leadscrew is HRC 50 whereas the drive nut is HRC 32. The result was a hot mess when they bound up. Floating the drive plate with the nut was the solution.
It's nice to be able to see where the exact cut will run, so I machined a couple of acetal inserts for the torch holder. These allow me to place either a laser pointer or a Sharpie in the torch holder and do a test run before firing up the torch.
I was going to use the cutter off the back of my truck as I have no more shop space. But like welding, using your chassis as a ground plane isn't a great idea unless you really know what you are doing. All Hypertherm systems are blowback start (as opposed to high frequency), so in theory if your ground is properly positioned you can plasma cut safety off the tailgate without disconnecting the PMU or battery. Having said that, I also know what a PMU for my truck costs, so a pair of sawhorses and a sheet of plywood sound like good risk management strategies just in case. At least for now—I may take the risk at a later date.
Future Modifications:
Originally I had planned to make either a torch holder that bevelled or a 45 degree offset torch holder. This would allow me to do bevel cuts on floorplates. However, as cool as that sounded to me, I realized I've never had to do this, so I scrapped the idea. However, should the need arise it will be pretty easy to just make a bent version of the torch holder for floorplates.
I was a tad surprized everything worked as planned on the first cut. Shocked in fact. This was only supposed to be another prototype. But it worked so well I may just do minor mods to the design. I do have to build a increment table to hold the plate under the sawhorse as well as some stop blocks on the hydraulic table as it tends to sag after a few mins and that is an issue for the torch-to-plate distance.
But for now I'm pleased.
While I don't regret getting rid of my CNC Plasma Table, there is one thing I do miss: being able to cut a perfectly straight line on plate with a consistent edge. This has been talked about in previous threads, as we all seem to have varying degrees of difficulty using our hand held torches to get a clean edge. So for this project I decided to build a motorized plasma cutter. There are lots of designs on YouTube, but I wanted some flexibility to make longer cuts, should the need arise. I also wanted to employ as many pieces of off-cuts I had laying around the shop rather than sink a bunch of money into this. This included channel, angle, tube, etc.
Looking around my shop I noticed most of my plate-based projects involve cuts that are under 36' in length. So I designed for that length of cut, with allowance for overshoot and limit switches. But instead of a welded design I went for a bolt-together design—this allows me to break it down for easy storage; but more importantly I can scale up the length so it can cut up to 96" if needed. (I'd just need to swap out the leadscrew and the tube that the trolley travels on.) For this reason I built my own torch trolley to specifically work with standard 2" square tubing because this is readily available. Another advantage of a bolt together design is that there is no warping from welding. I learned this the hard way from some prototypes—any warpage on the travel axis is transferred to the plasma torch, where millimetres can impact cut quality.
The homemade trolley is flexible in design so that it can be fine tuned to account for the variance in 2" dimensional tubing from different manufacturers. It's basically pre-punched tube, a bunch of bearings, some Allthread and some nuts. The nuts and Allthread let me tweak the fit on the tubing. Some of the YouTube designs online use 1" or even 1.5" tubing; however, with the ability to scale up to cutting 96", I wanted to make sure there would be minimal sag in the tubing, so I chose 2" square tube instead. And because it will be broken down for storage, I know parts will move around. Therefore, almost all critical components such as bearing mounts and drive components fit into punched oval (rather than round) mounting holes. This lets me adjust things when I scale up or reassemble the parts.
I run an older HyperTherm 45 torch. There is no remote trigger plug on this model so to get the torch to fire remotely without a bunch of zip ties on the handle to bypass the safety features takes some internal rewiring. Instead of defeating the safety features inside the torch itself I bypassed them inside the machine and ran wires for a remote plug to the back of the box. This allows me to use the torch manually and still have the safety features, but when I want to use the cut table, I just run an interface cable between the box and my home made controller. The safety features are only bypassed when the table is being used.
The motor is an old cordless driver and I modified an old controller to add a LED digital speed readout so I can dial in the speed for a given plate thickness (in the video the plate is 3/8"). There are limit switches, adjustable stops and directional controls, as well as an emergency stop that kills both the power to the motor as well as the plasma torch. When the limits are reached you must press a limit bypass switch and reverse the motor to reset the trolley.
A Few Lessons Learned:
The drive plate where the nut is welded on MUST float. This allows it to compensate for small irregularities in travel without binding up. I achieved this by punching the holes oversized by 1/8" and using nylon lock nuts on the top of the drive plate—but not fully tightening them down. This gives play in all directions so the leadscrew can wobble a bit rather than binding up. I may experiment with an acetal or Delrin nuts/couplers at some point. But I learned the combination of a stainless steel lead screw and a Grade 5 drive nut may not be the best. Without the float capability the SS leadscrew and the nut attacked each other. The leadscrew is HRC 50 whereas the drive nut is HRC 32. The result was a hot mess when they bound up. Floating the drive plate with the nut was the solution.
It's nice to be able to see where the exact cut will run, so I machined a couple of acetal inserts for the torch holder. These allow me to place either a laser pointer or a Sharpie in the torch holder and do a test run before firing up the torch.
I was going to use the cutter off the back of my truck as I have no more shop space. But like welding, using your chassis as a ground plane isn't a great idea unless you really know what you are doing. All Hypertherm systems are blowback start (as opposed to high frequency), so in theory if your ground is properly positioned you can plasma cut safety off the tailgate without disconnecting the PMU or battery. Having said that, I also know what a PMU for my truck costs, so a pair of sawhorses and a sheet of plywood sound like good risk management strategies just in case. At least for now—I may take the risk at a later date.
Future Modifications:
Originally I had planned to make either a torch holder that bevelled or a 45 degree offset torch holder. This would allow me to do bevel cuts on floorplates. However, as cool as that sounded to me, I realized I've never had to do this, so I scrapped the idea. However, should the need arise it will be pretty easy to just make a bent version of the torch holder for floorplates.
I was a tad surprized everything worked as planned on the first cut. Shocked in fact. This was only supposed to be another prototype. But it worked so well I may just do minor mods to the design. I do have to build a increment table to hold the plate under the sawhorse as well as some stop blocks on the hydraulic table as it tends to sag after a few mins and that is an issue for the torch-to-plate distance.
But for now I'm pleased.
Attachments
Last edited: