Hi All,
For many of the projects which I do, this is an operation which has to be undertaken dozens of times over the years so I will briefly describe how I do it. I am probably an outlier on this but it does work. I have described a non routine deep slotting operation before on "How to Produce Deep Narrow Slots" but this thread is for all of the routine stuff which still has to be made accurately.
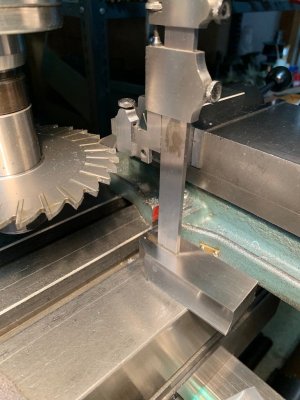
The first requirement is everything must be set up square (the mill spindle, the milling vise etc. so I assume this to start). Because these parts have long slender stems (and I do not want to distort or bend the parts), I used the setup shown in photo 1244 to set the parts level and square in the vise of the mill. Lots of fancy expensive accessories involved here but when you do this dozens of times...
The "theory" is to set the centreline of the cutter coincident with the centreline of the part. To do this the vernier height gauge is set on the top surface of the part, a reading taken and recorded. Then "mike" the part thickness and record this reading also. Check the cutter thickness (which read 0.125" exactly in this case) and record it. The centreline of the cutter will be coincident with the centreline of the part when: (part top surface height - the part thickness/2 + the cutter thickness/2) which will give a reading for the vernier caliper to be reset to. See photo 1249 for my calculation scribblings related to this.
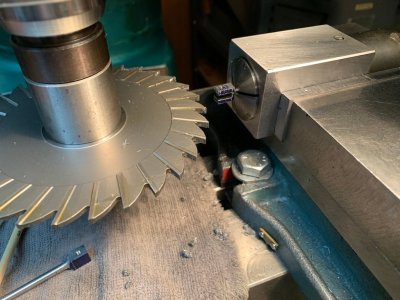
The reason for the above is one only has practical access to the top surface of the cutter when setting the cutter height. The vernier height gauge is swept over the tips of several cutter teeth until it just grazes the end of the teeth as shown in photo 1245. The quill lock on my mill is not a precision lock (as opposed to one found on a Moore jig borer for example) so locking the quill may alter its height very slightly so if you want to be really precise one may have to fiddle with the quill lock a bit.
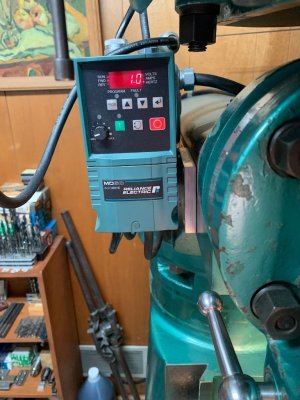
Now, for the actual slotting operation itself. As others have mentioned, one will find no matter how good is you cutter/arbor is, one will end up with only a few of the cutter teeth doing the actual cutting. For this reason, in the home shop here, I set the cutter speed on my VFD to be as low as possible (see photo 1247) which is probably only 40 RPM. The diameter of the cutter also affects this decision as large diameter cutters have increased surface speeds vs smaller cutters. Also, I advance the cutter into the work in increments of much less than 0.001" per increment. How can one do this by hand feeding? By lots of practice to enhance your fine motor skills. The reduction in torque at lower RPM with a VFD I like for an operation such as this as it forces one to use fine incremental feeds and if anything jams, nothing will be forced out of alignment with the reduced torque. Maybe, the ultra low feed and speed can increase the HSS cutter life (?) as I always use side tooth cutters when slotting. These cutters are expensive and not readily resharpened without specialized cutter grinding equipment so I try to preserve sharpness here.
As mentioned previously, in my deep slotting thread, cutter arbor concentricity and squareness of the mounting flange are critical if you need the slot to be on size. The arbor shown is offshore and turned out to be spot on but it is hit and miss. I also have purchased a known brand of arbor of very high quality but it was not cheap.
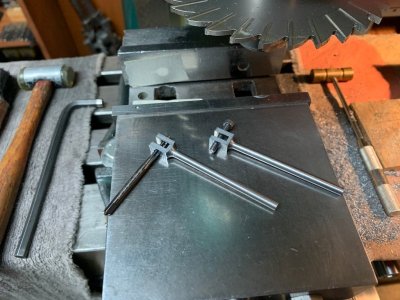
Use plenty of cutting oil for slotting, I feed the cutter straight into the work until the final depth of slot is reached before moving the crosslide and employ the sharpest cutter possible. It took about an hour per slot to make each one but the results speak for themselves. In this case there was little to no bell mouthing as the slots are not that deep and I use HR steel for the parts which has reduced internal stresses to begin with. Roughing down the parts first help as well.
For many of the projects which I do, this is an operation which has to be undertaken dozens of times over the years so I will briefly describe how I do it. I am probably an outlier on this but it does work. I have described a non routine deep slotting operation before on "How to Produce Deep Narrow Slots" but this thread is for all of the routine stuff which still has to be made accurately.
The first requirement is everything must be set up square (the mill spindle, the milling vise etc. so I assume this to start). Because these parts have long slender stems (and I do not want to distort or bend the parts), I used the setup shown in photo 1244 to set the parts level and square in the vise of the mill. Lots of fancy expensive accessories involved here but when you do this dozens of times...
The "theory" is to set the centreline of the cutter coincident with the centreline of the part. To do this the vernier height gauge is set on the top surface of the part, a reading taken and recorded. Then "mike" the part thickness and record this reading also. Check the cutter thickness (which read 0.125" exactly in this case) and record it. The centreline of the cutter will be coincident with the centreline of the part when: (part top surface height - the part thickness/2 + the cutter thickness/2) which will give a reading for the vernier caliper to be reset to. See photo 1249 for my calculation scribblings related to this.
The reason for the above is one only has practical access to the top surface of the cutter when setting the cutter height. The vernier height gauge is swept over the tips of several cutter teeth until it just grazes the end of the teeth as shown in photo 1245. The quill lock on my mill is not a precision lock (as opposed to one found on a Moore jig borer for example) so locking the quill may alter its height very slightly so if you want to be really precise one may have to fiddle with the quill lock a bit.
Now, for the actual slotting operation itself. As others have mentioned, one will find no matter how good is you cutter/arbor is, one will end up with only a few of the cutter teeth doing the actual cutting. For this reason, in the home shop here, I set the cutter speed on my VFD to be as low as possible (see photo 1247) which is probably only 40 RPM. The diameter of the cutter also affects this decision as large diameter cutters have increased surface speeds vs smaller cutters. Also, I advance the cutter into the work in increments of much less than 0.001" per increment. How can one do this by hand feeding? By lots of practice to enhance your fine motor skills. The reduction in torque at lower RPM with a VFD I like for an operation such as this as it forces one to use fine incremental feeds and if anything jams, nothing will be forced out of alignment with the reduced torque. Maybe, the ultra low feed and speed can increase the HSS cutter life (?) as I always use side tooth cutters when slotting. These cutters are expensive and not readily resharpened without specialized cutter grinding equipment so I try to preserve sharpness here.
As mentioned previously, in my deep slotting thread, cutter arbor concentricity and squareness of the mounting flange are critical if you need the slot to be on size. The arbor shown is offshore and turned out to be spot on but it is hit and miss. I also have purchased a known brand of arbor of very high quality but it was not cheap.
Use plenty of cutting oil for slotting, I feed the cutter straight into the work until the final depth of slot is reached before moving the crosslide and employ the sharpest cutter possible. It took about an hour per slot to make each one but the results speak for themselves. In this case there was little to no bell mouthing as the slots are not that deep and I use HR steel for the parts which has reduced internal stresses to begin with. Roughing down the parts first help as well.
Attachments
-
 1244 Setting the Part Square.jpg142.5 KB · Views: 17
 -
 1245 Setting the Cutter Height.jpg135.2 KB · Views: 18
 -
 1246 After Slotting.jpg145.9 KB · Views: 12
 -
 1247 Dialing in the Slowest Practical Speed on the VFD.jpg136.9 KB · Views: 13
 -
 1248 After Slotting Both Parts.jpg142.1 KB · Views: 10
 -
 1249 My Scribbled Calculations For Centering the Cutter on the Parts.jpg87.6 KB · Views: 8
Last edited: