• Spring 2024 meetup in Calgary - date Saturday, April 20/2024. discussion Please RSVP Here to confirm and get your invitation and the location details. RSVP NOW so organizers can plan to get sufficient food etc. It's Tomorrow Saturday! you can still RSVP until I stop checking my phone tomorrow More info and agenda
  • We are having email/registration problems again. Diagnosis is underway. New users sorry if you are having trouble getting registered. We are exploring different options to get registered. Contact the forum via another member or on facebook if you're stuck. Update -> we think it is fixed. Let us know if not.
  • Spring meet up in Ontario, April 6/2024. NEW LOCATION See Post #31 Discussion AND THE NEW LOCATION

Looking for some electrical help (reversing motor)

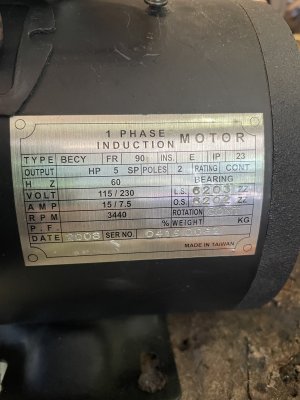
Well I thought I scored when I found a 5hp motor in like new shape at the local surplus store at a reasonable price. I didn’t notice it was labeled in the opposite rotation.
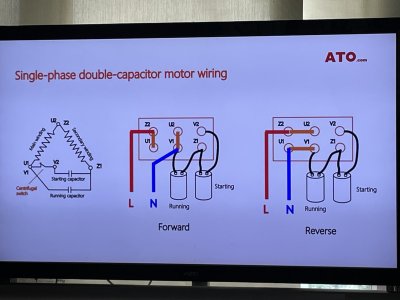
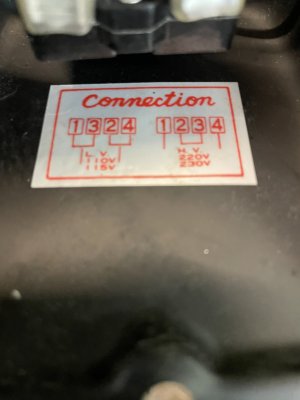
I know you can rewire by reverse the starter winding, but I can’t find a diagram that matches my 110/220v start and run cap motor. And it is not wired in the six wire configuration but 4 wire and the only label is for 110/220 connection. And both pairs of windings are the same size.

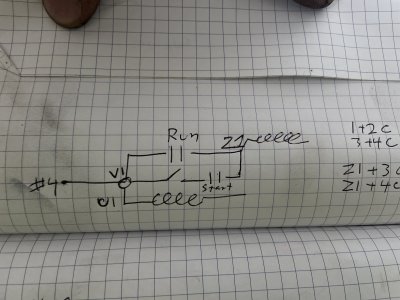
#1,2,3 all run directly into the windings

#4 is at U1/V1 I’m guessing. Attaches to windings and run cap, and to the start switch clutch/cap both caps connect to the same winding (Z1?)

wires 1&2 and 3&4 show connection on my ohmmeter
As well as Z1 to 3, and 4.
Tested with the caps disconnected.

having 5 connection points to the windings is messing me up. Can’t wrap my head around it today. Maybe some one can keep
Me from hurling this thing across the shop. Just want to get this lathe turning!!

Much appreciated brothers
 

Attachments

  • image.jpg
    image.jpg
    402.6 KB · Views: 9
  • B9E24B4C-D025-4060-87A8-04632E3DD8D8.jpeg
    B9E24B4C-D025-4060-87A8-04632E3DD8D8.jpeg
    254.6 KB · Views: 10
  • 364BF1AE-2C96-4F25-9BA2-1ACF70E73D85.jpeg
    364BF1AE-2C96-4F25-9BA2-1ACF70E73D85.jpeg
    522 KB · Views: 10
  • 3FCFFFF1-A4E3-43EA-A153-5F6D812603C6.jpeg
    3FCFFFF1-A4E3-43EA-A153-5F6D812603C6.jpeg
    350.8 KB · Views: 8

Tom Kitta

Ultra Member
Here is useful info: https://woodgears.ca/motors/reversing.html

Essentially you need to reverse the polarity on the starter winding. This may not be possible if motor is marked "non reversible" as it forces you to take it apart to get to the starter winding.

Since motor is 240 / 120 the main winding is two 120V which can be wired either in parallel or serial.

I bet you do not have control over starter winding and thus reversing === take it apart.

I am by far not an expert on these things. I am sure there are many members here more qualified.
 
Yeah the 4 wire set up doesn’t just let you switch wires for reversing. Cuts inside will have to be made.
I’ve got it apart now trying to figure it out.
woodgears is a video I did check out. He touches on a two Cap motor, but doesn’t reference it when detailing where to swap wires.

I wondering now if there is a winding connection buried in the windings somewhere that should be my 6th wire??
 

John Conroy

member
Premium Member
I ran into the same issue when I installed a larger motor on my belt sander and it turned the wrong direction. I searched Google and found that this video does a good job of explaining what needs to be done. You could run the leads to the outside of the motor like the guy in the video did to allow a polarity reversing switch so the lathe can be switched to run either direction. I didn't need that on the belt sander so I just reversed the start winding connections inside the motor


This is the thread on the belt sander upgrade.

https://canadianhobbymetalworkers.com/threads/more-power-for-my-6-x-48-belt-sander.3006/#post-38824
 
As far as rpm I planned on running a small to lower the rpm more inline with the lathe.
John I had watched his video as well, that’s more or less what I’m trying to accomplish but can’t figure these points out.

you can see in the pic the insulation wraps on the winding connections, one @12 o’clock, one @3, and 3@5

1FAAF3DD-8B98-4D8C-82FB-76B3316ADD16.jpeg
 

John Conroy

member
Premium Member
The winding that has the smaller wire diameter should be the start winding and will be connected to the normally closed side of the centrifugal switch. On my motor both windings had the same size wire so I used the switch connection to identify the start winding.
 
I can identify one side of the start winding as the wire the start cap goes to (both winding are the same gauge) but if I can read conductivity on two other wires with my ohmmeter the other side must be buried inside the windings somewhere. Hence why I have 5 winding connections rather then 6.
Woodgears touched on this briefly in on his table saw motor. That they bury connections as a cost saving measure. (Saves a whole 6” of wire)

I guess I’ll be returning this. If I’m lucky one of the other motors they had will be clockwise rotation. But you know what they say about Irish luck.

if it wasn’t for bad luck we’d have none at all.
 
Top