• Spring 2024 meetup in Calgary - date Saturday, April 20/2024. discussion Please RSVP Here to confirm and get your invitation and the location details. RSVP NOW so organizers can plan to get sufficient food etc. It's Tomorrow Saturday! you can still RSVP until I stop checking my phone tomorrow More info and agenda
  • We are having email/registration problems again. Diagnosis is underway. New users sorry if you are having trouble getting registered. We are exploring different options to get registered. Contact the forum via another member or on facebook if you're stuck. Update -> we think it is fixed. Let us know if not.
  • Spring meet up in Ontario, April 6/2024. NEW LOCATION See Post #31 Discussion AND THE NEW LOCATION

lathe V belt question

PeterT

Ultra Member
Premium Member
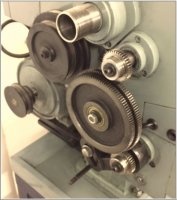
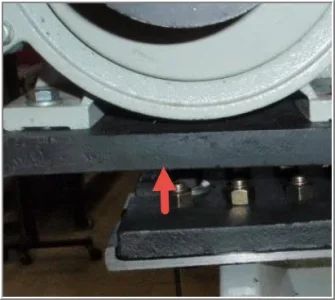
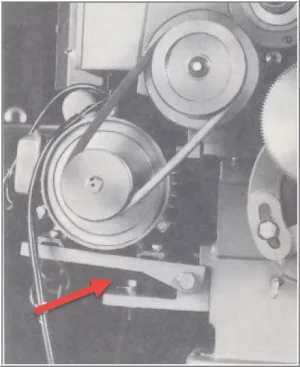
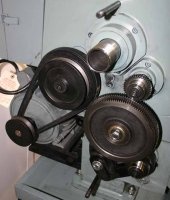
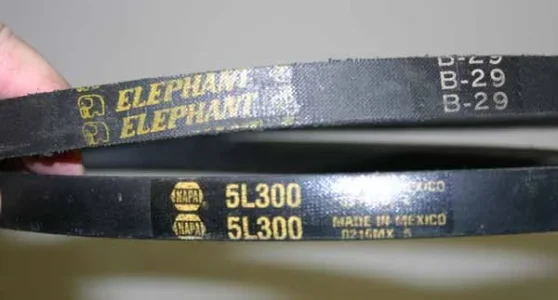
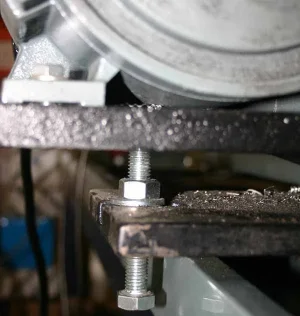
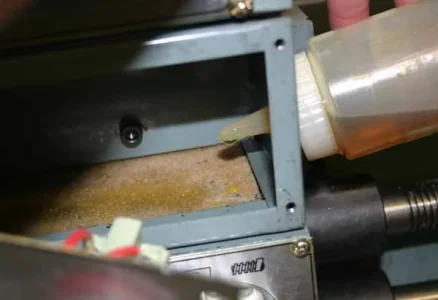
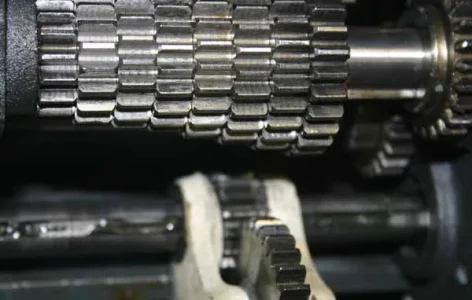
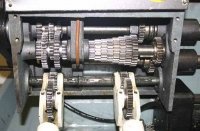
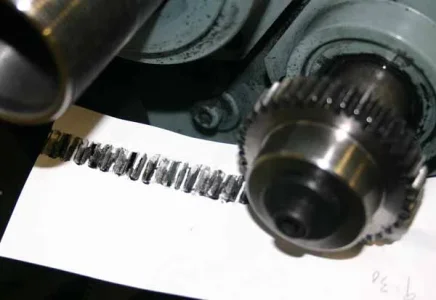
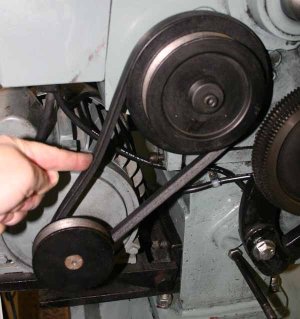
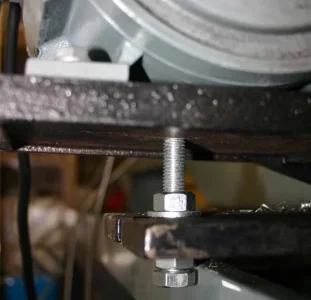
I decided to replace my lathe V belt on my 14x40. Its starting to look a bit tattered but mostly its making this powder grunge inside the cover & on the gears. The label said B29 so that's what I ordered from local NAPA. Unfortunately its longer than my stock belt. I thought he said 32" which works out tis 812mm & when I measured came up to something closer to 750mm, but I didn't spend much effort thinking its like ordering a bolt. Apparently not. I could see if the old one had stretched & was longer but this is the opposite. I installed it on the sheaves but 99% sure I don't have enough motor plate swivel to tension properly. Any ideas?

I didn't search extensively but similar dimensions keep coming up under B29. Maybe Taiwan didn't attend the international V belt Dimensions Conference? :)
http://www.vbelts4less.com/B29--B-Section-V-Belt-5L320_p_14079.html
http://www.gprindustrial.com/en/b-section-v-belts/194-B29-classic-vbelt.html

<update> maybe these dimensions will be useful.
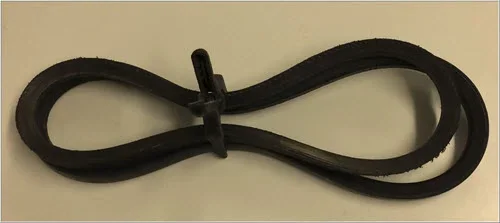
- original B29 belt = 30-1/8" outside circumference
- Napa supplied Hi-Power II B29 belt = 32.5" O.C. (hmm.. 0.5" longer than the web specs, but 2.375" larger than mine)
 

Attachments

  • 2016-12-16_16-30-21.jpg
    2016-12-16_16-30-21.jpg
    18 KB · Views: 6
Last edited:

PeterT

Ultra Member
Premium Member
Thanks John. That's exactly what I'm doing tomorrow. They were very accommodating. I gave them exact measurements this time & we will try a 5L300 (30 must mean inches). I also learned that B# is circumference + 3". So B29 + 3 = 32" OC. So the belt I bought was correctly sized by designation & I have no clue what B29 referred to on my original Asian belt.

Another question, the old belt is getting worn. Not bad but starting to frey & it must be 20 years old. I have this sooty, schmeg that clings to the inside belt cover, but also on the gears which are lightly oiled/greased. Hopefully the new belt will dust less, but do you think I should spray the gears with one of those dry lub's or Teflon..... or is that a no-no?
 

Attachments

  • 2016-12-16_18-38-41.jpg
    2016-12-16_18-38-41.jpg
    52.1 KB · Views: 5

John Conroy

member
Premium Member
That looks exactly like my lathe. I replaced my belt about a year ago, just took the old one to Napa and they measured it. They had to order the new one but I had it the next day. I use automotive 75-90 synthetic gear oil on the gears. Just a couple of drops each time I lube the Norton gear box. I'm very careful to adjust the backlash whenever I do a gear change. Just a very small amount of backlash and it makes a huge difference to how much gear noise there is.
 

PeterT

Ultra Member
Premium Member
Norton gear box.. hmm.. dumb question, do you mean the tumbler cluster area with 2 selection levers? This has always mystified me. When I poke a flashlight up there from below they seem 'lubey' but I don't think it gets a feed drip from anywhere so assumed it was pre-greased & maybe one should do a wipe down & re-grease at some longer frequency interval. I may be 100% out to lunch so should probably get myself ejamacated. I've had the front panel off but its been a while. Everything looked shiny & happy then. Is that how/where you lubricate with oil?

Modern Tool drilled a hole in the panel tin right by the selector knob & said put a squirt of way oil in there when you do the ways. I thought it was something they noticed over time could benefit from oil. I should probably have a looksee in there.

By backlash adjusting post gear change, you mean like swapping metric/imperial gears? Metric threading hasn't come up yet. So far I've been able to buy my out of the issue with a die! :)
 

Attachments

  • 12-16-2016 0005.jpg
    12-16-2016 0005.jpg
    76.7 KB · Views: 6
  • 12-16-2016 0004.jpg
    12-16-2016 0004.jpg
    40.9 KB · Views: 6

John Conroy

member
Premium Member
Peter, your lathe IS exactly like mine. Mine is branded "Cantek". The Norton gearbox is the gear cluster/selector lever stuff on the front of the machine. The gear cluster is supposed to be drip lubed by soaking the foam pad behind the switch area with oil. The oil then drips through the drilled holes in the casting above the gear cluster onto the gears. Mine has a plastic threaded access hole on the right end of the switch housing that has "oil" embossed on the head of it.

peters%20lathe_zps1tbtv9km.jpg


This is a pic of mine with the switch housing removed and you can see the holes in the top of the gear box casting. the next one shows the foam pad that lays in top of that area.

P5050033_zps857e2bd2.jpg


P5050034_zps550b267f.jpg


In this one you can see the black plastic threaded pug just below the oil sight glass. I take the plug out and squirt some oil on top of the foam pad every few days. It constantly drips down onto the gear cluster and into the chip tray. I keep a piece of paper towel laying under the gear box all the time and change it when it get soaked.

P5040032_zps4da00ca8.jpg


I added a shop built carriage travel dial indicator mount to mine and this pic shows it installed with the front switch cover removed.

P5050057_zps25949d63.jpg


P5050055_zps1cc68a39.jpg


You can see the oil plug again in this shot just behind the dial indicator.

P5050052_zps64627127.jpg


When I first got my lathe I found that the previous owner had slathered wheel bearing grease on all the gears instead of oiling them. This caused the sliding gears that are attached to the levers to run short of lube as the grease did not penetrate between the gears and the shafts they rotate on and galled the shaft. I completely dis-assembled the gear box and outer gear train and cleaned all the grease out and also had to repair the galled shaft and gear internal bushing. Here are some pics of that mess. The hollow bowl area formed by the casting around each sliding gear(seen in the second pic below) is supposed to form an oil reservoir to keep the area between the shaft and gear lubed.

P4210944_zpsa3b6b06b.jpg


P4200933_zpseca034d9.jpg


P4200932_zps526f20ef.jpg


Something else that you might look at if there is excessive belt dust is the motor mount plate. When I first got mine the belt was slipping and causing excessive dust because the motor mount plate had broken and the motor was flopping around causing misalignment. Strangely enough there didn't seem to be any weird noises caused by this until the machine was under heavy load. I fabricated and splint for the plate from a piece of 3/8" steel plate as I didn't want to try and weld the cast iron mount.

P4210938_zpscd475bef.jpg


P4210940_zpsecfb2123.jpg


P4210941_zps6c23a8b6.jpg


P4210946_zps68b1a723.jpg


P4210949_zps7d56bbdb.jpg


P4210950_zps62169908.jpg


Probably some overkill there but that's the way I usually repair stuff when I don't understand why it failed.

P4210953_zps9f2b6ab9.jpg


The backlash in the outer gears is adjustable by moving the large center gear on the "banjo" behind it by loosening the nut in the middle of the gear. You would only have to do this if you change the gears for metric threading or remove them to change the headstock oil. My drain plug for the head stock is behind the large gear. The arrow in the second pic below shows it's location.

P4220960_zps50f668b2.jpg


drain%20plug%20location_zpslnurelb4.png


Here's a shot of my machine on one of it's rare clean days.

P8110319_zps23a40613.jpg


Sorry for the long ramble but I couldn't get to sleep. It's now 2:30 and I guess I should call it a night.

Cheers,

John
 

PeterT

Ultra Member
Premium Member
John, I am SO! glad you posted this information. Thank you! I'm going to dig behind the panel & inspect the gear situation & foam pad (self inflicted butt kicking for lax maintenance commencing now). Hopefully I caught it before bad things. It seems logical now that you've explained everything & identified the corresponding parts. The <cough> manual says zip about any of this, just exploded views & minimal verbiage.

I really don't know if my original belt has stretched much, as mentioned the sizing was rather crazy. But when I get the new one are you saying the tension is taken up by the motor weight swivelling against that mount bracket? I have what looks to be a set bolt that can alter the plate angle kind of prop it up action. I can take a pic but it essentially runs where arrow is, maybe through the slot? I wasn't clear on this either, it looks to limit the downward movement with a different belt size, or? It doesn't look like you have this bolt. Anyway my belt needed tension, so bolt is essentially unscrewed at this point I think.
 

Attachments

  • 12-17-2016 0000.jpg
    12-17-2016 0000.jpg
    26.8 KB · Views: 4

PeterT

Ultra Member
Premium Member
ah, found a pic in manual showing by bolt
 

Attachments

  • 12-17-2016 0001.jpg
    12-17-2016 0001.jpg
    35.5 KB · Views: 2

John Conroy

member
Premium Member
Mine has the bolt there too, it was not installed in that pic. It is designed to pull down on the motor plate and tighten the belt. I think Gronk the hammer ( the previous owner) thought the belt should be as tight as a banjo string and that's why the plate broke. Just the weight of the motor is almost enough tension and I added just a little more with the tensioning bolt. I haven't even looked at it since I installed the new belt but there virtually no belt dust now every time I lube the gears.
 

PeterT

Ultra Member
Premium Member
OK, I'm batting low guessing averages now! Maybe my bolt is positioned upside down just shipped that way. It never occurred to me it could add tension. Another thing to check. Thanks John. If you were here I'd buy you beers. Gronk The Hammer, ha-ha. Hopefully I will not be known as Lubeless Pete!
 

John Conroy

member
Premium Member
Don't kick yourself too hard, my manual says nothing about lubing themNorton gearbox either. I only learned about it while repairing the galled shaft and installing the travel dial indicator. When I saw that foam pad, first I wondered what the hell is that for. The I after I saw the holes,under it I went AHA.
 

John Conroy

member
Premium Member
As,long as you can still slide yout gear change levers from side to side there has likely been no damage. The first sign of damage will be between the sliding gears and the shaft. They are numbers 47 and 49 in your first picture. They don't require a lot of oil and I probably lube it more often than required.
 

PeterT

Ultra Member
Premium Member
So today was eventful, educational, but hopefully successful. First up, the belt. Pretty easy once you have the right one. Sheesh, that was a learning experience. I want to say the motor seemed just a tad bouncier while than I recall but I've never actually stared at it while machining. The new one felt just a tad stiffer than the old. Its under motor tension as before. Maybe it needs to relax in a bit. I also didn't have a chuck on when I spun it up. Here is closeup of my bolt, its just sticking in the air at present, not connectedd to the motor hinge plate.
 

Attachments

  • IMG_5601_edited-1.jpg
    IMG_5601_edited-1.jpg
    59.9 KB · Views: 1
  • IMG_5600_edited-1.jpg
    IMG_5600_edited-1.jpg
    35.6 KB · Views: 1
  • IMG_5579_edited-1.jpg
    IMG_5579_edited-1.jpg
    48 KB · Views: 1

PeterT

Ultra Member
Premium Member
Here is the lubrication situation. Oil saturated foam pad exactly as John outlined. It was still oil wet, not super saturated but thankfully not dry & seemed quite clean. Decent lubrication on the gears & grease on the shafts once I had the cover off. I'm not sure that's the lub right combo but it looked ok & made me feel better.

The comedy came when I examined the 'localized lubrication' hole drilled in the front panel by Calgary distruster. It doesn't connect to anything! At least not anything useful. It basically drips behind the cover plate crack which gave me false security it was doing something useful. I think it was intended for the selector shaft, but that's the next floor down.

So I guess the gear cluster lubrication works is you dribble oil in from the side port & it wicks into the foam by capillary & then down into the channels. I noticed some little pipes than run to shaft bushings too.
 

Attachments

  • IMG_5596_edited-1.jpg
    IMG_5596_edited-1.jpg
    34.6 KB · Views: 3
  • IMG_5595_edited-1.jpg
    IMG_5595_edited-1.jpg
    38.4 KB · Views: 3
  • IMG_5583_edited-1.jpg
    IMG_5583_edited-1.jpg
    43.3 KB · Views: 3
  • IMG_5594_edited-1.jpg
    IMG_5594_edited-1.jpg
    50.9 KB · Views: 2
  • IMG_5582_edited-1.jpg
    IMG_5582_edited-1.jpg
    55.6 KB · Views: 3
  • IMG_5581_edited-1.jpg
    IMG_5581_edited-1.jpg
    38.3 KB · Views: 3
Last edited:

PeterT

Ultra Member
Premium Member
And now for the fun stuff. The threading/traversing selection knob is held on with a roll pin that goes through its body & a selector shaft. The knob has to be removed before panel tin & cover plate can be removed. I dont have a ton of mechanical experience but I've learned to dislike roll pins. This one was particularly hard to drive out & I get very squeamish about pounding on things. Oh and in case your lathe is similar, there is a detent spring & a ball bearing that I guarantee will zing off under the crevice of the heaviest, most remote cabinet in your shop! Closer inspection revealed the problem: the hole in the shaft was drilled by a 12 year old with a button for one eye so its cockeyed. I didn't want to risk pounding the pin back into that angled hole so I'm going to have to make a new shaft (which means having a functional lathe). It has a bolt kludge for now but I can set the knob ok.

I gave it some cleaning TLC. Hopefully addressed the issues & learned a few things along the way.
 

Attachments

  • IMG_5593_edited-1.jpg
    IMG_5593_edited-1.jpg
    35.6 KB · Views: 2
  • IMG_5590_edited-1.jpg
    IMG_5590_edited-1.jpg
    26.1 KB · Views: 2
  • IMG_5585_edited-1.jpg
    IMG_5585_edited-1.jpg
    37 KB · Views: 2

PeterT

Ultra Member
Premium Member
So just some follow-up. As it turns out my motor was hopping around a bit on the new belt, it wasn't my imagination. I could feel the machine vibrate just a bit & the motor would kind of softly oscillate up & down about 1/4-1/2" depending on the rpm in & out of harmonic. I went back & examined the bolt that has been disengaged forever. The motor mount swing plate has a matching threaded hole. I screwed the bolt into the plate & adjusted the stop nuts with just a bit of tension. One side of the belt was snug but not tight, the other side had this 'finger deflection' amount. Anyway, boom, zero vibration. This fixed it 100%. In fact its running smoother than I ever recall. I'm not 100% if 'anti-bounce- is what the bolt is actually for but it sure worked.

John mentioned setting the gears. I couldn't feel any undue tightness or backlash but I've never had the gears off & don't have a good feel for this. Someone told me if you run paper through its supposed to curl u, be lightly perforated with a nice oil track (just kidding - that's just what happened :) Is there a valid test for this?
 

Attachments

  • IMG_5607_edited-1.jpg
    IMG_5607_edited-1.jpg
    37.2 KB · Views: 3
  • IMG_5606_edited-1.jpg
    IMG_5606_edited-1.jpg
    57.1 KB · Views: 3
  • IMG_5605_edited-1.jpg
    IMG_5605_edited-1.jpg
    42.3 KB · Views: 3

John Conroy

member
Premium Member
Hey Peter, you're right, that bolt is supposed to pull down on the pivoting motor bracket. Just don't get carried away with the belt tension like the previous owner of mine did. If you want to be really fussy about the gear backlash you could measure each gears backlash to the mating gear with a dial indicator. I don't do that, I just make sure there is a barely perceptible amount of clearance between all the gears. Getting it just right makes a big difference in the amount of gear noise.
 
Top