• Scam Alert. Members are reminded to NOT send money to buy anything. Don't buy things remote and have it shipped - go get it yourself, pay in person, and take your equipment with you. Scammers have burned people on this forum. Urgency, secrecy, excuses, selling for friend, newish members, FUD, are RED FLAGS. A video conference call is not adequate assurance. Face to face interactions are required. Please report suspicions to the forum admins. Stay Safe - anyone can get scammed.

Keyway Broach

YYCHM

(Craig)
Premium Member
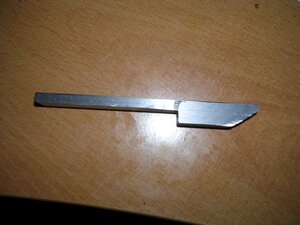
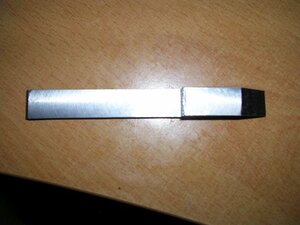
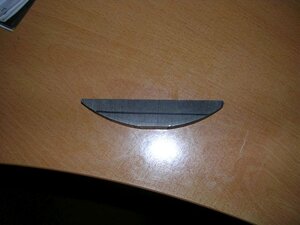
I'm attempting to make a 3/16" keyway broach for use on my lathe. 1.JPG

2.JPG

3.JPG

I'm using a remnant of 4340 I got from @John Conroy (Thanks John!).

I'm to the point of creating the cutting edge and hardening it. At what angle should I grind the edge to? For hardening I was planning on heating the edge to cherry red and quenching in water. Any feel for how long I would need to maintain the critical temperature? I have read 1 hour per inch of thickness. The blade is 3/16" X 1/2". This tool shouldn't see any shock loading. Is annealing necessary?

I guess the other question is, do I harden and grind the edge in or grind the edge and harden it?

Any input is appreciated. I'm exploring new territory here.
 
Last edited:

RobinHood

Ultra Member
Premium Member
I would machine / grind all the angles you need with some allowance. Harden it. Finish grind it and hone the cutting edge.

2*-3* clearance angle is what I would go for. Maybe 5* angle for the cutting edge - more will have a tendency to dig in. Once you have your tool made, try it on some scrap material (the same type that you are going to broach) to see if the tool performs to your satisfaction. Modify if required. It will also show how much deflection you get and how large the cutting forces are.
 

YYCHM

(Craig)
Premium Member
I would machine / grind all the angles you need with some allowance. Harden it. Finish grind it and hone the cutting edge.

2*-3* clearance angle is what I would go for. Maybe 5* angle for the cutting edge - more will have a tendency to dig in. Once you have your tool made, try it on some scrap material (the same type that you are going to broach) to see if the tool performs to your satisfaction. Modify if required. It will also show how much deflection you get and how large the cutting forces are.

2*-3* ? 20-30? I held a protractor up to the image @Brent H posted and got 20.
 

YYCHM

(Craig)
Premium Member
5.JPG 4.JPG

A little more progress. It now has a cutting edge and it just made center height without resorting to milling a step in it. The way this material behaved on the grinder has me wondering if I need to harden it at all?
 

Brent H

Ultra Member
Hey Craig - I had a bigger relief angle as I was plunging into a blind hole. - left lots of clearance so material wouldn’t build up behind the cut on the way down.

you will need to adjust the angle depending on application and material being cut.
 

YYCHM

(Craig)
Premium Member
@Brent H Is your broach rectangular in cross section or does it have some tapered relief on the sides like some cut off blades have?

Craig
 

Brent H

Ultra Member
It is straight, that being said a 1 or 2° angle would be fine - its all about taking shallow cuts.
 

YYCHM

(Craig)
Premium Member
6.JPG

So far this isn't going according to plan. The tool is spinning the tool post away from the cut and I'm not sure I want to crank the tool post down any harder than it already is. The tool is just rubbing a keyway into that aluminum.

Not sure what to try next?

Is there something thin I could put between the tool post and tool post mount point to provide more friction between the two?

A shorter tool would help I imagine.
 
Last edited:

johnnielsen

John (Makonjohn)
Premium Member
Do you have t slots on your cross slide? If so, you can make a solid type of toolpost like a Gibralter type. It is just a big chunk of material with a hole for a boring bar. Put a keyway cutter (piece of square high speed steel ground to suit) in the boring bar. That is how we used to do odd internal keyways. This is hard on the arms but it works.

If you don't have t slots, you can attach braces that use the front and back surfaces of the cross slide to keep the tool post from turning.

Another alternative is to make a lever type pusher, kind of like a horizontal drill press quill but I would mount it to a heavy non rotating tool post like the gibralter. This is much easier on the arms but requires time to build the mechanism. See attached url.


RobinHood

Ultra Member
Premium Member
Is there something thin I could put between the tool post and tool post mount point to provide more friction between the two?

you could try a single sheet of blotting paper. It would take away the metal to metal contact. And potentially any unevenness between the mating surfaces.

how sharp is your cutting edge? it needs to be razor sharp. As you state, reduce the amount of stick-out so that you have just enough length to go through your part, no more.
 

YYCHM

(Craig)
Premium Member
you could try a single sheet of blotting paper. It would take away the metal to metal contact. And potentially any unevenness between the mating surfaces.

how sharp is your cutting edge? it needs to be razor sharp. As you state, reduce the amount of stick-out so that you have just enough length to go through your part, no more.

I put some 0.002" thick brass shim stock under the tool post and then the tool started moving in tool post. So I choked up on the tool to get three screws on her. At that point I was actually able to get a sliver of swarf to form on the tool edge and push it out. Yea progress:) After two passes like that I discovered the tool had lost it's edge:(

So looks like I'm going to have to harden the tool after all. I wouldn't say it was razor sharp to begin with, but I'll strive for that after hardening it.

Interesting learning experience that's for sure.
 
Last edited:

Brent H

Ultra Member
Hey Craig,

busy as heck here but thought I could send you some additional pictures of the tool as well as a boring bar adapted for the same purpose. The tool worked best in the mill as it is round.

E4713BE5-BA65-440B-8C9B-59BFC5031045.jpeg
F4466958-DD78-4F98-9ACE-3C1434BA4609.jpeg
9679FB82-FA42-4230-B2EE-3EF9F34097A3.jpeg
4948A039-ED24-4114-BBEF-5870DBF6CD3D.jpeg

note the tool taper on the top
 

historicalarms

Ultra Member
Craig, I have used "home built" keyway cutters a bit but never used the lathe as a "pusher" but most of the principles are the same I would think. When I say this thread yesterday I was going to comment but then my computer shut down so sorry im bit late to the party.
anytime I used a home built broach , I also used a homebuilt "backing shaft, same as a store-bought one, this eliminates the "backlash/ flex" that you mention today. it just doesn't allow the cutter to deflect away from the work piece.
Another attack you might like to try is to use a mill cutter in your milling machine and pre-cut most of the slot material out first before broaching, you anly need to "broach" the back corners out then, not so much back force on your cutter.
I might also suggest trying to use your mill as the broaching machine. Just leave your work piece mounted on the table "raised up a bit for cutter clearance underneath". now mount your cutter into the quill chuck and, using the mill down-stroke gearing, cut straight down on your aluminum. there will be less "side flex" on one straight down push than a sideways slide using a bunch of lathe apparatus.
for what its worth I used square HSS cutters ground to size with an ordinary bench grinder for my homebuilt broaches and then cut individual teeth with a Dremmel tool ...sure not fancy but they worked the couple of times I used them.
I should clarify that both times I used them ,I didn't use a lath or my mill, I used an ordinary hyd bottle jack the first time but had a Hyd press for the second attempt.

Edit again; Just visited the vintage Safe thread and Robinhood used his mill quill just as I had envisioned it to work.
 
Last edited:

DavidR8

Scrap maker
Administrator
Moderator
Premium Member
For what it's worth I wonder if a HSS cutoff tool held on its face might work better for you.
When I cut the key way in my pulley bushing I used a 1/8" HSS cutoff blade. It worked well enough in aluminum. The only challenge I had was that the keyway was 1.25 long and the tool flexed and didn't track in a straight line so the sides of the keyway were not parallel. I think it would have been prefect if the keyway were not a long.
 

Tom Kitta

Ultra Member
I add soon a video of cutting on a milling machine. Everyone is into a lathe - time to use something new. A mill, or even a drill press.
 

YYCHM

(Craig)
Premium Member
I add soon a video of cutting on a milling machine. Everyone is into a lathe - time to use something new. A mill, or even a drill press.

I'd be using the mill if I had something bigger than a mini-mill. Can't picture using a drill press? How would you advance the tool to achieve the desired keyway depth?
 

Tom Kitta

Ultra Member
You can easily use a drill press or a mini mill (you can move the whole head up and down). Behold the video. Its easy. Its a good workout for your arm.


YYCHM

(Craig)
Premium Member
For what it's worth I wonder if a HSS cutoff tool held on its face might work better for you.
When I cut the key way in my pulley bushing I used a 1/8" HSS cutoff blade. It worked well enough in aluminum. The only challenge I had was that the keyway was 1.25 long and the tool flexed and didn't track in a straight line so the sides of the keyway were not parallel. I think it would have been prefect if the keyway were not a long.

Were you trying to cut to depth and widen the keyway in multiple passes? I think the only way this works is to cut the width to depth in multiple passes to reach depth.
 

DavidR8

Scrap maker
Administrator
Moderator
Premium Member
Were you trying to cut to depth and widen the keyway in multiple passes? I think the only way this works is to cut the width to depth in multiple passes to reach depth.

I thought that I could cut to depth then drop down the width of the blade and again cut to depth.
I think my mistake was that I didn’t drop down the full thickness of the blade. So it tracked correctly for the first 1/4” or so.
If I were to do it again I’d grind a HSS bit to the width of the key way.


Sent from my iPhone using Tapatalk
 
Top