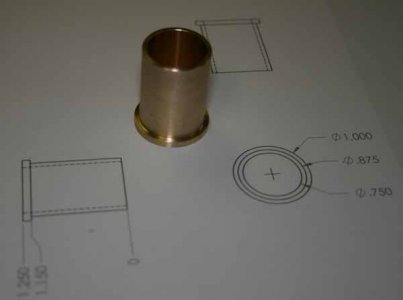
Graziano Sag12 Lead Screw Support Repair

Safarir

(Charles)
Today's project was to repair the busted lead screw support for my Graziano. I forgot to take a picture of the part in it original condition but it is quite easy to imagine. I started by grinding away the broken cast iron with a rotary burr and strip some of the paint with some roloc paint stripping pad. I use those on my M12 Die Grinder and they work amazingly well.

PXL_20211228_211803244.jpg
PXL_20211228_211804930.jpg
I never braze before and to be honest, I just got my oxy-acetylene torch about 1 week ago and bought brazing rod at princess auto this morning. After some experimentation with some test piece, I felt ready for it and went for it. I made sure to slowly pre-heat the part as much as possible to prevent building to much stress in the part.
PXL_20211228_214147597.jpg
PXL_20211228_214150723.MP.jpg
Not pretty, but also not as bad as I expected. I covered the part in welding blanket to let it cool slowly. One thing I really learned for next time: Just remove all the paint on the part:
PXL_20211228_214314665.jpg
Here it is after a quick trip on the milling machine
PXL_20211228_230609273.jpg
I am not too concern about the porosity, but after looking at it correctly, I did not feel I had enough material to fix the bore correctly. So after stripping the paint completely, here we go for round 2.
PXL_20211229_012311107.jpg
PXL_20211229_012314239.jpg
For some reason, the second pass felt even more difficult. When trying to work inside the bore, I had my torch die on me a couple of time. I think my acetylene pressure was too low. Here it is after a quick pass on the milling.
PXL_20211229_023228199.jpg
PXL_20211229_023231429.jpg
There is still quite a bit of porosity, but at least I seem to have plenty of material to fix this bore correctly. Next step, chuck this in the 4 jaws...
PXL_20211229_014617268.jpg
Oups ... it doesn't fit ... My 8" chuck is a tiny bit too small for the part.

The next logical solution is to throw this on the mill and bore it with a boring head, but I am still waiting for the right boring head to pop up at auction... I am now tempted to simply buy a chinese one, but don't really want to wait for one. Anyone have a good lead on a decent boring head ?
 

PeterT

Ultra Member
Premium Member
Your project kind of reminds me of when I remedied my 14x40 lathe power feed rod bracket (which bridges the worm gear). The stock casting one was an ill fitting cast iron POS. I think the idea of cast iron as a bearing surface is the carbon filled porosity or something. Which is fine & good as long as perfectly aligned & minimal side load. When I machined new steel blocks from steel, I sized the holes to incorporate bronze bushings which are a nice slide fit on the rotating rod. The bushings can be removed & replaced if they wear. Bronze on steel is a happy combination with oil lubrication. It never ran smoother. Looks like you may have an oil port in your casting? If so that would have to be incorporated into the bushing but easy to do.

Just an idea to ponder. Your Graziano is probably better aligned & assembled than my Taiwanizo which was way out of whack from the factory floor. But just saying pay attention to the fit post-fixing so its not bending or rubbing the rod even a little bit. Adverse effects can show up in machining finish. Or worse, can lead to bigger headaches down the road trying to remedy or replace a more obscure rod/leadscrew if it loses the friction battle with the (easier to fix) hole in a plate.
 

Attachments

  • IMG_6352_edited-1.jpg
    IMG_6352_edited-1.jpg
    25 KB · Views: 5
  • IMG_6425_edited-1.jpg
    IMG_6425_edited-1.jpg
    39.3 KB · Views: 5

Safarir

(Charles)
Your project kind of reminds me of when I remedied my 14x40 lathe power feed rod bracket (which bridges the worm gear). The stock casting one was an ill fitting cast iron POS. I think the idea of cast iron as a bearing surface is the carbon filled porosity or something. Which is fine & good as long as perfectly aligned & minimal side load. When I machined new steel blocks from steel, I sized the holes to incorporate bronze bushings which are a nice slide fit on the rotating rod. The bushings can be removed & replaced if they wear. Bronze on steel is a happy combination with oil lubrication. It never ran smoother. Looks like you may have an oil port in your casting? If so that would have to be incorporated into the bushing but easy to do.

Just an idea to ponder. Your Graziano is probably better aligned & assembled than my Taiwanizo which was way out of whack from the factory floor. But just saying pay attention to the fit post-fixing so its not bending or rubbing the rod even a little bit. Adverse effects can show up in machining finish. Or worse, can lead to bigger headaches down the road trying to remedy or replace a more obscure rod/leadscrew if it loses the friction battle with the (easier to fix) hole in a plate.
Really good points !

Yes, both the leadscrew end and the spline shaft are lubricated with a oil reservoir built into this support. I am lucky in this case, because the bore that I need to fix is simply holding a double row self aligning bearing for the spline shaft. The leadscrew bore and bearing surfaces are still in excellent shape, it is the hole in the background in the first picture.

The problem I was having is that the broken casting was causing all the oil to drip out of spline shaft bearing bore. This is the only reason I decided to fix this.

The block also have taper pin to locate in the main bed casting, which should take care of any alignment issue. Other than the transmission, I am very happy with the engineering of the Graziano.
 

PeterT

Ultra Member
Premium Member
Ah! Cancel that recommendation then. You have a more sophisticated machine. The reason lathes like mine cost less is they eliminate some superfluous components like bushings & bearings... LOL.
Looking at your pics closer I now see a ledge, maybe like a stop for a bushing/bearing? I naively assumed it was a plain 'ol hole like mine.

I'm only a welding 'lurker' thus far but related to OA brazing, you might want to checkout Paul's channel (if for no other reason, other interesting metal fabbing). Bikes are slightly different application/context but I certainly learned a few things. There is probably lots more resources on YouTube but this channel popped into my noggin.


Dabbler

ersatz engineer
I have a (Ahem) busy bee chinesium boring head. I also have a thomas skinner one that Bert paid 4X the price for. They are identical in form and function.

Now the rub: (pun intended) You should never take a cut more than a small one - for instance one or 2 thou. So how do you get all that brass our of the hole? well, I usually mill things out to ten thou or so and take the rest in small cuts; -- or -- you can hole saw brass with a wood working hole saw to rough out the hole. I have been known to use a jewelers' saw to rough out before boring. roatary table? there you go.

A lot of machining, so I have found out, is also hand work.

anyway, if you stick to the 'shallow cuts' rule, then any boring head will work fine. Of course I am looking for a cheap, used Wolhapter boring head. But we all dream of that sort of idyllic relationship...

When boring an irregular hole like you have, the impacts are really hard on your bar, boring head and bearings. someday ask me how I found out. Not too pretty.
 

YotaBota

Mike
Premium Member
Of course I am looking for a cheap, used Wolhapter boring head
Are you even allowed to use "cheap" and "Wolhapter" in the same sentence?
 

Safarir

(Charles)
I received my boring head, which look pretty good. It is quite a bit bigger than I expected but does not look ridiculous on the excello

PXL_20220119_033143137.MP.jpg
What does not look good is the hole have a couple pass with the boring bar. I am not happy with the result and I think I will got for a third brazing attempt.
PXL_20220119_033207072.jpg
 

Darren

Ultra Member
Premium Member
looks good

For future reference, preheat is key when doing brazing repairs on large castings. Your prep work was great, couldn't be better, but without preheat its hard to get the brass to flow and bond. Toss it in a bbq at 500 degrees for an hour and that would have eliminated those pockets, and the job goes so much easier. When the brass sizzles and flows on the red hot metal, you'll see it bond right in, then you layer it and flow it in, and you'll be able/you have to reduce your heat as you go.
 
Top