• Scam Alert. Members are reminded to NOT send money to buy anything. Don't buy things remote and have it shipped - go get it yourself, pay in person, and take your equipment with you. Scammers have burned people on this forum. Urgency, secrecy, excuses, selling for friend, newish members, FUD, are RED FLAGS. A video conference call is not adequate assurance. Face to face interactions are required. Please report suspicions to the forum admins. Stay Safe - anyone can get scammed.

Tips/Techniques Finding out 3ph motor voltage without a nameplate?

Tips/Techniques
I remember (barely) as a kid, I got a model kit of an electric motor. Part of making the model was winding the commutator. If I was a couple years older at the time I think it would have worked much better and I might have learned a little bit more. I have been searching hobby and toy shops for similar models and project kits for the grandkids. It's not easy trying to find things for them that they will enjoy and feed their minds a little.
 

Dan Dubeau

Ultra Member
You are on your own with this one Dan. I don't think I'd have the courage to do that. Afterward, my motor would probably have the shakes as bad as I do from all the shaky wiring. Even the shops that I know of around here use specialized winding equipment to keep the wires tight and in place.

Consider stopping in at a rewinding shop near you for a tour.
I'm only mildly interested in it. Not seriously considering doing it myself. I always just get struck by the curiosity of learning. I also very simplistically think, "what one man can do, another can too". Curiosity and stubbornness has led me on many great adventure so far.....
 

Dan Dubeau

Ultra Member
I remember (barely) as a kid, I got a model kit of an electric motor. Part of making the model was winding the commutator. If I was a couple years older at the time I think it would have worked much better and I might have learned a little bit more. I have been searching hobby and toy shops for similar models and project kits for the grandkids. It's not easy trying to find things for them that they will enjoy and feed their minds a little.
For grade 6 science fair I made an electric motor. Pretty simple affair from found stuff around the garage, and some salvaged magnet wire. They initially disqualified me because they thought my parents made it. The reinstated me after calling my Dad. I then went on a 3 years streak of 1st's until I found sports and girls, and suppressed my inner nerd for a long time.......:D.
 

Dan Dubeau

Ultra Member
I just dug it out from under a bunch of stuff on a shelf. Couldn't find my alligator clip leads for my power supply (I really need to clean up my bench....), so I rigged up some clips on an m12 battery adapter and it sprung to life immediately. I didn't even have my phone out to take a video yet.
20S8IJQ.jpg


Not bad for 30 years old. I think the last time I ran it ran was about 3-4 years ago.

They don't do science fairs at my kids school anymore :(
 

Dan Dubeau

Ultra Member
VFD Arrived yesterday for the new motor. So today I took a crack at making a new motor mount adapter plate.

Took some measurements, and came up with a couple ways to do it, but it would all depend on what material I had. My preference would have been 1 piece out of tooling plate, but the biggest one I had was 1/2" too small :(
20231229_112252.jpg

Digging through my heavy steel stock rack under the steps I came up with a weldment plan
20231229_112119.jpg
20231229_115629.jpg
20231229_120210.jpg

If you haven't tried these discs yet, you should give them a shot. Princess auto is where I got this one, but amazon has them for pretty cheap too. They work awesome for removing millscale.
20231229_123019.jpg 20231229_123043.jpg

Clamped up to tack weld
20231229_124416.jpg

welded solid front and back.
20231229_125648.jpg

Time to let it cool, and focus my energy on cleaning up the mill......
 

Dan Dubeau

Ultra Member
I'm still in the teething phase with this mill, and everytime I use it for a new project I come up with a bigger list of stuff to fix and play with....But it works, and I'm glad it's running now. Wish I would have got it running years ago.....

The side bars had a bit of a crown, so I welded them crown down. On the mill table I shimmed the rock out of it so I could flatten the top. Only took 0.005"
20231229_133439.jpg

Lightly clamped for milling. Just to hold it, not to force it flat.
20231229_133805.jpg

Then I milled the top flat. First time for my amazon special 2" apkt facemill. Worked great.
20231229_134412.jpg

Then I flipped it over to mill the bottom flat, and to take it to thickness. I first made it flat, the flipped it back over to see if it sprung or twisted again, but it didn't, so I snugged it back down and took it to size. I needed 0.85" so starting with 1/2" + 3/8 = 0.875 I had some material to play with.
20231229_134832.jpg 20231229_135350.jpg

Then I flipped it back over, squared it up, and picked up the center to start drilling the bolt patterns.
20231229_151517.jpg

Spot drill
20231229_151514.jpg

Drill
20231229_153547.jpg

Tap. I had to use 5/16", as I couldn't find any 8mm taps anywhere.....
20231229_154700.jpg
20231229_155554.jpg


Done. I also "spotfaced" the 3/8" clearance holes in the bottom plate with my 1" apkt tool so I had some clearance for a socket/wrench. I was pretty good keeping the weld away from there, but it did remove a bit of material.

20231229_155644.jpg

Test fit with the new motor. What you can see here now, is I mounted it backwards......:D. Once I figure THAT out....it fit great...
20231229_160226.jpg

Test fit in the shaper, the right way round, revealed some slight clearance issues at the front. Easily resolved with a portaband and flap wheel
20231229_162718.jpg

Fit's like a glove. Now it's a simple matter of pressing the old pulley on, and getting it all aligned......
 
I'm still in the teething phase with this mill, and everytime I use it for a new project I come up with a bigger list of stuff to fix and play with....But it works, and I'm glad it's running now. Wish I would have got it running years ago.....

The side bars had a bit of a crown, so I welded them crown down. On the mill table I shimmed the rock out of it so I could flatten the top. Only took 0.005"
View attachment 42262

Lightly clamped for milling. Just to hold it, not to force it flat.
View attachment 42263

Then I milled the top flat. First time for my amazon special 2" apkt facemill. Worked great.
View attachment 42274

Then I flipped it over to mill the bottom flat, and to take it to thickness. I first made it flat, the flipped it back over to see if it sprung or twisted again, but it didn't, so I snugged it back down and took it to size. I needed 0.85" so starting with 1/2" + 3/8 = 0.875 I had some material to play with.
View attachment 42264View attachment 42265

Then I flipped it back over, squared it up, and picked up the center to start drilling the bolt patterns.
View attachment 42267

Spot drill
View attachment 42266

Drill
View attachment 42268

Tap. I had to use 5/16", as I couldn't find any 8mm taps anywhere.....
View attachment 42269
View attachment 42270


Done. I also "spotfaced" the 3/8" clearance holes in the bottom plate with my 1" apkt tool so I had some clearance for a socket/wrench. I was pretty good keeping the weld away from there, but it did remove a bit of material.

View attachment 42271

Test fit with the new motor. What you can see here now, is I mounted it backwards......:D. Once I figure THAT out....it fit great...
View attachment 42272

Test fit in the shaper, the right way round, revealed some slight clearance issues at the front. Easily resolved with a portaband and flap wheel
View attachment 42273

Fit's like a glove. Now it's a simple matter of pressing the old pulley on, and getting it all aligned......
Look at you go...... Hurling yourself wildly into the 19th century........ Welcome back.:p :rolleyes:

Looking forward to seeing your first chips...
 

Dan Dubeau

Ultra Member
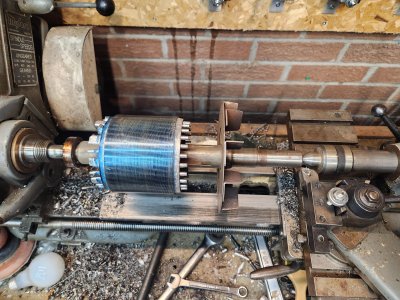
So I initially thought the original shaft was 7/8".....It's not, it's 22mm (with a 5mm woodruff key). Minor detail.....Scratched my head a bit trying to figure out the best way forward, and thought turning the motor shaft down is probably the best with what I have to work with. So I popped it out quick to see if it would even fit in my little Myford, and it did. Barely.
20231229_172115.jpg 20231229_172450.jpg

Ok. It fits, so it was time to rig up a drive dog, and have a go...Don't laugh it worked :D
20231229_173652.jpg
I ended up putting another Kant twist on the other side of the rotor opposite the drive one to balance it out. Believe it or not, it ran pretty true and smooth. I don't have any proper lathe drive dogs. Added to the blacksmithing projects list......
20231229_174409.jpg
20231229_174428.jpg
Runout was within about half a thou

Nothing to it but to do it. Not much coming off, but I really didn't want to go over....
20231229_175215.jpg

New one
20231229_180012.jpg

Original
20231229_180039.jpg

Good enough for tonight. I need to make a stepped key tomorrow.

This always makes me chuckle...
20231229_172559.jpg
20231229_172609.jpg

Like turn signals on a Tesla.

I cleaned the motor all up but I have to wait to make a stepped key tomorrow to reassemble because I don't want to press against the end bell when installing the sheave. I need to pull the vise off the tormach, and I had enough of side projects today.....

And yes, I know I need to clean the lathe. I'll get to it......
 

Attachments

  • 20231229_172453.jpg
    20231229_172453.jpg
    700.2 KB · Views: 2
Last edited:

Dan Dubeau

Ultra Member
Look at you go...... Hurling yourself wildly into the 19th century........ Welcome back.:p :rolleyes:

Looking forward to seeing your first chips...
So am I.....I WILL make a chip with it this year.....

BUT, the only toolpost I have for the shaper is a keyway one. Ironically, it would be perfect to cut a new keyway in it's sheave so I wouldn't have to make a stepped key........

One of the first projects I need to make for it, is a tool post. Side quests.....Seems like it's ALL side quests......
 
You have the lantern style toolpost in the clapper, don't you? Or is that one more twist in the trail? 20201105_071156.jpg 20220126_171636.jpg I don't usually use a toolholder in mine, rather I use tool steel directly in the toolpost, using a "sled" I made to hold it..... The groove in the tee is to drool a little bit of cutting oil down the face of the cutter.
 

Dan Dubeau

Ultra Member
No I never got a lantern holder with it. The only "toolholder" I got with it is a custom keyway toolpost that mounts in the clapper. I always figured I'd stumble across one for cheap/free that I could modify to fit by the time I got around to getting it running, but here I am on the verge of it chugging, and haven't found one yet.... Making one wouldn't be that hard, but I'll probably have a poke around the internet again before I commit to it.
20231229_210443.jpg
20231229_210447.jpg

I DO have a couple toolbit holders I could use when I get a toolpost. I did make those too, so the side quest was already done years ago.....(for another reason).
 

Dan Dubeau

Ultra Member
I found a key hiding in this little piece of O1 Flat ground this morning. Then pressed the sheave on, and reassembled the motor.
20231230_112442.jpg 20231230_113225.jpg 20231230_121455.jpg 20231230_122839.jpg

Then I hooked it back up to my mills VFD to verify that it was running before installing it in the shaper.
 

Dan Dubeau

Ultra Member

It's alive. Motor is running backwards in the video (faster on forward stroke), but it lives. That was it's first movement under it's own power since I've owned it.

I tried hooking it up to the Vevor VFD as the manual instructed me, and it didn't work. It would whine like it's coming up to speed as the frequency ramped up, but no movement. I ran out of time to play with it, so I'll leave it for tomorrow. But pretty happy with it running now.

I drew up a toolpost last night, and will have a crack at making it in the next little while. A few more little things to take care of, but it's running.....I don't have any tee nuts the right size to bolt the vise down, or I would have made some first chips. Tomorrow......Maybe.

Now it's time to go make some sushi rolls for a new years party, rice should be done.
 

Dan Dubeau

Ultra Member
The Vevor VFD didn't pan out.....
20231231_152818.jpg

While I sort that out with Vevor, I came up with another solution to running the shaper. I bought 5 pairs of these years ago at the barrie flea market for $5/pair. I knew they'd come in handy one day.....
20240101_124708.jpg

A while back at the restore I bought a big back of large strain reliefs for a few bucks. This one is perfect.
20240101_131002.jpg

I also picked up some soow 12/4 cable last weekend. I was headed into homedepot to buy some, but checked marketplace first. Found 2 10' cables for $50 (home depot price would have been around $75) closer than a trip to home depot. Guy had used them for speaker wire.....looked brand new.

This shaper, and all the other Prema's I found online had the louvered cover on the back, and the solid one on the side. I swapped them, as it seems more logical to have an air inlet on the end of the motor, and seeing as how I'm not routing the wires through the casting to a starter it was a great spot for the strain releif.
20240101_133140.jpg

Next up was to swap my Mill DRO arm to the other side. Drill a couple new holes in it, to both shorten it up, and provide a spot to mount the vfd.
20240101_140546.jpg 20240101_141244.jpg

I was fighting the urge to half ass this pretty hard at this point, because I eventually want to mount the vfd inside an enclosure, and run a pot, and switched for speed and direction control etc, and don't want to spend a lot of time doing something that I'll just replace, but for now I just needed a solid mounting point that was both temporary and semi permanent :D. I'd say this is more 5/8's assed.....

I did some imagineering in my scrap pile for a quick path to victory, and came up with this. A chunk of angle, and a piece of flat bar welded on the end. A few gland nuts, and a scrap of plywood.....
20240101_164331.jpg
It's pretty solid, and not going anywhere. I will at some point in the near future make a cover for it to protect the wires and such from chips etc.

The cord for the shaper reaches over just fine, and swapping back and forth couldn't be easier with the twist lock plugs. I'm only a half step from shutting it off while running the shaper, and with the clutch as your primary control, it's not a big deal.
20240101_141326.jpg

I wrote a note for future me what this motor was from and will tuck it away in the barn next time I head back. I also have some wire end scraps to strip and add to the melt down pile. Yes, I'm that cheap :D
20240101_164037.jpg
20240101_163956.jpg

After Dinner I'm going to pare down a couple teenuts to fit the shaper, and make some chips with it. I found a bunch of pics showing the original toolpost, so I'm going to ditch my idea, and try to replicate it.

It's funny, while scouring the internet for Prema info the past couple days, I found some old posts from me on HSM/PM in 2010 when I bought it. I was so sure I'd have it up and running within a short period of time with a phase converter lol. All I can say is, life got in the way.....This has been one hell of a detour....
 

Susquatch

Ultra Member
Administrator
Moderator
Premium Member
I was so sure I'd have it up and running within a short period of time with a phase converter lol. All I can say is, life got in the way.....This has been one hell of a detour....

Don't feel bad. I think that's the main message of my future eulogy. I'm not sorry either. Life SHOULD get in the way!
 

Dan Dubeau

Ultra Member
Don't feel bad. I think that's the main message of my future eulogy. I'm not sorry either. Life SHOULD get in the way!

My life has always been about the journey. It's been fun. Besides, I needed to have kids first, and have them grow up a bit before finishing this because I needed my Son and his little hands to reach in and get the last motor mount bolt in so I could FINALLY get this running :D. Couldn't have done it without him....:D
 

Dan Dubeau

Ultra Member
Dug through my surplus hold down hardware to find some matching nuts as it makes it easier to gang mill them, then milled them down to fit the prema table.
20240101_182344.jpg
20240101_183441.jpg 20240101_183450.jpg

Then I pulled the vise, cleaned everything, lubed all the ways, etc, and cleaned and hit the table and vise with a burr file. This is when I noticed the front 1.5" of the middle teeslot has met somebody with a heavy hand at some point.....argh Something else to fix....
20240101_184606.jpg

Next I spent some time acquainting myself with the stroke and ram adjustments before finding a suitable chunk of scrap to fit the limited useable stroke I had with my only toolholder.
20240101_185905.jpg
After that, armed with zero confidence or shaper running experience......I pulled the clutch lever and this happened.
20240101_190234.jpg


CHIPS!!! Crappy ones, but...... The cutter that's in there is pretty dull. It's also not ideal for cutting anything but a keyway in a bore, so before I break anything I pulled the chute. It seemed like it was digging in, flexing, then jumping out of the cut.....I'm happy getting this far. It's been a long time coming, but before I go any further I need to make some proper tooling for it.

I was hoping to do this yesterday, but spent all day on the couch on a heated blanket after getting some wicked back spasms in the morning that laid me up all day. Today was a bit of a struggle too, I'm still not 100% but I just had to get this checked off the list before going back to work tomorrow.

Now that this is "done" I can start cleaning up a bunch of stuff. I have generated a long list of upgrades and stuff to do to the mill and shaper before I really start using them. Mill needs cleaned up. It's not a show queen, it's honestly a bit of a cosmetic blister and it's days of doing toolroom level tight tolerance work are long gone but it's still reasonably tight and should have a long serviceable life in my shop doing mostly fab related work. Things like way covers, some zerks cleaned up, maybe a one shot oiler, etc.....Table covers, etc Those will be the focus of my shop time in the next little while.
20240101_190519.jpg

The shaper needs some minor work too, but for the most part it's in pretty good condition despite the paintjob....

My lathe also needs some cleanup too. Then the Tormach, and the rusty coolant problem I've been ignoring for too long......

I should be busy for a while....
 
I have been cheering you on, and then the realization of the weight of the matter came crashing down on me........
If my wife finds out that you got your shaper going, while mine is still in pieces, she's going to make me drywall that bathroom wall that I tore out a couple years back...... Apparently if you've got time to get yours going, and drywall random women's walls......:eek::rolleyes:
 

Dan Dubeau

Ultra Member
I have been cheering you on, and then the realization of the weight of the matter came crashing down on me........
If my wife finds out that you got your shaper going, while mine is still in pieces, she's going to make me drywall that bathroom wall that I tore out a couple years back...... Apparently if you've got time to get yours going, and drywall random women's walls......:eek::rolleyes:
Don't worry. I still haven't found time to repair the drywall ceiling in my bathroom yet. Or finish drywalling the basement. Or the multiple other stalled home reno projects in various stages of completion around here. BUT I have a shaper that now works after 13 years of holding my garage floor down..... :D.

As a good buddy of mine always says, "there's no need to rush into things".

I really should fix that bathroom ceiling though......Maybe this weekend......:D
 
Top