• Scam Alert. Members are reminded to NOT send money to buy anything. Don't buy things remote and have it shipped - go get it yourself, pay in person, and take your equipment with you. Scammers have burned people on this forum. Urgency, secrecy, excuses, selling for friend, newish members, FUD, are RED FLAGS. A video conference call is not adequate assurance. Face to face interactions are required. Please report suspicions to the forum admins. Stay Safe - anyone can get scammed.

Dreaming of a riser block

DPittman

Ultra Member
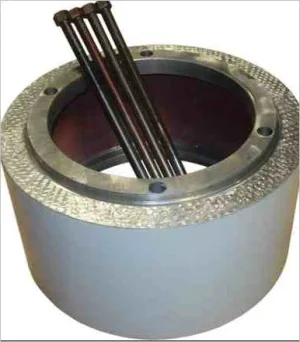
I have a 6x26 milling machine that was born with a very short Z axis envelope. I'm thinking I would like to someday attempt a riser block for it. I'm wondering about how you would go about milling out the pockets for the bolts as seen in the image? ( obviou
unnamed.webp
sly my milling experience is extremely limited as I dont even know what the proper milling technique would be for this operation, so my apologies for the ignorance).
 
It could be my eyes but in that picture the block looks like it's made up of three rings. the bottom has a notch, the next two don't (or at least not in the view shown.)
 
It could be my eyes but in that picture the block looks like it's made up of three rings. the bottom has a notch, the next two don't (or at least not in the view shown.)
Oh by George I think you're right. I'm not sure they are all like that tho? I just grabbed a pic that looked familiar to the design I was thinking of. I was hoping to use a solid chunk of 6" 4140 for the project.
 
Is that a pic of a riser block on your style/make of mill?
 
A couple of ways I can see to tackle that, a large woodruff keyway cutter ( cutter that size would prob be somewhat expensive for a "one-off" job ).
The most cost effective I think would be to cut a flat across the round face of the stand at both notch positions ( just long enough to create the notch size you need) now, at the flat spot drill to depth you need at both ends of your flat spot. You need these initial flat spots to facilitate jobber drills to start instead of deflecting off the curve. Once you have two holes drilled to depth, now just use a common endmill to join the holes at the depth you drilled....done...
 
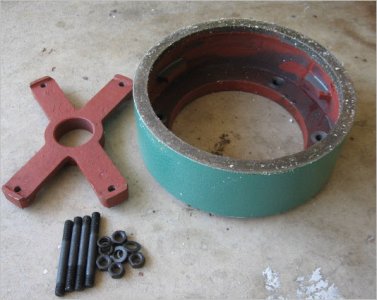
I'm kind of wondering why that intermediary pocket is required for the nut as opposed to studs/bolts passing straight through the riser into whatever connected it before? Unless they are indeed stacked risers for some reason. Some others here on the forum have more direct experience (having installed them). From what I've gathered a lot kind of depends on the machine itself. Do the bolts go into the column base, or is there an intermediary clamp arrangement. That will probably dictate how you go about it. Mills seem to vary based on size & type. Here is another example.
 

Attachments

  • SNAG- 11-6-2020 000.jpg
    SNAG- 11-6-2020 000.jpg
    40.3 KB · Views: 2
  • SNAG- 11-6-2020 001.webp
    SNAG- 11-6-2020 001.webp
    20.3 KB · Views: 2
Why dream - make one. It does not need to be something ultra precise - after all that what traming the mill is for.

Are you worried about drilling deep holes straight? Yes it could be an issue - this is probably why on the first picture they have 3 blocks vs. one (they could use threaded bar if they cannot find long enough bolts). How big of a block you want? What is hole diameter? Note that the holes have some "wiggle" room as far as how straight they need to be - the actual location is done with a collar - but even that does not need to be perfect.

The main idea is to have the actual collar touching surfaces relatively parallel to each other or your mill will be a bit on an angle. You can counter the angle with tilting the head but obviously you want to keep things as good as you can - I guess you could shim things if it gets bad.

2nd idea is also a thing but now you need to make 3 bars precisely - its 3 not 4 for a reason - I think it was done that way due to simply having such materials vs something to make a collar. Only a bit crazy people like myself will have stuff to make a collar in stock + you need a touch big lathe to machine it as well.

Making a good collar can be a weekend project for sure - it can even run into a 3 days thing. At least when you screw up a bit you can simply shrink the collar - i.e. no one is telling you it has to be 4" or 6" if its 5.79" because of "oops" its still OK.
 
At one point I found a 9" X 3/8" round 4140 pipe - perhaps 7" high) for Janger to make a riser out of. (the machine is now with Kevin)

Measure up your flange and we'll see what we can do....
 
I have a section of that pipe and the top/bottom plates that came with the deal -- waiting for my inevitable riser project. :)
 
Do the bolts go into the column base, or is there an intermediary clamp arrangement.
I believe the bolts go into the column and that is the clamping mechanism. I haven't taken the column apart yet so don't know the specifications yet. I've seen different specs on riser blocks that I thought were for the same 6x26 milling machine but apparently there are some dimensional differences in the column of the machines.
 
Ok if I understand things right (and I likey don't) the only reason I wouldn't make just a more or less solid block for my riser is because drilling the holes in that sort of depth is difficult? Could I drill from
20201112_103956.jpg
both ends to meet in the middle and it be ok? Here is a picture of my column
 
Step 1 :Measure the column
Step 2: Decide how high you want to rise up
Step 2.5: Create a plan
Step 3: Get material needed - measure how much extra margin you need for the bolts. You can always get thinner ring and weld bolt holders to it.
Step 4: take mill head off
Step 5: machine your riser block, depending on what you got as material this can take just some lathe work and drilling or may involve welding
Step 6: paint it nice color
Step 7: re-assemble

Solid piece is possible but will be heavy for a larger size - this may or may not be a good thing (adds mass to your machine BUT makes it harder to machine). Say a large riser made of solid is goin to be above "lifting range" of a human and thus will make it difficult to machine. Imagine machining 200lbs, moving it around etc.

Do not worry so much about the holes unless you are going say 8" - these are probably like 5/8" bolts.

You could also make two blocks that fit together - more work but easier to deal with - the key is *Step 2*
 
The servers have been up and down, and lost my reply.

Riser blocks are never solid. The one we started for Janger/Kevin started as a 9" X 3/8 4140 tube. 2 - 1/2" flanges to weld on, and the riser is done.

I had a mill that had exactly the same config as yours. a 5-6" pipe, two flanges, 2 triangles, about 1.5 X 1.5 as a stiffener, some welding, and there you are! Making a Bridgeport riser is much more intricate, as the internal bore.ledge has to match top and bottom for a good fit.

Yours is easily done with flat flanges. (you might consider a round boss on the top flange to facilitate rotating the head)
Well the main reason I was thinking of a solid chunk is because I have a solid 6" chunk of 4140. I'm thinking it would be about 5-6 tall. I don't have tube/pipe.
 
If its only 6" & needs to be only flat or maybe just a "flange" then it sounds like maybe 1h to 3h of work on a lathe.

Then to drill 3 holes maybe around 1.5h on the mill.

This is for solid. If it is 6" column then this is rather trivial project. I was thinking of my mill where the block would be like 16" or something.
 
Back
Top