• Scam Alert. Members are reminded to NOT send money to buy anything. Don't buy things remote and have it shipped - go get it yourself, pay in person, and take your equipment with you. Scammers have burned people on this forum. Urgency, secrecy, excuses, selling for friend, newish members, FUD, are RED FLAGS. A video conference call is not adequate assurance. Face to face interactions are required. Please report suspicions to the forum admins. Stay Safe - anyone can get scammed.

Cribbage Pegs

mbond

Super User
Premium Member
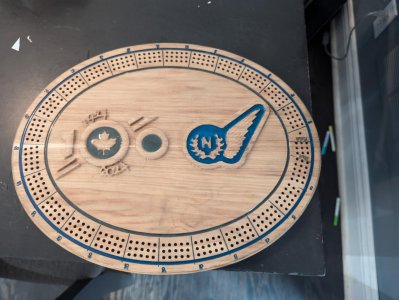
Recently, our family when on a trip near Trenton and we made a visit to the air force / aviation museum there. One of my sons found a cribbage board in the gift shop that was produced for the 100th anniversary of the air force and anyway we got it. It is clearly meant to be a wall mount piece, but he wanted it so we could play. It didn't come with any pegs, so I decided it was easy enough to make some

here is a picture of my first prototype

peg.png
This one is made of brass, but I promised 3 pairs in different colours - probably Aluminum, brass and copper. But it is harder than I thought because of the small size of the work. The holes in the board are drilled 1/8th to a depth of about 3/8th. That means that along the taper about 3/16ths up, the diameter should be 1/8th (both the pegs and the wood will wear). I choose 4 degrees for the taper. But it it way too small to get a tail stock in, and at that size the stock simply bends away from the tool.

To make this prototype, I turned the blank to about a 1/4. Then set the cross at 4 degrees and moved it to start at about 7/64. At that angle it gets to the full diameter at about an inch and a quarter - taking huge flanking cuts as it goes. Hand feed only. The final piece is to be 1"

I think I will do better with the next one
 
I'm not sure I understand your process.

But my goto method for cutting small diameter parts is to do all the cutting toward the headstock on a part big enough to withstand the pressure. Because the skinny part that is left doesn't have to take any pressure, you can cut needles if you want.

No tailstock required. In fact it would not work if you tried to use one.

Just for Shits N Giggles, I took this to the limit of my ability with crappy steel. I have wanted to go back and see if I could cut a 10 thou needle out of brass or aluminium. But never got to it.


If you used brass, aluminium, or copper it should be downright easy to cut an inch long peg with a 1/8 average taper on it.

You can use a carbide tool, but if so, use one intended to cut aluminium with the smallest nose you can find. Inserts for aluminum are sharp and that is the key here. You need sharp and a pointed nose. A rounded nose will exert radial pressure and bend the skinny work. The best by a wide margin is a sharp HSS tool.

As noted in the reference thread, I also found its best not to have too much back relief in order to prevent cuttings from getting in behind the tool and bending the work.
 
I didn't take a picture of my progress. But what I did was to to turn the blank down to around a 1/4 (by eye because it didn't matter). and then to set the tool close to the minimum diameter at the very end of the stock. Then advance the tool slowly using the compound. The result starts at a small size and then gets larger towards the headstock.

At the beginning the tool carves out large wide chips. Then they get smaller as the taper approaches the diameter of the blank.

Cutting off the smallest and largest ends of the work, I should get the size I need. Then grind off the burs and shuffle the cards!

I made this one with the carbide insert tool that I happened to have on the tool post. I have HSS, so I'll try the next one that way
 
Yes, that sounds exactly like what I described. The key is to cut everything off down to the target diameter right away. A skinny part isn't strong enough to take incremental cuts along its length.

As long as the slenderness ratio doesn't get you when you take your working pass (sorry, I couldn't resist..... Insert evil grin here) it should work just fine for your purpose. For a 1 inch part, you should be able to cut a 30 thou needle. A 1/8 average plug should be easy.

If your machine can handle it, I wouldn't hesitate to start with 3/8 rod (or even 1/2) and take it to target on the first pass.
 
Before I managed to make this one, I tried cutting it thinner first and then taking small cuts. That was no good. Then I made this one by leaving it thick and taking a big cut right to the final size. It worked much better
 
Just for Shits N Giggles, try cutting a 20 thou needle and see how long you can make it.
 
what material? Not brass

Free machining steel would be best I think. I played a bit with titanium and it didn't work so well. I wouldn't be afraid to try brass just to see when it gives up.

I think the primary magic is in the tool shape. Sharp as a razor along the left edge ending in a point with a very low angle relief that won't catch swarf but allows the needle to stand behind it.

You will have to play with feed rate too. Deep enough to take away the heat but not so deep that it pulls the needle with the cut.
 
Here I was doing something 'simple' I hardly needed to look at the gauges. I was going to do all six just by eye and tell the children that the discrepancies were features!

But at least my middle son has told me that they are not alike enough. So i need to do better
 
I was told once that the difference between a metal worker and a craftsman is that the craftsman can make mistakes look like they're supposed to be there, I'm a metalworker. lol

We were finding those little pegs getting to be fiddley and just an all around pita to use so I made some as well.
I made them long enough to grab easily and the heads big enough to actually be able to hold.

1721610094580.jpeg

One set is a brass shaft with an aluminium head the other an aluminium shaft with a brass head. Much easier to use.
 
Back
Top