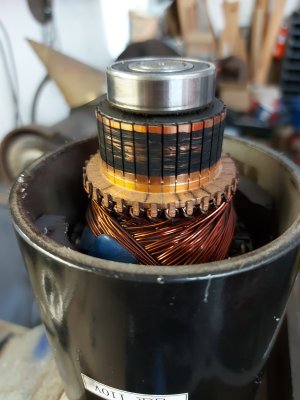
For a while now when I pushed the start button it would buzz then the motor would start. Lately a couple of times it would hesitate then start. The other day I pushed the start button and there was no sound at all but the RPM display lite up like it usually does and the motor did not start. Of course you are in the middle of something you want to get finished when something like this happens. I did some investigating, fuses wire connections etc. All checked out OK. Keeping the buzzing in mind I went to the push button switch and removed it. Looks like I can pop this thing apart, but will it go back together. I checked on line and Busy Bee had one in stock that they could ship right away so I ordered it then proceeded to take the old one apart. Not too bad. All looked pretty good so I cleaned the contacts and managed to pop it back together. Put it back in place still nothing. I am still thinking that maybe there is something wrong with the switch that I can't see like the magnetic coil not pulling the armature in. Just for kicks while I am waiting for the new switch I thought I would try connecting the motor directly to a 12 volt auto battery. The motor runs on 90 volts DC. Pulled the leads out and connected to the battery. Nothing, just like an open circuit. OK a good time to pull the motor out and at least give it a good clean because It has never been out. The picture shows what I found. So much carbon build up on the commutator that there was no connection. Cleaned it all up with some scotch bright and put it back together. Even with the 12 volts it rolled over quite smoothly but very slow do the low voltage. A word of caution here if you are going to take one of these DC motors apart. Hang on to the armature very will because the magnets are super strong and you could do serious damage to a finger or two if the the armature snaps around in the housing. All back together again and works very well with no buzzing in the switch. I guess I will have a nice new switch to put on the shelf in a few days.
-
Scam Alert. Members are reminded to NOT send money to buy anything. Don't buy things remote and have it shipped - go get it yourself, pay in person, and take your equipment with you. Scammers have burned people on this forum. Urgency, secrecy, excuses, selling for friend, newish members, FUD, are RED FLAGS. A video conference call is not adequate assurance. Face to face interactions are required. Please report suspicions to the forum admins. Stay Safe - anyone can get scammed.
-
Several Regions have held meetups already, but others are being planned or are evaluating the interest. The Calgary Area Meetup is set for Saturday July 12th at 10am. The signup thread is here! Arbutus has also explored interest in a Fraser Valley meetup but it seems members either missed his thread or had other plans. Let him know if you are interested in a meetup later in the year by posting here! Slowpoke is trying to pull together an Ottawa area meetup later this summer. No date has been selected yet, so let him know if you are interested here! We are not aware of any other meetups being planned this year. If you are interested in doing something in your area, let everyone know and make it happen! Meetups are a great way to make new machining friends and get hands on help in your area. Don’t be shy, sign up and come, or plan your own meetup!
You are using an out of date browser. It may not display this or other websites correctly.
You should upgrade or use an alternative browser.
You should upgrade or use an alternative browser.
Craftex CX701 failing to start
- Thread starter Larry_C9
- Start date
Not really. One Brush had the similar carbon build up on the face as the commutator. Everything cleaned up looking like new and the brushes didn't look they had very much wear on them. Maybe there was some kind of contamination left in there when the motor was originally assembled and over time caused the build up combining with the carbon dust.Any idea why so much carbon built up on the commutator?
DPittman
Ultra Member
I had similar issues on my CX700. The brushes looked hardly worn but new ones made it run again.Not really. One Brush had the similar carbon build up on the face as the commutator. Everything cleaned up looking like new and the brushes didn't look they had very much wear on them. Maybe there was some kind of contamination left in there when the motor was originally assembled and over time caused the build up combining with the carbon dust.
BaronJ
Member
Hi Guys,
One of the major problems with these motors, having a permanent magnet field, is heat build up !
The heat from the armature can only escape via the bearings at each end. The built in fan is mostly ineffective simply because the motor is rarely running fast enough to get a reasonable air flow. I use an added 5 inch 12 volt ducted fan on my mill set to suck air up through the motor and out.
The other problem that is common, is the connections to the carbon brushes overheat and become bad increasing the heating. The net result is excessive carbon build up and higher than normal wear.
Cleaning the commutator as you have done will help.
I replaced the motor on my mill with a 180 volt, 4HP treadmill motor, a much better quality motor. I still use a fan but this motor doesn't even get warm.
I see what BaronJ is saying about heat build up. The motor on the CX701 is situated inside a metal box on the back of the head. If my memory serves me right there one decent size hole going down out of the compartment the motor is in. This does not make for very good air flow or the ability to see how hot the motor is getting while running. It would probably be a good idea to put another hole through the back of that compartment with a fan to create some air flow through the compartment.
BaronJ
Member
Hi Guys,
Whilst the same kind of motor is used on both the lathe and the mill, you will have to decide for yourselves how to implement a cooling fan on the lathe ! Since the lathe motor is horizontal and my mill motor is vertical the method that I used may not be suitable.
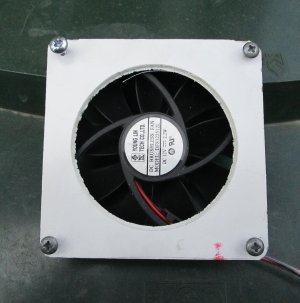
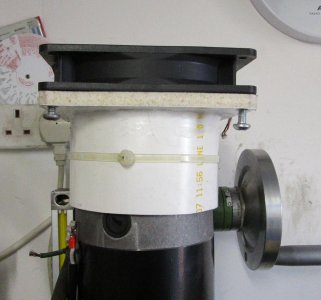
I used a piece of 100 mm (4") plastic pipe slit down one side and wrapped around the motor and held with Ty wraps whilst the adhesive set. I then cut a slot on either side for the brush holders, allowing the plastic pipe to sit further down and add stability.
Note that the air flow direction should be to suck the air out over the brushes and commutator. I also have a thermometer so that I can keep an eye on motor temperature.
Whilst the same kind of motor is used on both the lathe and the mill, you will have to decide for yourselves how to implement a cooling fan on the lathe ! Since the lathe motor is horizontal and my mill motor is vertical the method that I used may not be suitable.


I used a piece of 100 mm (4") plastic pipe slit down one side and wrapped around the motor and held with Ty wraps whilst the adhesive set. I then cut a slot on either side for the brush holders, allowing the plastic pipe to sit further down and add stability.
Note that the air flow direction should be to suck the air out over the brushes and commutator. I also have a thermometer so that I can keep an eye on motor temperature.
BaronJ
Member
Hi Guys,
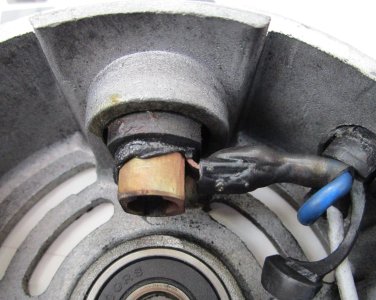
Here are some pictures of the original mill motor ! The supplier replaced the motor (twice) because of the heating damage.
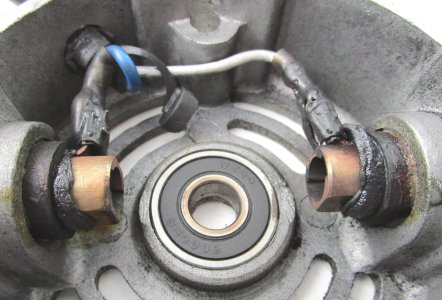
In this picture you can see the damage that the poor connections on the push on connections created. The brush holder on the right has melted and allowed the holder to tilt.
The left hand brush holder isn't that far behind.
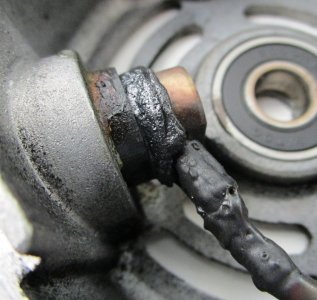
On the third motor, I took it apart and soldered the push on connector to the brush holder spade.
This motor lasted the longest until the armature shorted and destroyed the speed controller module.
I got a replacement from the USA for about $125. A KBxxx
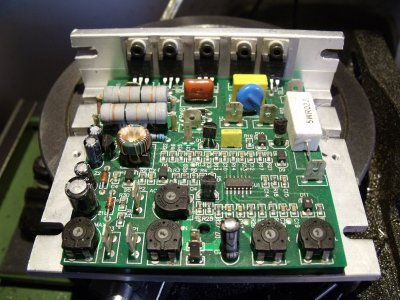
I didn't have to do anything other than add the 0.2 ohm 5 Watt resistor. The large white ceramic one on the right of the picture. The unit simply fastened in exactly the same as the original one.
Here are some pictures of the original mill motor ! The supplier replaced the motor (twice) because of the heating damage.

In this picture you can see the damage that the poor connections on the push on connections created. The brush holder on the right has melted and allowed the holder to tilt.

The left hand brush holder isn't that far behind.

On the third motor, I took it apart and soldered the push on connector to the brush holder spade.
This motor lasted the longest until the armature shorted and destroyed the speed controller module.
I got a replacement from the USA for about $125. A KBxxx

I didn't have to do anything other than add the 0.2 ohm 5 Watt resistor. The large white ceramic one on the right of the picture. The unit simply fastened in exactly the same as the original one.
BaronJ
Member
I wonder if the "KB" control boards in all these Asian lathes are actual KB boards or if they have simply cloned them?
I find these factory installed motors marginal at best, especially low speed torque.
Hi Slow-poke,
I would guess that since they are made in China, it's quite likely that they are original boards. Both my original one and the USA replacement are marked made in China.

