Broach sets

A few days ago I came home with a couple of new to me treasures from yet another auction. One lot was a couple of broach sets, one imperial and one metric. They are both in wooden boxes but covered in such a thick layer of oily dirt you could hardly tell there was any wood underneath and thats to say nothing about seeing any labels on the boxes. The pieces inside were packed with chips. Don't machine shops ever clean their tools??? Anyway on bringing them home and inspecting them a couple of questions came to mind. I'd be very interested in others opinions.

1/ I now have several wood boxes housing old used tools and I'm wondering how to properly restore or lets say at least refresh these boxes. Inevitably they are covered with oily dirt and felt liners are very worn or outright destroyed. I cleaned out all the chips as best as I could and cleaned up the steel parts. This time I got out some Princess Auto pressure washer degreaser and used it with a cloth to scrub the oily dirt off the boxes. It worked to some extent but some dirt remained in the grain of the wood where it could not be removed by cleaners and scrubbing. Also numerous scratches and dents also harbored some dirt. So I decided a light sanding was in order followed by some new varnish and paint. Trouble is sanding the top of the black box would remove the Manufacturers name and logo which I would prefer to keep. Is there a better way to refresh such things? What would you guys do?

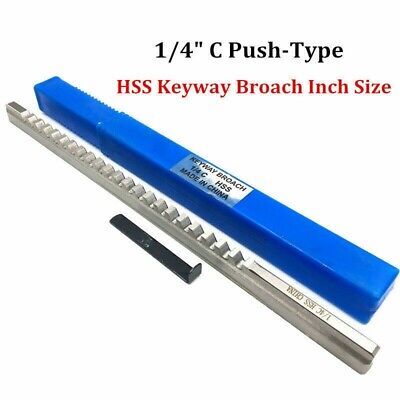
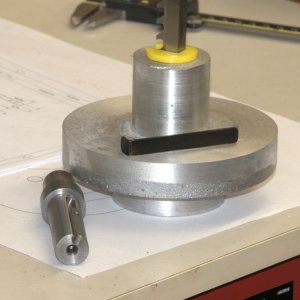
2/ On inspection I discovered that a few important pieces were missing. A couple of guide bushings and the 1/4 inch broach were missing. I realize that once I have my mill running guide bushings and backers could be made in the shop. The broach itself however is a different matter. I would rather buy one. The most obvious source would be China. But are these Chinese broaches of reasonable quality? What do you guys think?

zbroach3.JPG

zbroach2.JPG

zbroach1.JPG
 

LenVW

Process Machinery Designer
Premium Member
Ian,
Hang on to the Broach sets you have.
They do not make those wooden cases for very many tools anymore.

Chinese Quality is a question from some sources.
Some are comparable, Taiwan quality has improved greatly.
I have purchased some Chinese Center Drills that were garbage !!
Let the buyer beware and listen for referrals on this site.

I found this broach set on AliExpress.
There are Chinese sets but you have to pay for the tools PLUS shipping.


30pcs Inch Sized HSS Groove keyway broach  broaches set key broaching tools tool 5pcs 1/2''-1-1/2''18pcs Bushings 7pcs Shims

  • 30pcs Inch Sized HSS Groove keyway broach  broaches set key broaching tools tool 5pcs 1/2''-1-1/2''18pcs Bushings 7pcs Shims
  • 30pcs Inch Sized HSS Groove keyway broach  broaches set key broaching tools tool 5pcs 1/2''-1-1/2''18pcs Bushings 7pcs Shims
  • 30pcs Inch Sized HSS Groove keyway broach  broaches set key broaching tools tool 5pcs 1/2''-1-1/2''18pcs Bushings 7pcs Shims
  • 30pcs Inch Sized HSS Groove keyway broach  broaches set key broaching tools tool 5pcs 1/2''-1-1/2''18pcs Bushings 7pcs Shims
  • 30pcs Inch Sized HSS Groove keyway broach  broaches set key broaching tools tool 5pcs 1/2''-1-1/2''18pcs Bushings 7pcs Shims
  • 30pcs Inch Sized HSS Groove keyway broach  broaches set key broaching tools tool 5pcs 1/2''-1-1/2''18pcs Bushings 7pcs Shims

30pcs Inch Sized HSS Groove keyway broach broaches set key broaching tools tool 5pcs 1/2''-1-1/2''18pcs Bushings 7pcs Shims​


C$ 324.91
C$ 361.01
-10%
Store Discount: Get C$ 2.71 off orders over C$ 93.48
C$ 5.42 off Orders over C$ 6.77
C$ 27.10 Off Store Coupon

Ships toCanada
Shipping: C$ 135.70
From China to Canada via AliExpress Premium Shipping
Estimated delivery on Oct 12
 

LenVW

Process Machinery Designer
Premium Member
For tools that have limited uses, I would go with what you have found.
Buy only the size you need and work with them until you are confident with their quality.

Can you live with the delivery ?
(Mid Oct - Early Dec)
 

trlvn

Ultra Member
Princess Auto pressure washer degreaser and used it with a cloth to scrub the oily dirt off the boxes. It worked to some extent but some dirt remained in the grain of the wood where it could not be removed by cleaners and scrubbing.

I would not sand the box. You might try more aggressive solvents to remove more of the oil. Maybe start with mineral spirits and move up to acetone or lacquer thinner if that doesn't work.

BTW, you can borrow my 1/4 inch broach whenever you need. Should I ever need a metric broach, I might come back to you!

Craig
 

jcdammeyer

John
Premium Member
What a find! I've been buying my broaches one at a time with a few of the broach guides all from KBC Tools before the prices went too high. So I have 'duMont' brand in 3mm, 4mm, 5mm and 1/8". Along with a few duMont guides bought as I needed them. After the first couple I have started making my own. These were all purchased over several years.

The attached screen shot is one I'm doing now for 14mm shaft with 5mm key. The Broach is 'B' size which is about a 6.5mm wide slot.

The last one I made I turned the dimensions leaving extra length still held in the 5C collet. The collet was then transferred to the spin indexer on the mill and using a 6mm cutter on the centerline I roughed out the basic slot. Then 0.25mm on either side of the center line to clean up the sides and bring the total width to 6.5mm.

For a 6mm key slot in aluminum I was too lazy to turn the broach guide out of metal. Second photo shows the 3D printed version. I don't think that would work for steel pulleys. This time the broach was from China. Worked find in the casting.
 

Attachments

  • BroachGuide-14mmB.jpg
    BroachGuide-14mmB.jpg
    25.1 KB · Views: 4
  • SpindlePulleyBuild-4.jpg
    SpindlePulleyBuild-4.jpg
    146.8 KB · Views: 4

jcdammeyer

John
Premium Member
Following on the subject of broaching I did get a chance to turn down a piece for the broach guide. Using a carbide cutter I ran 920 RPM, 0.1mm per rev, 0.025" depth of cut.
No carriage stop needed. I faced off the end after jogging to that point. Set Z=0. Then BEGIN=1.25mm. END set to -43mm.
After that a few passes with measuring to get to the 20mm diameter for the shoulder.
Then change END=-36mm to turn to the shoulder. Figure out I needed to cut to a depth of 0.117" with the caliper as a guide. Four passes 0.025" and one at 0.017". Left me with about 0.001" and I used a file to clean up the roughness. Now a micrometer to verify it's the same diameter as the motor shaft.
Still need to just cut a relief at the shoulder.
After that. Onto the mill to cut the broach slot. Think I'll write some G-Code for that. BroachGuide-14mmB-1.jpg
 

jcdammeyer

John
Premium Member
Sigh... Kind of wish I'd just bought one given the time I've put into this already. Broach fits nicely in the slot.
BroachInSlot.jpg
I used a 5mm cutter since it was a two tooth slot cutter rather than a 4 tooth end mill. Speed 2000 RPM. Depth of cut per pass 0.025" and F5 speed setting. Which I determined by a bit of trial and error cutting the shoulder near the spin indexer.
Then once I was sure the speeds were good I type in G1 X-1.9 F5 from the X==0.2 position away it went. right into the collet. Accidentally set -1.9 instead of -1.8.
Fixed that and then cut to the depth I'd worked out in CAD.

Now the cutter was 5mm but the slot needs to be 6.5mm and as I'd used my probe to find the center line of the part I figured I'd just move over half of 1.5mm and mill the full depth to get up to the 6.5mm width.

Didn't realize that the collision with the collet had damaged the cutter. So there was a ridge that I didn't notice and the broach wouldn't fit in the slot. So I kept making the slot wider until it hit me that the ridge was the issue. A bit of scraping and now the broach settled in place although now a bit sloppy.

OK. Cut it off, cleaned it up, tried it in the 14mm hole. Hmm Broach won't go through. Slot is not quite deep enough. The two corners of the broach stick out more than the top on the curved surface. Suffice to say I made a mistake in the drawing.

But that's not the worst of it. Turns out the slot isn't centered. Now how could that be?
OffsetSlot.jpg

I looked at the 3 other broach guides I've made in the past and what do you know. They have the same problem. Turns out backlash on the Y axis is enough that the positioning isn't accurate enough and clearly I don't have the LinuxCNC backlash values correct. From the bottom of the slot over to the side on one side it's 0.02" wider than the other; so only out by 0.010". Which fits in with the backlash.

I can probably clamp it in the vise and use a 6mm or even 1/4" (6.35mm) end mill to deepen it enough so it would work. Don't really want to spend money for a new one. It's not even in the Delta location so who knows when it would arrive or what shipping would cost.


I think I'll try and save this one.
 

jcdammeyer

John
Premium Member
Used a 1/4" 2 flute slot cutter with the broach guide held in the vise. Cut an extra 0.021" depth and moved it a bit either way on the Y axis to widen to 6.5mm from the 6.35mm cutter.
NewKeySlotDepth.jpg
And it turns out my 3 Ton arbor press can do steel. Slot could have been only 0.015" extra depth so I had to add an extra shim to deepen the slot. Then a bit of work with a file to get it past the 'stiff' parts. A few occasional uses of the gear puller to get it off. Now it slides on nicely.
KeySlotCut.jpg

Next step, rotary table and 4 holes to mount the two pieces together and finally square off the nub to fit a 3/8" socket.

Once you have the ability to broach, and practiced a few times it's not so scary.
 

jcdammeyer

John
Premium Member
Well crap. Spent an hour looking for a second pair of jaws for the chuck on the rotary table so I can hold it on the outside and drill the 4 (or 6) mounting holes. I don't think I ever had a set. Since 14mm is a common size for servo motors etc. I thought I'd whip up an arbor. Just need to cut the key way slot. Then I can lock the hub onto it, clamp it in the 3-jaw and spin the rotary table to create holes in the same spot as the other part. Arbor-14mm.jpg
 
Top