An Arduino based stepper driver.

jcdammeyer

John
Premium Member

Attachments

  • x-nucleo-ihm03a1.pdf
    462.5 KB · Views: 2

Proxule

Ultra Member
Very coool, Thanks!
Just finished using some 2208 drivers and an arduino for the powder trickler project for reloading.
 

jcdammeyer

John
Premium Member
Very coool, Thanks!
Just finished using some 2208 drivers and an arduino for the powder trickler project for reloading.
The discussion on the linux group of course is that this probably won't work with linuxCNC but I don't think that was the point of the posting. From a space perspective stack three of these on top of an UNO R3 and have the ability to move a given distance. At least based on that arduino code. I don't know how well this will work with a simple move at a given speed until I tell you to stop and then decelerate to a stop.

My idea has always been there are times where typing in
G01 X3.0 F20
to move 3" at 20 IPM to mill for face the top of a piece of metal is a bit of a pain. I did like my power feed where I flipped the handle to the right and set the knob to the speed and then waited until the face mill was clear of the work before flipping the leaver. Then tweak Z or Y and move the handle in the other direction.
That versatility doesn't really exist in most CNC systems. And yet using the system in manual mode that's the type of operation we actually want.
Now back when I had that power feed I also had (and still do) the DRO so it was easy to move Y over manually half the tool width without having to figure it out from the dial on the handle. Then engage the power feed.

Now just imagine that you can add 3 stepper motors to your mill with the idea of having power feed. Not CNC. Instead of modifying a battery operated drill or some other motor types. Now all you need is a center off switch for motion left/right and a knob for setting speed. And what would be a really cool addition to this would be a 3 or 4 line display showing XYZ position based on those stepper motor micro-steps. Yes. Not closed loop. But then my power feed on X wasn't either and it sure was useful.

Just thinking out loud here.
 

jcdammeyer

John
Premium Member
Now that's WAAAY more useful than CNC! (Flame suit on.)
I won't flame. Remember if you have one of those standard Power Feed like what came on my mill you can also set the spring loaded blocks on the front T-Slot to trip the limit switch.
1698886187241.png
So then you can raise the quill or lower the knee speed back until the limit. Raise the knee or lower the quill for the next depth of cut, dial in the feed speed and move the lever.
Walk away and do something else until it stops.

Now wouldn't it be nice... (this is the bait on the hook here) if you could accurately and easily set those two stops at the front so you could move exactly 3.75".

Move the XY so the tool is where you want to start and like on the DRO zero the X and Y.
Then turn on the spindle. Use the quill and dial to move down until the tool bit just starts to scratch the surface (or you can use paper method). On the DRO zero the Z.

Then move Z down to depth of cut and press GO RIGHT. It moves for 3.75" and stops move. Retract quill and press GO ZERO. Move quill down for next depth of cut. Rinse and repeat.

We already do this without CNC. It's just that with the DRO we turn the handles manually doing our best to create an even/ smooth cut.

To do this with CNC is very easy. Like before you set the XY zero using the 'Touch Off' feature. Then with the tool clear of the work type in G0 X0 Y0. Now jog the quill down (or knee up) until it just scrapes the surface and click Touch Off Z.

Finally jog Z down for the depth of cut. Then G01 X3.75 Fnn where nn is the desired feed rate. When it's done G0 Z0.1 which means clear the work by about 0.1" and G0 X0 which goes full speed back to the beginning.

Now jog down (say using the MPG) so the depth of cut is the original plus the new one. Say now 0.2" instead of 0.1". We do this slowly with a milling cutter than can plunge cut (2 flute). Now we don't have to type anymore. Scroll up through the history to find G01 X3.75 Fnn and hit enter.

And so on until the slot is cut. The down side is it's like being in the late 70's with the first personal computers. Lots of typing. So annoying...

What about angled cuts?
One option is to rotate the vise.
1698886890615.png
Another option, although I've never used it is rotate the table. Not all mills can do this. Undo the 4 clamping bolts and rotate the entire table. Yes it pivots at the cost of losing a couple of inches in the Z direction.
1698886977052.png

Or just clamp the work on the table so the X or Y direction follows the line drawn on the work. Tedious. One can also use a sine bar against a straight edge to accurately set an angle of the work or the table.

Or, from the X=0,Y=0 position set the X=n,Y=m position by entering
G01 X3.75, Y3.75 F20
And bingo a 45 degree slot. Without moving the work and having to realign.

It's only that the trajectory planner can accelerate both axis so even if they have different lead screws and different reduction drives the acceleration path and fixed speed path are still along the 45 degree line.

But there's no reason that little Arduino with stepper motor drivers can't do that either. The hardest part is the trajectory planning so the startup path isn't skewed.
 
I have to say when I first started with the CNC I used the hand controller and did some simple stuff manually, because it was what I was used to, except everything was power operated.

Now I spend about 5min set up my program, throw in a piece of material touch off and press a button, stand back wait a few and out comes a piece neat and clean, want a second identical piece just repeat. Over all I would say for one piece maybe a little longer but its repeatable easily.

It comes down to getting used to it, once you do, its like carbide there is generally no desire to go back unless required because your approach to getting the end result changes.

Personally, kicking myself fir not doing it sooner.....next one is the lathe, the question is when.
 

jcdammeyer

John
Premium Member
I have to say when I first started with the CNC I used the hand controller and did some simple stuff manually, because it was what I was used to, except everything was power operated.

Now I spend about 5min set up my program, throw in a piece of material touch off and press a button, stand back wait a few and out comes a piece neat and clean, want a second identical piece just repeat. Over all I would say for one piece maybe a little longer but its repeatable easily.

It comes down to getting used to it, once you do, its like carbide there is generally no desire to go back unless required because your approach to getting the end result changes.

Personally, kicking myself fir not doing it sooner.....next one is the lathe, the question is when.
Question for you @Degen
How often do you use your CNC mill? Multiple times per day? Once per day? Once per week? Once per month?

There are times when more than a month will go by where my mill is used. That's actually true for my 3D printers too. Months will go buy before I touch them. Although I keep the table saw top clean (most of the time) I don't think I've used it in 6 months. OTOH, my soldering station, scope and meter are likely used at least once per week. AlibreCAD software at least once per week. Delphi once every few months. Same with a lot of the other software. All depends on the projects.

And there is the problem really. Like a musical instrument or even ballroom dancing, if you don't practice you forget. It comes back but in the case of the milling machine the occasional broken (expensive) probe etc.
 

jcdammeyer

John
Premium Member
Holy Crap John.....

I don't even have power X or Z yet.....

So ya, Touche!
Once you have power feed on the X axis you'll wonder how you ever did without it. And if you do decide to do it go with the approach that the drive could be controlled by a computer. Even if it's just an arduino with a pot for speed and buttons for direction. So Servo or Stepper means that you could, if you wanted move in the CNC direction.

Don't recall if you have a knee mill. A friend who has the big brother to mine finally added some sort of 12V motor and several belt drive reductions. He runs it off a battery charger and is so happy to not have to hand crank the knee. He's also about 10 years older than me. He has CNC on his other mill and on his lathe. I'm amazed at what he can turn out. Very envious here.

For example he TIG welded up the base to my pipe crucible and rather than leave the weld he turned it down to be smooth arc.

Flask1.jpg
 
Question for you @Degen
How often do you use your CNC mill? Multiple times per day? Once per day? Once per week? Once per month?

There are times when more than a month will go by where my mill is used. That's actually true for my 3D printers too. Months will go buy before I touch them. Although I keep the table saw top clean (most of the time) I don't think I've used it in 6 months. OTOH, my soldering station, scope and meter are likely used at least once per week. AlibreCAD software at least once per week. Delphi once every few months. Same with a lot of the other software. All depends on the projects.

And there is the problem really. Like a musical instrument or even ballroom dancing, if you don't practice you forget. It comes back but in the case of the milling machine the occasional broken (expensive) probe etc.
Tough answer as it varies from week to week. CNC milling closer to daily, lathe weekly, drill press multiple times a week, soldering station weekly.

The main reason for CNC, is there are certain parts that I use a lot of and let the CNC work, load, run unload, repeat. During the run cycle do another task. I believe my shortest cycle is 3 mins, longest about 2-1/2 hours.

You can see CNC makes money as it frees time to do other work. Almost doubles your work capacity.

Currently evaluating CAD software for 3D work, in strong running is Progecad (3D Autocad alternative). For CAM software looking MESHCAM (Mastercam alternative), interesting in terms of functionality. Both would increase the use of the mill.

Ideally, if I can get mill run time up to 30 hours a week, I'd seriously consider larger mill/faster mill. ROI would be 6-9 months.
 

jcdammeyer

John
Premium Member
Well I finally found the bug in some PIC18 software. The last time I used some of the processor pins as inputs I correctly configured one register. Since then all the other projects always had those pins set as outputs so that config register didn't matter.
Added an 'i' command to look at all the ports.
Code:
PORTA=2C
PORTB=1D
PORTC=90
PORTD=EF
PORTE=01
>
The 'F' used to be a '0' but now it's correctly an 'F'
Now I can wire up LEDs and test and then get back to the mill. I need to make 25 of these.
AnodizedHeatsink.jpg
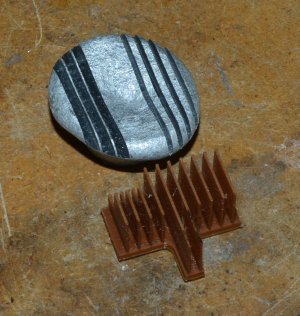
I've redesigned it to work with a 3mm mill.
Heatsink-Rev3.jpg
And 3D printed a sample which shows the cutter fits in between the fins.
MillCutterFit.jpg
The machine shop that used to make them is gone as the owner retired. They were cut on a HAAS at over 10,000 RPM. I can just get 3000. I'm more worried the backlash will snap a fin or end mill. They weren't cheap to make. About $35 each. So if I can make them here with a $5 material cost the CAD time is easily recovered.
 
Should be no issues. Carve out the layers slow and easy with a 4 flute bare Carbide Endmill. Do not use HS endmill too much flex.

If you don't mind the runtime 10 IPM 0.015 depth, 0.0.0625 step over, 2 IPM plunge should be fine. I would use a 0.125 end mill which is slightly smaller. I would like run at 20 IPM (and have).

Flood cool if you can keeps chip out and cutter cool.
 

Susquatch

Ultra Member
Administrator
Moderator
Premium Member
Once you have power feed on the X axis you'll wonder how you ever did without it.

That's how I feel about my DRO.

I had power X on my mill drill till it broke. Didn't see the piece of cardboard that got under the far handle. It caught and the drive stripped its internal gears. I'm selling the mill drill so all I'm doing is replacing the handle where the drive was.

I already know it's only a matter of time till I get power X & Z on my mill. I'd have already done it if I had no other priorities.

I use a drill drive on Z now and it would be especially nice to dump that.

And if you do decide to do it go with the approach that the drive could be controlled by a computer. Even if it's just an arduino with a pot for speed and buttons for direction. So Servo or Stepper means that you could, if you wanted move in the CNC direction.

This is probably solid advice. I don't know what I don't know. And who knows what might drive me to change down the road. It would probably be good to install a power X that could be used as a CNC drive down the road if I should ever want that.

But I think it's important to recognize that I am a hobbiest and farm machine repair guy. I don't even measure for the majority of stuff I do. My work can vary from eyeballed one-offs to a precision part. But I'll bet I only use my mill once a week if that. But sometimes I'll spend several days making stuff. Usually carefully and slowly.

I am old, semi retired, and a small farmer by western standards. My time means nothing in dollars and cents. Especially since I enjoy machining for its own sake. I make stuff for other people just for the joy of doing it, the appreciation, and I usually do it for free. The idea of saving time with CNC isn't a factor (or a goal) in my life at all. To the extent that it might make machining easier or faster, it might actually rob me of the joy of doing it myself. I'll never say never, but at my age it's prolly highly unlikely I'll ever be interested in CNC.

Don't recall if you have a knee mill. A friend who has the big brother to mine finally added some sort of 12V motor and several belt drive reductions. He runs it off a battery charger and is so happy to not have to hand crank the knee. He's also about 10 years older than me. He has CNC on his other mill and on his lathe. I'm amazed at what he can turn out. Very envious here.

My mill is a big floor knee mill. It is a Hartford Bridgeport Clone.

Ya, that knee crank is a beast. It turns quite easily, but I have to bend over to do it and I'd prefer not to. Adjusting the depth of cut is a zero issue. But raising or lowering a long distance to clear a big part is another matter.

I bought a castle adapter and use my big Dewalt 20V drill to do it most of the time. As I said above, someday I'll install a power Z, but the drill works and there are other things I want to do before that.

My neighbours and family are all envious of the work I do for them. And quite frankly, I even amaze myself at what I can turn out. But I think it's mostly because I have little to be compared with. I don't pretend to be an artist.
 

Bandit

Super User
John, that looks more like horizontal milling work, with a gang of cutters slotting a long bar stock, then cut to length and finish. Maybe a number of ways to skin that cat. Why are the fins length wise stepped at about 1/2 height?
 

jcdammeyer

John
Premium Member
John, that looks more like horizontal milling work, with a gang of cutters slotting a long bar stock, then cut to length and finish. Maybe a number of ways to skin that cat. Why are the fins length wise stepped at about 1/2 height?
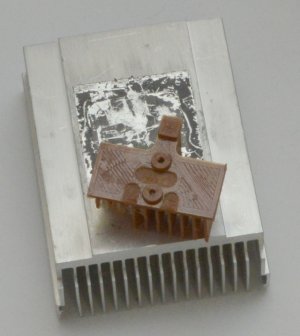
When I first looked at doing this in fact I played around a bit with a slitting saw.
TrialHeatsinkCutting.jpg
But time was such that I needed something quickly so instead I scrounged an old PC CPU heatsink and used my CNC router to modify the fin shape.
HeatSinkModel.jpg
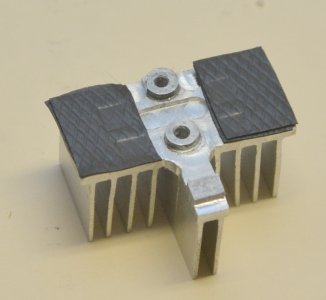
Into this:
Pads4Fets.jpg
The sil pads contact the high power transistors and the slots clear the larger surface mount capacitors. The tab and the screw holes have heatsink grease applied. The tab contacts the area where on the back side of the board the main power supply driver chip sits.

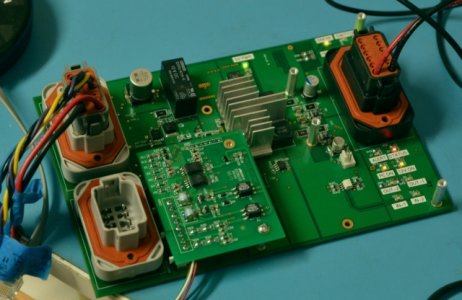
The cutout is to make room for the high voltage AC interface board.
PCM2.0_noFan-s.jpg
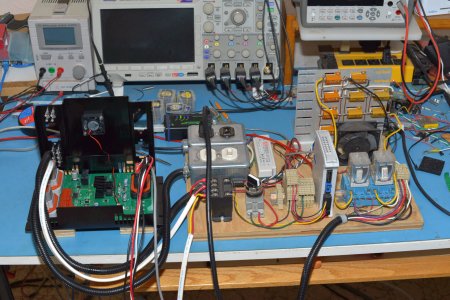
There's a fan in the lid of the box. In this photo is my test and exercise setup with load resistors to run the power supply at full output power. Verifies the separate high voltage AC and DC inputs. Relay and Input sensing etc.
TestSet.jpg

And Yes. If I had the horizontal mill version of my mill I would have done this with the slitting saw.
@Degen Thanks for the feeds and speeds info. I have until mid December before the parts ordered back in March arrive so I have some time to try making my own or finding a contractor to do them for me.
 
Top