A reply to the request for photos of the aluminum tooling and a few new models

Oldarm

John
First, thank you so much for the warm reception you have given me as a new guy on the block and also for the sensible questions posed. I hope I have been able to answer them in a like fashion.
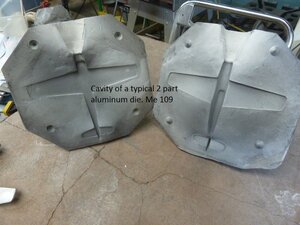
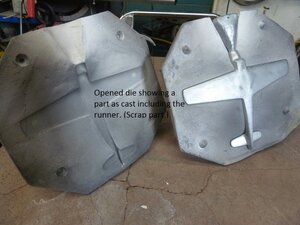
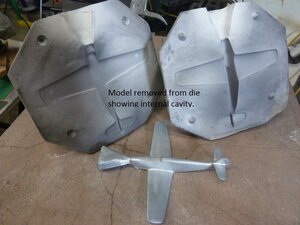
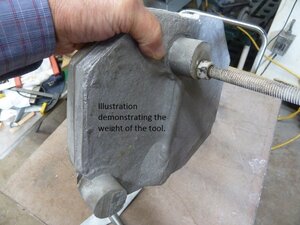
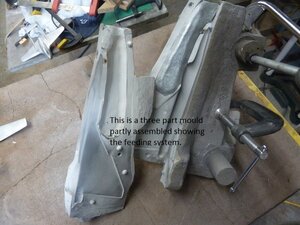
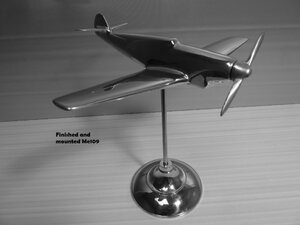
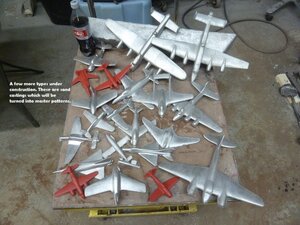
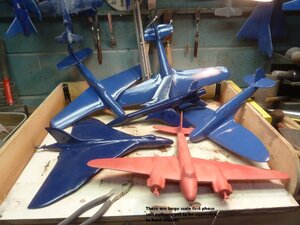
I have taken a few snaps today of the basic tooling I make which I think will give a better idea of the form it takes. As I say, it is hand manipulated and locked by means of "C" clamps as per the photo. The tooling is inherently light being made from aluminum, also seen in one of the photographs. Also attached is a photo of a three part tool as opposed to the simple structure of the two part die. Note also a few images of new types at various stages of patternmaking. The red and blue models are prime patterns before I turn them into aluminum masters.
 

Attachments

  • 1.JPG
    1.JPG
    136.2 KB · Views: 20
  • 2.JPG
    2.JPG
    126.8 KB · Views: 20
  • 3.JPG
    3.JPG
    129.6 KB · Views: 20
  • 4.JPG
    4.JPG
    136.4 KB · Views: 20
  • 5.JPG
    5.JPG
    154.8 KB · Views: 20
  • 6.JPG
    6.JPG
    147.4 KB · Views: 20
  • 7.JPG
    7.JPG
    71.2 KB · Views: 21
  • 8.JPG
    8.JPG
    194.6 KB · Views: 24
  • 9.JPG
    9.JPG
    146.9 KB · Views: 24
  • 10.JPG
    10.JPG
    138.4 KB · Views: 23

francist

Super User
That’s pretty nifty! We did a few pewter castings into two-piece aluminum moulds but they were machine routed. Your way is decidedly nicer — I had no idea it could be done that way.

Boy, do those ashtray stands ever bring back memories... :)

-frank
 

Oldarm

John
That’s pretty nifty! We did a few pewter castings into two-piece aluminum moulds but they were machine routed. Your way is decidedly nicer — I had no idea it could be done that way.

Boy, do those ashtray stands ever bring back memories... :)

-frank
Thank you Frank. I have not tried pewter in aluminum only rubber and RTV. Worth a thought.....
John
 

francist

Super User
The convenient thing about the pewter is it’s low melting point — around 460 degrees or something like that — so an ordinary hot plate and tin can crucible are all a person needs. Preheating the moulds was important, but the pieces my buddy was doing were quite thin and with cold moulds the metal didn’t flow well enough.

-frank
 

Oldarm

John
The convenient thing about the pewter is it’s low melting point — around 460 degrees or something like that — so an ordinary hot plate and tin can crucible are all a person needs. Preheating the moulds was important, but the pieces my buddy was doing were quite thin and with cold moulds the metal didn’t flow well enough.

-frank
Preheating the mould would be essential due to the massive chilling factor of aluminum also to dry off any moisture from the surface of the mould. I have witnessed some rather interesting Vesuvius like effects due to the introduction of molten metals into damp places. Believe me, even pewter at 450f has a knack of finding it's way into orifices you never knew existed! Been there!!!
On the subject of pewter, I am attaching a few photos of some very early types I cast many years ago in that medium. You may well find them of interest.
Regards,
John A V Roe Lancaster.JPG Hawker Hurricane.JPG Heinkel HE 111.JPG Short Sunderland.JPG
 

YYCHM

(Craig)
Premium Member
Are you 3D printing your models? Are the models consumed during the mold making process?
 

Oldarm

John
Are you 3D printing your models? Are the models consumed during the mold making process?
No, I build the master patterns by eye and hand and mistakes. There are many considerations which come into play during the generation of the model which I can usually resolve via modifications as I go along. The original model from which I make my hard master is a little fragile and has to be treated with a little bit of tenderness while ramming it up in sand. Touch wood, I have not lost one yet!
The aluminum model around which I envelope in liquid aluminum has the capacity to absorb an enormous amount of thermal energy particularly when it is coated in a “magic” protective coating. Think of a re-entry vehicle if you will.
So no, I do not destroy the master pattern.
Having said that, the floor was littered with lost patterns while getting the balance right!!!
All a bit of a mystery I know, but trust me it works. And, thanks for all the really pertinent questions. I think you have the sequence of events correct. It does take a bit of understanding and that is why I thought the lads and lassies on your site would be interested.
Sorry to ramble on and for any typos, thick fingers on a small iPhone!
John
 

PeterT

Ultra Member
Premium Member
Really neat, thanks for sharing. I'm still scratching my head why the molten aluminum would not stick/partially fuse to the female mold aluminum. Is there any kind of surface releasing agent treatment employed, or it just doesn't for whatever combinations of reasons? I've heard of centrifugal or (wrong terminology I'm sure) injected cast, bu I thought they were always steel based molds? Anyways, very cool artistic objects!
 

Oldarm

John
Really neat, thanks for sharing. I'm still scratching my head why the molten aluminum would not stick/partially fuse to the female mold aluminum. Is there any kind of surface releasing agent treatment employed, or it just doesn't for whatever combinations of reasons? I've heard of centrifugal or (wrong terminology I'm sure) injected cast, bu I thought they were always steel based molds? Anyways, very cool artistic objects!
Hi Peter,
Yes, a very thin thermal barrier is applied to the cavity and the rest of any thermal energy is dispersed by die mass, radiation and convection. The capacity of aluminum to undertake all these body blows is still quite amazing to me too.
John
 
Top