• Scam Alert. Members are reminded to NOT send money to buy anything. Don't buy things remote and have it shipped - go get it yourself, pay in person, and take your equipment with you. Scammers have burned people on this forum. Urgency, secrecy, excuses, selling for friend, newish members, FUD, are RED FLAGS. A video conference call is not adequate assurance. Face to face interactions are required. Please report suspicions to the forum admins. Stay Safe - anyone can get scammed.

Tips/Techniques 3DP Post Processing

Tips/Techniques

PeterT

Ultra Member
Premium Member
How about tips, tricks, fails & things we do to parts AFTER they are printed?

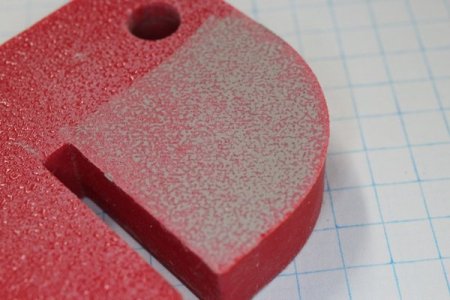
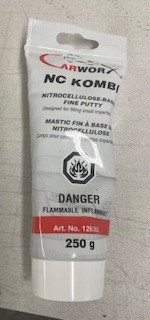
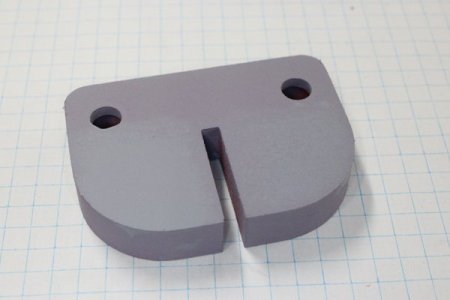
I'll start with this one. One of the things I want to do is make plugs or molds from 3D parts to then make composite parts The typical print striations & plate texture is not conducive to a slick finish so just messing around with common autobody supplies. I picked up this 1K putty, a brand I hadn't used before & spread it into some test surfaces just to see how it would fill and hold. This is generic PLA. Actually quite impressed. I thought it would flake off but adhesion was quite good. It sands predictably. I don't have any catalyzed 'Bondo' to try. Not sure if the styrene would play well but many thinners I wiped on PLA didn't affect it except acetone which does soften it slightly.

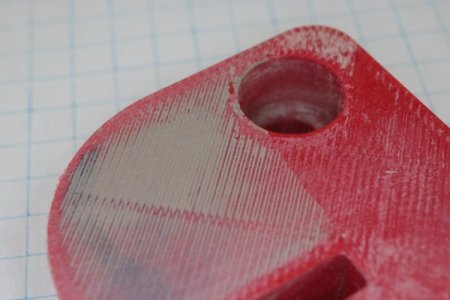
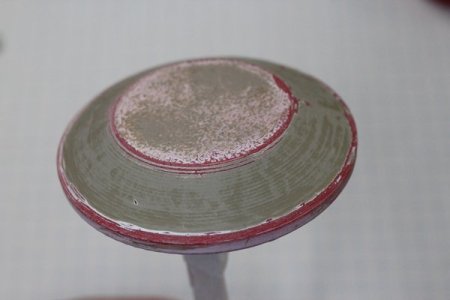
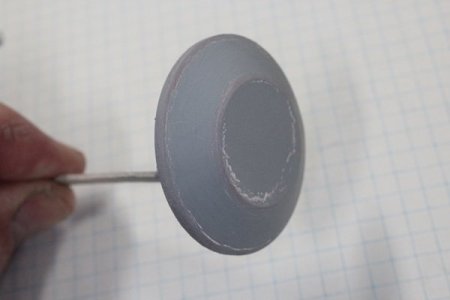
You just have to watch sanding into the plastic itself because it exposes that kind of what I call 'microscopic carpet' texture. The round piece had more magnified 3DP stair stepping due to the bevel print angle. You can see a test coat of white Tamiya primer intended for plastic models, just had it handy. That stuck well too. The grey is primer is regular Auto 1K. Again, no problem curing, or bonding to the filler or bare 3DP. I gave it a pre-wipe of paint prep which didn't affect PLA.

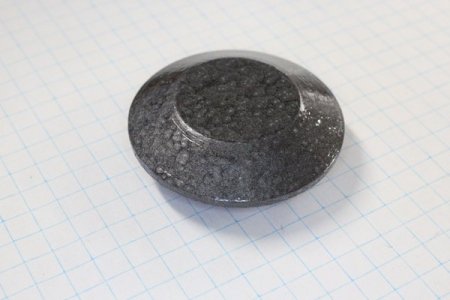
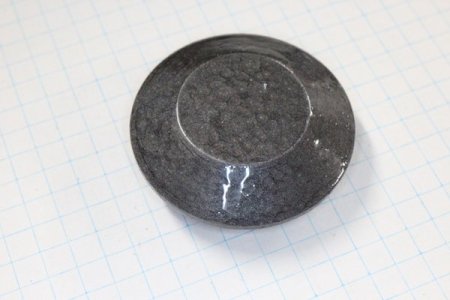
Casting soft molds like silicone from parts like these would be a no-brainer IMO. Hard molds are more challenging as they adhere much stronger to finishes even with proper mold release systems. Anyways, thats down the road.
 

Attachments

  • 011906.jpg
    011906.jpg
    44.6 KB · Views: 3
  • 011907.jpg
    011907.jpg
    35.2 KB · Views: 3
  • 011908.jpg
    011908.jpg
    25.1 KB · Views: 3
  • putty.jpg
    putty.jpg
    15.5 KB · Views: 3
  • 23012501.jpg
    23012501.jpg
    23.7 KB · Views: 3
  • 23012502.jpg
    23012502.jpg
    17.9 KB · Views: 3
Looks like I didn't take pics of regular rattle can spray bomb paints but they sprayed & cured predictably. I bought some of this 'Hammertone' paint for metalworking projects, it sprayed OK. I'm finding some hammer paints spray better than others, but haven't zeroed it down to brand or color. This is Rust-O-Leum dark which is kind of snotty thick, then it does its swirl magic on the surface. Then I had some leftover 2K clear from another job so gave it a swipe with a brush. Again no problem curing on the paint or bare PLA.
 

Attachments

  • 23012507.jpg
    23012507.jpg
    31.7 KB · Views: 2
  • 30012505.jpg
    30012505.jpg
    32.5 KB · Views: 2
Last edited:
I've been using (well testing) regular CA glue & seems to be holding reasonably well. Again, I was quite surprised. Plastics can be quite finicky.

This Gorilla clear was a complete fail, peeled right off on the bond surface even though the external joint seemed hard. I had high hopes because (I think) its a urethane based. But that stuff can act weird too if it doesn't have porosity.

Another forum was mentioning acrylic cement & by association some of the plumbers cement. I don't have any to test & probably (for the cost) wont buy any unless I have proof its awesome. If anyone does mess around, I'd be interested.
 

Attachments

  • SNAG-17-01-2025 11.11.08 PM.jpg
    SNAG-17-01-2025 11.11.08 PM.jpg
    153.5 KB · Views: 1
  • SNAG-17-01-2025 11.04.35 PM.jpg
    SNAG-17-01-2025 11.04.35 PM.jpg
    145.1 KB · Views: 1
  • 30012511.jpg
    30012511.jpg
    63.8 KB · Views: 1
Remember my sharpening jig? I wanted something thin & grippy & a bit cushiony. Found this stuff on Amazon pretty cheap. You can get it textured or smooth. Basically peel the adhesive backing off & stick it down. Its only ~1mm thick so reasonably conformable to simple curved surfaces I'd imaging. You see this stuff on commercial objects all the time like coffee mugs or things that need some grip. You could even inset the 3DP surface so its kind of flush & professional looking LOL
 

Attachments

  • 30012502.jpg
    30012502.jpg
    33.4 KB · Views: 2
For my cosplay armor I use uv cure resin. The stuff for resin printers. Mix it with different powders to get different thickness. Using non scented baby powder currently. Brush on let it smooth out. Freeze it with the uv light and then in to my little uv tub to fully cure. I have used body putty with good results. Lots of sanding. If you print with abs you can use acetone to smooth prints. I have also used a small heat gun with pla. If you do a search on the cosplay how to, you will get some of the people making armour that has a mirror finish. Does not even look remotely 3d printed.
 
Thanks. I have seen some YouTube videos on that stuff & other FX for movie industry, very cool. I've used lots of epoxy laminating resins but have yet to play with UV. I understand exactly what you are doing, done that too. Maybe you know already but Cabosil/Aerosil (fumed silica) is a good product to add viscosity to epoxy right up to a basically thick cream. But it cures glass hard, not for sanding. Historically baby powder was made from talc which increases viscosity too, but mostly makes the mix more sand-able because talc is a soft & a layer-like mineral. Its also common in putties. But talc was linked to cancer so modern powder is (corn) starch based for human skin. I actually haven't tried starch based from a sanding perspective because lately I've been having this strange iridescent glow from my crotch that has be concerned till I see a Doc

anyway, blah-blah - on some of my parts I may be a bit more conscious of dimensions so a thicker resin coating may or may not work depending on the application. I'd like to see some of your stuff one day. and you are welcome to try some Cabosil or other composite stuff I have laying around.
 
Last edited:
I've made a number of 3D printed patterns now and sand cast them with aluminum. Other than some really large ones it's been a while since I've done a pattern in wood.

The process is:
1. 3D print it with appropriate draft. Usually about 3 degrees.
2. Sand file any rough edges from poor 3D printing.
3. Spray with filler primer.
4. Use water soluble putty to fill in all the crap. Doesn't matter if it's rough.
5. Once dry a wet finger softens the putty and it can be smoothed.
6. Shellac the putty.
7. Spray with filler primer.
6. Sand looking for blemishes and dips.
7. More filler and shellac after it's been sanded and is hard.
8. More primer, wet sand (reason for the shellac so the putty doesn't disolve)
9. Spray with glossy paint.
10. Cast.

For example:
1. The 3D printed samples were used to verify the operation.
2. Then 3D printed patterns and finished them for casting.
3. Cast the parts.

1738571262186.png


And the end result.
1738571353409.png
 
I've made a number of 3D printed patterns now and sand cast them with aluminum. Other than some really large ones it's been a while since I've done a pattern in wood.

The process is:
1. 3D print it with appropriate draft. Usually about 3 degrees.
2. Sand file any rough edges from poor 3D printing.
3. Spray with filler primer.
4. Use water soluble putty to fill in all the crap. Doesn't matter if it's rough.
5. Once dry a wet finger softens the putty and it can be smoothed.
6. Shellac the putty.
7. Spray with filler primer.
6. Sand looking for blemishes and dips.
7. More filler and shellac after it's been sanded and is hard.
8. More primer, wet sand (reason for the shellac so the putty doesn't disolve)
9. Spray with glossy paint.
10. Cast.

For example:
1. The 3D printed samples were used to verify the operation.
2. Then 3D printed patterns and finished them for casting.
3. Cast the parts.

View attachment 59128

And the end result.
View attachment 59129
Very cool. Living the dream there John. That is basically my end goal for a pile of my coming projects. Making 3d print for proof of concept, prototype, then make the 3d printed pattern, finish the pattern, cast in aluminum, then machine and finish the final product.
 
Very cool. Living the dream there John. That is basically my end goal for a pile of my coming projects. Making 3d print for proof of concept, prototype, then make the 3d printed pattern, finish the pattern, cast in aluminum, then machine and finish the final product.
Thanks. Between hot summers and fire dangers and work-work and then life tragedy I've not cast in many years. That photo was from Sept 2021. I think I have about 8 or 9 patterns made now ready to cast.
 
I spotted a post on using Oakley Purple Primer for PVC as a glue for PETG. Anybody who has used this stuff knows that it is a thin liquid. I tested it on a couple test coupons of PETG and it works very well. It doesn’t leave a thick glue layer. It does soak into a joint very well. On the test coupons, the joint did not fail, it broke beside it. If you use a small amount of the primer, the two parts bond very fast and will not move. One shot is all you have. If you use almost too much, you have more time to set and place as you push the two parts together. Where the primer lands there can/will be some discoloration.
On the weekend I printed three of these in two parts. The dome that holds the nut was printed top up, and the remainder of the bracket was flipped upside down. This gave me a better finish on all sides and no supports required. I did use the bolt to align and help hold the parts together while spreading the primer around the joint. I did have to reprint one as the dome was off centered which I did not noticed when I brought them into contact. Operator error.
PLA will not bond with the stuff. I have not tried on anything else, as I have only PETG-CF and PLA at this time.
Pierre

IMG_9659.jpeg

IMG_9682.jpeg
 
I made a parametric storage box just for fun. Parametric = change the box dimensions drives all the other dimensions & features to self adjust. The box slot, lid dimensions, finger slot, friction wedge...
Anyway some corners & edges to clean up a bit with blade or light grit sandpaper. Its not hard work but got me thinking. If one had kind of miniature shoe shaped tip in a soldering iron with temp set right around filament melt temperature, could you just zip around all the edges & make a more controlled & aesthetically pleasing micro chamfer? Sanding is OK but it leaves a lighter open grain 'fur'. There are inexpensive digital irons but, but not sure minimum temperature would be too hot or how accurate they are. Anybody tried this?

1738643020203.png
1738643196500.png
1738643710203.png
 
.....ts not hard work but got me thinking. If one had kind of miniature shoe shaped tip in a soldering iron with temp set right around filament melt temperature, could you just zip around all the edges & make a more controlled & aesthetically pleasing micro chamfer? Sanding is OK but it leaves a lighter open grain 'fur'. There are inexpensive digital irons but, but not sure minimum temperature would be too hot or how accurate they are. Anybody tried this?
I use a deburring tool and a small block plane to chamfer the edges. The soldering iron works ok if you have a fine touch, though I found I was just a twitch away from ruining a nice print. The hand plane is much nicer!

I always use an internal fillet or chamfer in boxes, and on the outside too when possible which avoids the need to chamfer. The new printers have decent resolution so you will find that details such as the drawer slides can be printed with just the right clearances to do a good job with no cleanup. One setting to pay attention to is the gap between the brim and the part. If it is less than 0.35mm (PLA, PETG) or 0.5mm (Nylon, TGlase) there will be more cleanup needed.
 
Thanks @Arbutus kind of what I figured. I have a triangle type scraper for metalworking that works pretty good. The mini Noga style cuts well but takes a bit too much bite

In ancient times of balsa dust & dope (not that kind of dope) everyone had a cool hobby plane that used razor blades. Maybe there is a 3DP version.
 
Yes I also use my chamfering tool for cleaning up sharp edges. I haven't thought about the iron but I do have a hot air soldering station with temperature control and air speed control. Might be a way of 'fixing' odd looking prints.
 
Back
Top