Hi All,
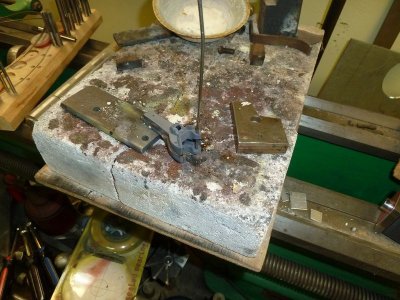
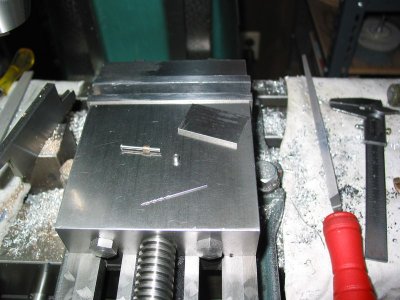
Have you ever had to cross drill a miniature pin? It is easy to do but everything is preparation. The pins in question had to be cross drilled at the end with a #63 drill so that a 1/32" dia. cotter pin could be passed through. The first photo is of the items needed to do this in my Millrite vertical mill. The square steel strip acts as a pin support parallel and is machined parallel so that its height sits just below the top of the vise jaws. It also needs to be slightly thinner than the head of the pin itself (5/32" dia) so it is 1/8" thick. Next, there is a support spacer which has an OD the same as the pin head diameter and is drilled through the same diameter as the body of the pin (3/32"). The drill bushing is last and its OD is also 5/32" and it is centre drilled through with a # 63 drilled hole. It is best if both of these parts are held in a collet in the lathe to ensure concentricity and the best drilling accuracy.
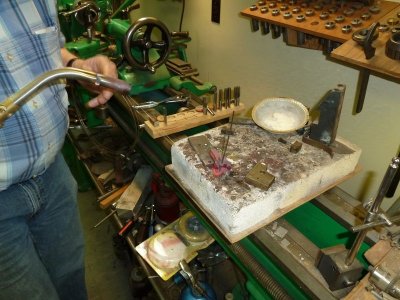
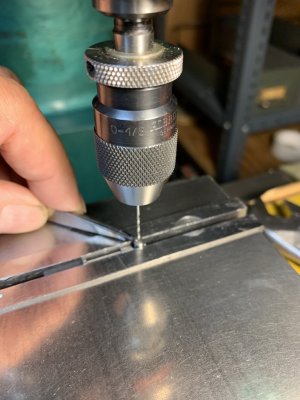
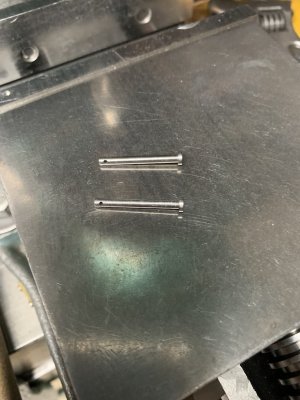
The actual setup to do the cross drilling is shown in the second photo. Since the parts are so tiny, long nosed tweezers help to position everything. The pin can be held fully on the support piece as shown (and you drill through into it) or the pin can be extended slightly out from the end of the support pice so you don't drill into it. Once positioned and the mill vise is tightened but not excessively (after tapping the pin assembly slightly to ensure everything is fully bedded on the support piece) I ran the drill at the highest speed my VFD would go and gently drill through. Sometimes, escaping chips from drilling will tend to lift out the drill bushing so use your long nosed tweezers to gently hold the drill bushing down in place as shown in the third photo, if needed. It also helps if one employs a precision drill chuck for the drilling operation. An Albrecht drill chuck is super expensive to buy but if it is not abused it will last a lifetime of precision drilling.
Have you ever had to cross drill a miniature pin? It is easy to do but everything is preparation. The pins in question had to be cross drilled at the end with a #63 drill so that a 1/32" dia. cotter pin could be passed through. The first photo is of the items needed to do this in my Millrite vertical mill. The square steel strip acts as a pin support parallel and is machined parallel so that its height sits just below the top of the vise jaws. It also needs to be slightly thinner than the head of the pin itself (5/32" dia) so it is 1/8" thick. Next, there is a support spacer which has an OD the same as the pin head diameter and is drilled through the same diameter as the body of the pin (3/32"). The drill bushing is last and its OD is also 5/32" and it is centre drilled through with a # 63 drilled hole. It is best if both of these parts are held in a collet in the lathe to ensure concentricity and the best drilling accuracy.
The actual setup to do the cross drilling is shown in the second photo. Since the parts are so tiny, long nosed tweezers help to position everything. The pin can be held fully on the support piece as shown (and you drill through into it) or the pin can be extended slightly out from the end of the support pice so you don't drill into it. Once positioned and the mill vise is tightened but not excessively (after tapping the pin assembly slightly to ensure everything is fully bedded on the support piece) I ran the drill at the highest speed my VFD would go and gently drill through. Sometimes, escaping chips from drilling will tend to lift out the drill bushing so use your long nosed tweezers to gently hold the drill bushing down in place as shown in the third photo, if needed. It also helps if one employs a precision drill chuck for the drilling operation. An Albrecht drill chuck is super expensive to buy but if it is not abused it will last a lifetime of precision drilling.
Attachments
-
 17 The Items Needed to Drill the #63 Drill Cross Hole in the End of the Knuckle Pin.jpg75.8 KB · Views: 19
 -
 18 Setup for Drilling the #63 Cross Drill Hole In the End of the Knuckle Pin.jpg65.5 KB · Views: 19
 -
 641 Gently Pressing Down on the Drill Bushing with Long Nosed Tweezers.jpg101.9 KB · Views: 19
 -
 642 Two Perfectly Cross Drilled Holes.jpg106 KB · Views: 19