• Scam Alert. Members are reminded to NOT send money to buy anything. Don't buy things remote and have it shipped - go get it yourself, pay in person, and take your equipment with you. Scammers have burned people on this forum. Urgency, secrecy, excuses, selling for friend, newish members, FUD, are RED FLAGS. A video conference call is not adequate assurance. Face to face interactions are required. Please report suspicions to the forum admins. Stay Safe - anyone can get scammed.

8x26, 8x30 Knee Mill: Removing Knee Leadscrew?

slow-poke

Ultra Member
I'm sizing the situation up for lead screw to ball screw conversion (knee) for my A1S mill.

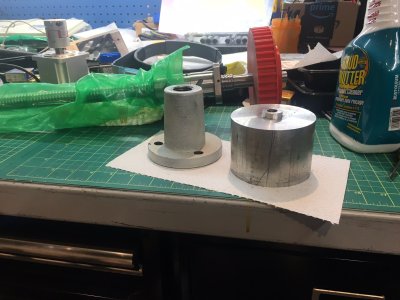
I cranked the knee all the way up, and then used a couple of ratchet straps to lift the knee a bit higher so the lead screw disengages the factory nut on the base. I then removed the three bolt cast iron pedestal nut thingy. So the lead screw is now hanging in the breeze attached (somehow) to the knee at the top. Hand crank is still in. The lead screw passes through a bearing in the knee and then above that is the gear on the top of the lead screw that mates to the hand crank gear. Obviously that top gear needs to be separated from the lead screw to allow the lead screw to come down. I'm not sure how that top gear is mated to the lead screw, key, roll pin? no idea and I don't have a proper manual.

What do I need to do to get the lead screw out?

Hoping/praying I don't need to take everything above the knee off.

Anyone take one of these apart?
 

Attachments

  • IMG_1120.JPG
    IMG_1120.JPG
    274 KB · Views: 10
  • IMG_1121.JPG
    IMG_1121.JPG
    354.6 KB · Views: 10
I don't know what manual you have but IIRC the CX603 is pretty close to your machine. The manual is still available from BusyBee.
Good luck.
 
@YotaBota , thanks for the CX603 manual tip.

Everyone, I'm trying to remove the leadscrew (437) ......

I managed to bend the tab down on leadscrew tab washer (416), and then remove the nut (415). With the nut off, the leadscrew can slide up and down about 1/4" (slight clearance with bearings) however it will not simply slide down and off the bevel gear (417), as soon as the bottom of the gear makes contact with the upper bearing (436) it stops.

I tried threading the pedestal nut (438), all the way up, thinking that it would act as a puller to pull the leadscrew down, however it just gets real tight and I don't want to force it.

Any ideas????


Knee.png
 
Last edited by a moderator:
Sounds like the gear is stuck on the shaft. If you can get a punch to the top of the shaft try a gentle tap and see if that loosens it off. You could also try using the shaft like a slide hammer and use the up/down play to try and tap the gear off.
There isn't a set screw in the bevel gear is there? I know the manual doesn't show one but,,,,,,,,
I suspected and was correct that the keyway for the bevel gear does not go all the way to the end of the shaft (as shown in the drawing), so when the key met the top of the bearing it stopped the shaft from being pulled down any further. I shifted the Y axis to move the ballscrew nut away from the bevel gear to give more clearance above and the gear slid off the top. With the gear off and the key removed it just dropped out easy peasy.

Getting there one baby step at a time.


***
The original leadscrew was driven indirectly via a pair of bevel gears, one on the hand crank shaft and one on the leadscrew. In theory I could machine the end of the new ballscrew to mimic the old one so that the original bevel gear could still be used allowing the manual hand-crank to be used If desired. With the new setup the servo will be driving the ballscrew (no longer using the bevel gears), IIRC driving the bevel gears in reverse is a problem, can one of you mechanically inclined verify this?
50731E8C-6B4B-42DC-B06B-2B57124DD145.jpeg


B8C294F9-0858-46A9-8E65-4637A17DFD3C.jpeg
 
Last edited:
I'm so envious. That project on my mill has been stuck at #42 for ages already.

Time to get greasy;-)

The good news is:
a) The leadscrew can be removed with the knee and everything above it in place.
b) It's quite easy to make and mount a servo bracket that puts the servo in a great position to drive the new ballscrew with a short belt and still clear everything and allow full Z- travel.
 
Last edited:
Time to get greasy;-)

The good news is:
a) The leadscrew can be removed with the knee and everything above it in place.
b) It's quite easy to make and mount a servo bracket that puts the servo in a great position to drive the new ballscrew with a short belt and still clear everything and allow full Z- travel.
Looking forward to photos on how you mount your motor and pulley assembly. Or hang on... You did that already. You are turning the lead screw not the nut right? It's me that has plans to turn the ball nut and hold the lead fixed.
 
Back
Top