Scam Alert. Members are reminded to NOT send money to buy anything. Don't buy things remote and have it shipped - go get it yourself, pay in person, and take your equipment with you. Scammers have burned people on this forum. Urgency, secrecy, excuses, selling for friend, newish members, FUD, are RED FLAGS. A video conference call is not adequate assurance. Face to face interactions are required. Please report suspicions to the forum admins. Stay Safe - anyone can get scammed.
Yours are MT2. I have purchased machinable MT3 in the past for use in my rotary table. At the time they had no R8. Any chance they had R8 where you got yours?
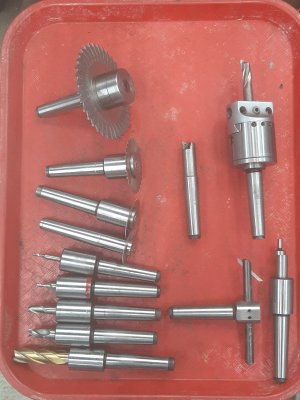
I purchased them at Busy bee for $10.50. I looked and they don't have R8 stubs.
I should practice my taper turning skills. I plan on making a MT5 to 5C adapter like Paul. I am just waiting for a super deal on some 5C collet set..
Modify another MT2 1" stub. I now have quick access to an edge finder holder.
I make most of them the following way.
-measure the 1"stub runout in my milling machine quill. .0005" is acceptable.
-dial in the 1" stub in the lathe 4 jaw chuck.
-drill under size.
-bore to .005" under size.
- ream to size.
- drill and tap for a set screw.
I have not done anything to harden the collets. So far they haven't worn much if any wear..
Most of the holders in the picture turn out better than .001" of runout. Some .0005'' like my mill spindle.
The single carbide cutter I made didn't work. I wasn't able to make the pocket accurately.
My 3 in 1 metal working machine was not working properly and needed some attention. It's a 40 inch busy bee brand, looks solidly made but poorly put together.
Fixed 6 problems and now it's much better. Fixes matches the numbers in the picture.
1. I made some clamping plate to hold brake beam. Because the pocket were the two SHCS are to large for the heads and don't clamp properly.
2. The brake beam uses two screws to prevent any movement once it's clamp down. Under stress it cracked the thin housing on the geared side. Made some larger block to distribute the pressure more evenly.
3. Made a longer guide to square pieces along the shear. The original guide was 2" the new is 4" long.
4. The clamping bar setup wouldn't clamp anything. Made longer screws and installed heavier springs.
5. The original roller bushing was hand filled round and oval in shape. ???
Made a new one.
6. The removable slip roller lock-in cam screw, which keeps the roller secured in its groove would open under load and the complete roller would pop out. Made a pin to keep the cam lever in lock position during use.
Another thing I did was to machined to the same lenght, all the individual brake plate so that they all were resting equally on the backing plate and the Vee groove.
Finally cleaned, adjusted the shear blade sliders and gap, the brake height and stoppers, greased all the pivot, sliders and gears.
Having worked on some good quality Diacro sheet metal machine. I never really liked this 3 in 1. But after this round of TLC I have warm up to it a bit.