curmudgeon
(Steve)
This won't be nearly as complicated as John's recent adventures with his Bosch fridge, but I do need some advice; later...
Our Bosch dishwasher has been awesome good for 11 years; quietly and effectively cleaning and looking good with it's custom cabinet door panels. It was quietly working away the other evening when it started making a very nasty grating noise. I checked and cleared the filters, removing some broken glass and soggy paper, but no joy - same awful noise.
After some no-fun time with Mr. Google I came across a very well done video showing how to replace seals and impeller on a very similar model -
I followed along with the video, improvising where our model was different and got the pump out with only one casualty, a rubber seal that I foolishly sliced with my screwdriver, and one curse directed at the designers for using a crimp clamp instead of a reusable hose clamp. When I got into the impeller I found a couple kernels of un-popped popcorn and thought "yay - not so bad....".
Reliable Parts brought the seal in overnight (no shipping charge) - A1 service, and I found a stainless hose clamp to replace the single use crimp clamp. I was a bit worried about my ability to reassemble without breaking something else, so catastrophized for a few days... Today, I was brave enough (and tired enough of hand washing) to tackle reassembly. It went well enough, and I eventually found a home for every fastener previously removed. The testing was successful enough that there was no smoke in the air, nor water on the floor, but although the noise was improved the pump was not building pressure like it should.
The impeller assembly in the video was not identical to mine, but what I hadn't realized the first time is that the two halves of the assembly are supposed to be firmly attached; not loosely connected as mine were. Here's a bottom view of a new (out of stock, no longer available) impeller assembly:

notice the green mushrooms; only one is broken.
My assembly looks like this:
![VEXh3CHOY0XVSFuXa6VCrfRSWBPOnOokXL0XZpBlLK8KALqqGDgxljhghsKWQpcaSgsJ8YMZ0F4-RcBPhKwyJf4kqDZbtdr1iA9D7R6Ec7X34rCkSOFOyoE06HKZfHjBzu9npcm-AzdmzvyhCQj95Ran037JvGLFxvn48IT68nG0EiWeygSnXNUm9dzw68KYVNBnNu2XkhjQFBF173zyfkoIhFnVPtZSDymzNJjv4p23O9wgMBh9VWRY7n5XPcxMv6zfB8TBVR7Vm7gokJNZLUSCe3CILSKkFkfLQRUONw55p_uaF62tnX3FdFpTBwW2lHmGSbMePt6zW0SbMIKknm5V7uUflZChHKiCcboprZXU3tEf8rd1NkqsYe0BDu_gfAKZX9dJDIh7mx9_Yig5BHwNUtOUQUBBvA3_yCSSALYgqInOTfaAB1jRgRixN2Iw1VRRQgcl-dGgR1iKrc9DUJReIDJA2BLOUAT0lWT40XdsxEVast4cyYSpQGtcWp2d6vGgYsv8HXSuJg0LhPQljoLPYHYYZcGI9CO4D62Qf75a0NRYlAU63CJZZT71DfVlWQ-MFxBVfPfCKWmfYZipZoxzdDcn88_7KWi3B_1JsZ-YV4ZNvP8Q3qc0rm31ErIOQrt8V7hLQ8wyKGZfyzS0mmrbHK1uJNxahXs5tPufBYi_MPboR_W5aVJ9aMx555DlOIGodiVg5ZqNd14L3qnSwOZJ6twXKLZ3ztHU3ux1_2ebaXay6Ry2u4ZPplpyrP_-hEGXTCVw9MykMIGpea5VU1okWKlDBI15e4UBmWKJnk-0VfH9GyqsKX6Z74ndkXrVk2ejhOwMMD50OFyPevcR8QgorNE5mJ66GjJKr-mOY2DO7wpZ3aXyCS_w5e_4IHDCwefSjZ9OEsMHfv75RjigvK9_1Kb_c_TWuPeE2Zy0oMT4=w905-h933-no]()
no mushrooms left. I mistakenly thought it was supposed to look like that. The lack of mushrooms allows the two halves to separate:
![RMjzF24ccjPpChQQizvpZUtnU7BaSJPB7c7uB17wg5UotdMwVoiWOcVw_LNfzv7l3MCymPxjlMgtHLjeunzrzhGbxK6qFqqS_HfEnlTmQvYiSICg7ShmDrawB2W0c-fjSKAwFzHdEnW8KV8NJZYv4B2iGEJpdS6tc06vfEsnHVfdKAoX608W1hv7EUG2bN6HXx1Xhwa7ranYnhhOUCWr0bNgnjrKzkGKFxbf3EbpBhN6jYicZv4cFD3sO_3xyjYrwIWuBLxSkXOEZ9148J3ymIISGItaQL1-Kxrd44FP13DHUDYXTGgpiKg-NyzP9YQLeWiVZDD_3FhMRjV37LEgLaBq3zFHy1PRCi9uUMhQroL0xnMXmbuhicIk2BOKmnjQUeNIWCJ8Syq0PddvAz2YezjRsA3YenTzfBkHfyxSenB0a-H4FG5a1XezyE8MRfIiXPOpAumKtnSCG_lhAasgXSwjQPiwy36MDNATYeFg-G73eiq4BBFxE-R4E4CWpndcZcPOddTcL-ZbqfBxS3jhPqJdQo647BIaeA2o77zOeH81MmBiOiM4_pxgaiCrKjosdk-Nm50WmTSHe9LkEbEfueooZWmvt5bYM86lomOkB3qocQ5yN7vKYBQUSwZv7KCm5GI-F-AO2ZoimpxP7sCrcQRfiYolR-8-mzupt36md1CvhX-ql9nYHADDZ8M5tGpybiCtLY-nyAYKVXBjWn53Cc_5p5gBOGF-mu5iMzTsJOThihiz_IUuAoSXWJOu2XryRupgSOr0h3__hzwMyw-kDjSIr0JGejq_kxN1syf494u8DGl1ElJwcSOH-Za3VLbAMHwxjSjvhNTnZSMwOgJ00-kU-VUCNzWaw44KRUXr-1t6lHW31gYmaK-anBWAn4yRD_8_PYxu_njYvPGu6Iaev5nS4oGpp-dh8gyO3kBESUAj=w1804-h933-no]()
There is enough clearance in the housing for the green piece to rotate at a much slower speed than the tan coloured piece and make noise as it rubs on the the housing
So far, I can not find a replacement for the impeller or the repair kit, 00167085, that includes it.
Do you think that JB Weld would be effective to glue the components together? A very thin layer between the parts and blobs on the bottom to fill the dimples in the tan coloured component and bond to what's left of the green coloured stubs. There's about 1/16" clearance on the bottom, so I can be a bit sloppy, er, I mean generous, with the JB Weld on the bottom. On the other hand, if I were really meticulous, I could cut off all of the stubs and replace them with tiny, stainless screws - seems like a lot of fiddly work that I would prefer to avoid.
Ideas? Thoughts? Anyone have a spare impeller stashed away in their "this is too nice to throw away" drawer?
-Steve
d
Our Bosch dishwasher has been awesome good for 11 years; quietly and effectively cleaning and looking good with it's custom cabinet door panels. It was quietly working away the other evening when it started making a very nasty grating noise. I checked and cleared the filters, removing some broken glass and soggy paper, but no joy - same awful noise.
After some no-fun time with Mr. Google I came across a very well done video showing how to replace seals and impeller on a very similar model -
I followed along with the video, improvising where our model was different and got the pump out with only one casualty, a rubber seal that I foolishly sliced with my screwdriver, and one curse directed at the designers for using a crimp clamp instead of a reusable hose clamp. When I got into the impeller I found a couple kernels of un-popped popcorn and thought "yay - not so bad....".
Reliable Parts brought the seal in overnight (no shipping charge) - A1 service, and I found a stainless hose clamp to replace the single use crimp clamp. I was a bit worried about my ability to reassemble without breaking something else, so catastrophized for a few days... Today, I was brave enough (and tired enough of hand washing) to tackle reassembly. It went well enough, and I eventually found a home for every fastener previously removed. The testing was successful enough that there was no smoke in the air, nor water on the floor, but although the noise was improved the pump was not building pressure like it should.
The impeller assembly in the video was not identical to mine, but what I hadn't realized the first time is that the two halves of the assembly are supposed to be firmly attached; not loosely connected as mine were. Here's a bottom view of a new (out of stock, no longer available) impeller assembly:

notice the green mushrooms; only one is broken.
My assembly looks like this:
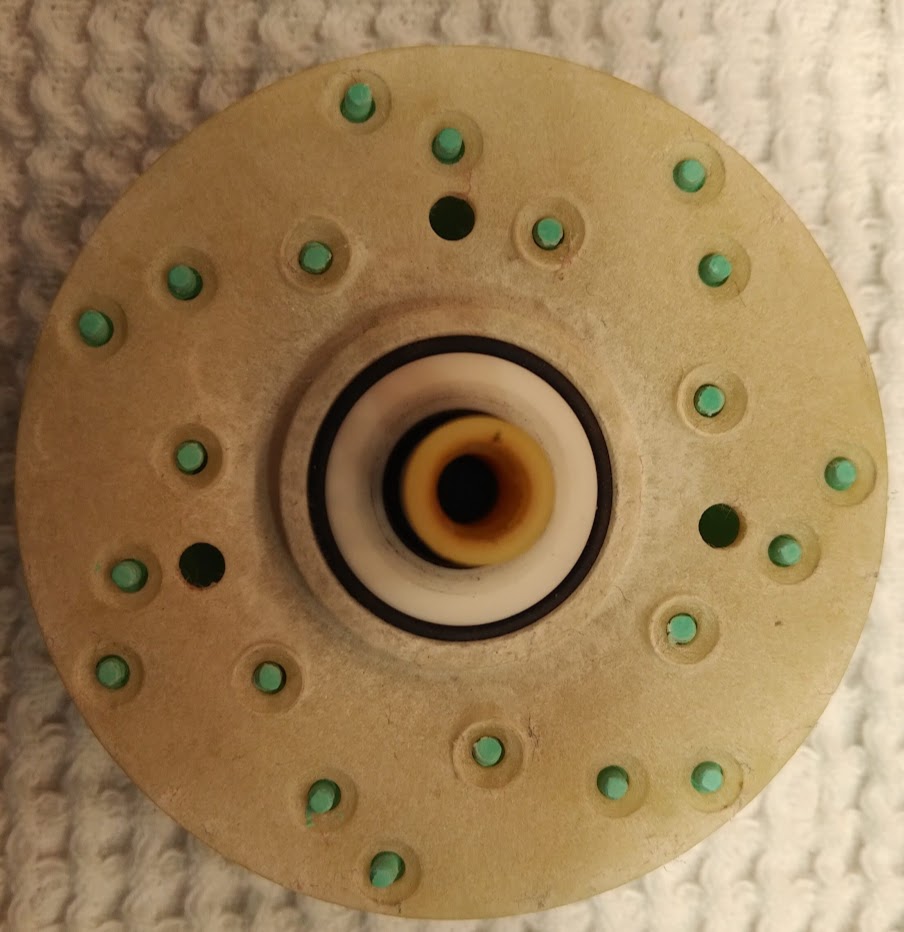
no mushrooms left. I mistakenly thought it was supposed to look like that. The lack of mushrooms allows the two halves to separate:
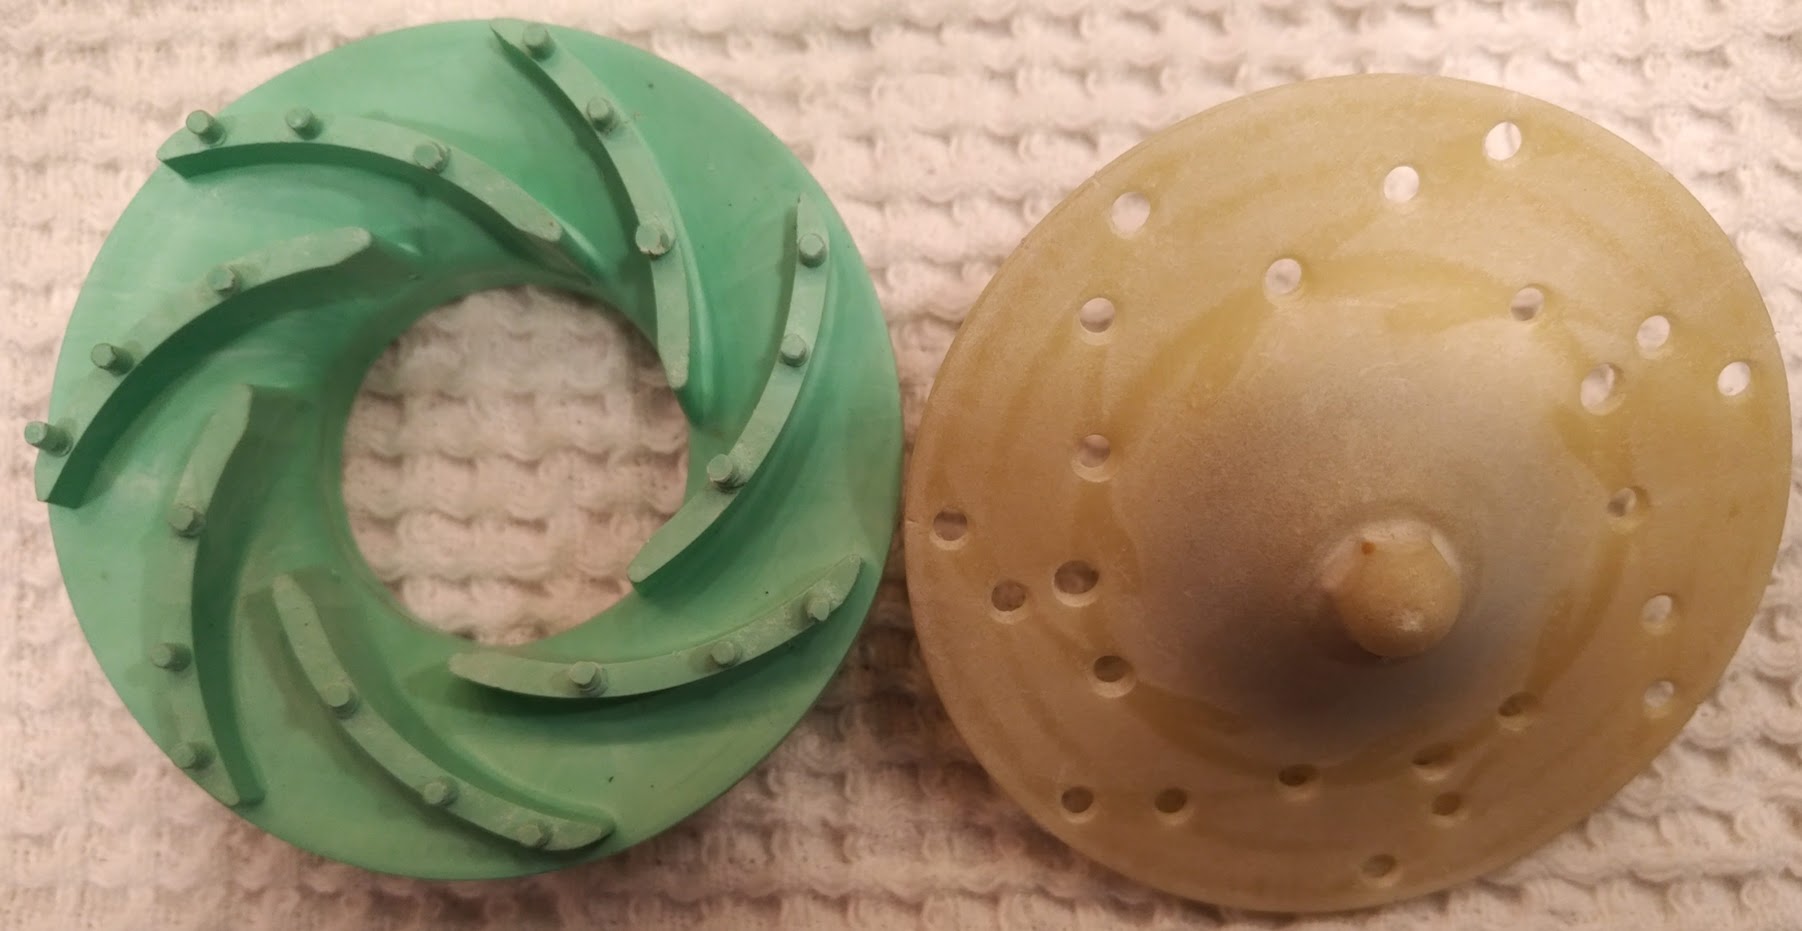
There is enough clearance in the housing for the green piece to rotate at a much slower speed than the tan coloured piece and make noise as it rubs on the the housing
So far, I can not find a replacement for the impeller or the repair kit, 00167085, that includes it.
Do you think that JB Weld would be effective to glue the components together? A very thin layer between the parts and blobs on the bottom to fill the dimples in the tan coloured component and bond to what's left of the green coloured stubs. There's about 1/16" clearance on the bottom, so I can be a bit sloppy, er, I mean generous, with the JB Weld on the bottom. On the other hand, if I were really meticulous, I could cut off all of the stubs and replace them with tiny, stainless screws - seems like a lot of fiddly work that I would prefer to avoid.
Ideas? Thoughts? Anyone have a spare impeller stashed away in their "this is too nice to throw away" drawer?
-Steve
d

