• Spring 2024 meetup in Calgary - date Saturday, April 20/2024. discussion Please RSVP Here to confirm and get your invitation and the location details. RSVP NOW so organizers can plan to get sufficient food etc. It's Tomorrow Saturday! you can still RSVP until I stop checking my phone tomorrow More info and agenda
  • We are having email/registration problems again. Diagnosis is underway. New users sorry if you are having trouble getting registered. We are exploring different options to get registered. Contact the forum via another member or on facebook if you're stuck. Update -> we think it is fixed. Let us know if not.
  • Spring meet up in Ontario, April 6/2024. NEW LOCATION See Post #31 Discussion AND THE NEW LOCATION

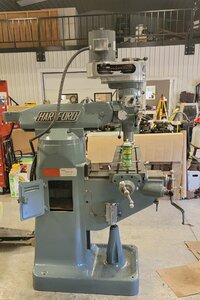
New to me Hartford Mill

Susquatch

Ultra Member
Administrator
Moderator
Premium Member
Just acquired a new to me Hartford Mill. I do not have access to 3ph power - only 110/220 so I can't actually run the machine yet.

Here is a quick link to the original thread about finding a good mill.

https://canadianhobbymetalworkers.com/threads/where-to-get-good-used-mill.3372/

Here is a link to the Bridgeport mill I acquired at the same time.

https://canadianhobbymetalworkers.com/threads/new-to-me-bridgeport-mill.3491/

Here is a quick survey of the mill and its condition as received:

Shyehorng Machine Tool
Taiwan
Imported by Clarkson
Machinery
Model 2S
Serial Number 792216 (also on casting Frt)
Date 1979 12 5

Motor 550V 3ph 2HP 1720rpm
20 thou x-axis over length
9 thou y-axis over length
Oil pump works
Y slides good condition, Ways ok, Gibbs good
X slides good condition, Ways ok, Gibbs good
Z slides good condition, Ways ok, Gibbs good

Bed looks good with a few peck marks
Not evaluated for flatness or raised bumps

Left Side
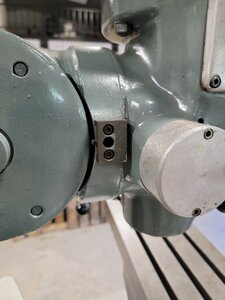
Forward/Back tilt
missing 25° limit pin
Head centered front to rear
Head Offset to right
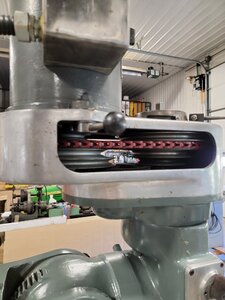
V-Belt Wierd
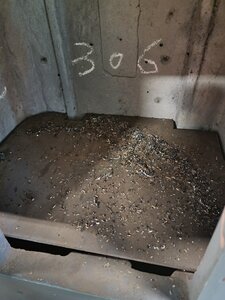
Chips inside base?
Chalk mark looks like
auction lot number

Right side
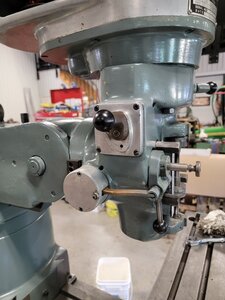
What does top cam do?
What does top lock do?

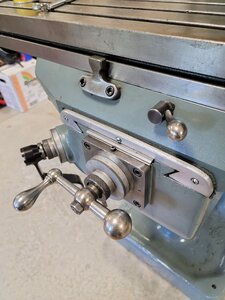
Front
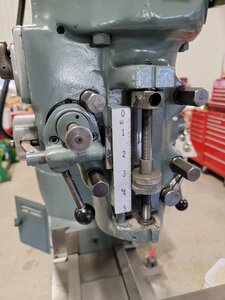
Table Lift lever is home
made but works
Table Lift lock not effective
Spindle lock doesn't work
No way to clamp R8
tools to tighten draw bar

Top
Draw bar has been
hammered on
Would not fit 3/4 socket
Fixed with tool grinder
Why? What else is
damaged/broken

Spindle
Rotates freely/smoothly
R8 key pin present but
loose
Hole at back of quill cap
Missing Allen screw

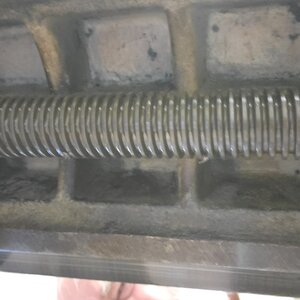
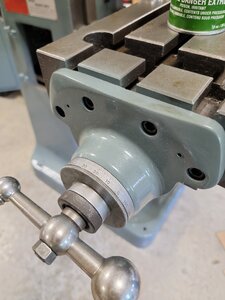
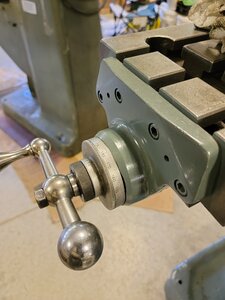
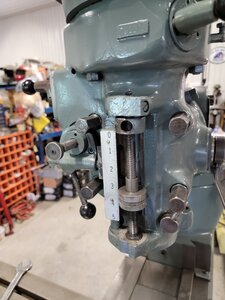
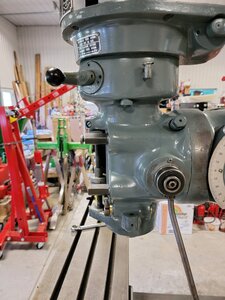
Here are some photos:

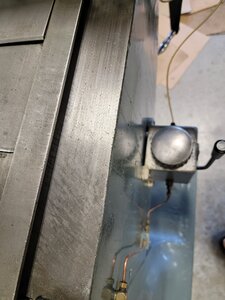
Hartford Left.jpg Hartford Head 2.jpg Hartford chips & Auction#.jpg Hartford Lead Screw.jpg Hartford Left Table Screw.jpg Hartford Right Table Screw.jpg Hartford Front.jpg Hartford Head Front.jpg Hartford Belt.jpg Hartford Head Left.jpg Hartford missing 25deg stop.jpg Hartford Ways.jpg Hartford Right Head.jpg
 
Last edited:

Brent H

Ultra Member
@Susquatch :

The top lever is the brake and lock for changing collets or slowing the machine down quickly.

The lever at the back (cam) is to loosen the motor quickly so it can rotate a bit and you can change the belt to a different pulley.

The stop pin should be a cheap repair.

The Vee belt is a link belt and is a good belt - especially on smaller diameter pulleys

Easy mill to change out motor to a 2Hp 3 phase and drive and speed control with a VFD.

Exactly the same mill as a Bridgeport step drive machine
 

Susquatch

Ultra Member
Administrator
Moderator
Premium Member
@Susquatch :

The top lever is the brake and lock for changing collets or slowing the machine down quickly.

The lever at the back (cam) is to loosen the motor quickly so it can rotate a bit and you can change the belt to a different pulley.

The stop pin should be a cheap repair......

....... Easy mill to change out motor to a 2Hp 3 phase and drive and speed control with a VFD.

Exactly the same mill as a Bridgeport step drive machine

It seems the top cam is on the drive pulley, not the motor. But it does seem to loosen the belt a bit. Maybe even enough to change the belt up or down. But it seems like I am forcing it to do that.

The front lever does not seem to provide any braking at all let alone enough to loosen or tighten the drawbar. I'm thinking it either needs adjustment or repair.

So, you and several others have mentioned 3 phase VFD. What is all involved in that? Keep in mind that I only have 220 in my shop. Even worse, the guy who did it only ran two wires - no neutral.

Good stuff on the step drive Bridgeport. I can probably get a manual for that from Bridgeport.
 

Susquatch

Ultra Member
Administrator
Moderator
Premium Member
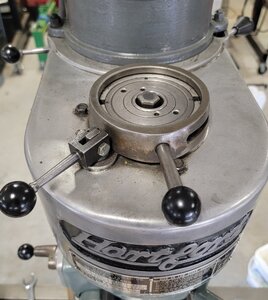
I mistakenly posted a photo of the top of the Hartford mill head in my Bridgeport thread.

It belongs here. So I deleted it there added the correct photo there, and added the top of the Hartford here.

20210606_184432.jpg

I was told by @Brent H that the lever on the top left is the brake. I assume it's the left lever in the photo above. But it doesn't seem to work. Any idea how to fix or adjust that?
 

Brent H

Ultra Member
You rotate the lever on the center section and then lift up the second lever to lock the brake in position. If the brake pads are worn out you will be able to rotate the lever to the end stop and the spindle will still turn. Adjustment is basically like a drum brake - there should be a video out there. The other variable speed head mill has a different set up and the brake is not really all that adjustable- it is, but not the same. I only use mine to change collets - the VFD will brake stop the mill pretty quick.

I added the 2 parts from the parts manual for your Hartford style head
 

Attachments

  • Pages from BridgeportSeriesIMillingMachine 1981.pdf
    1 MB · Views: 4
Last edited:

Susquatch

Ultra Member
Administrator
Moderator
Premium Member
You rotate the lever on the center section and then lift up the second lever to lock the brake in position. If the brake pads are worn out you will be able to rotate the lever to the end stop and the spindle will still turn. Adjustment is basically like a drum brake - there should be a video out there. The other variable speed head mill has a different set up and the brake is not really all that adjustable- it is, but not the same. I only use mine to change collets - the VFD will brake stop the mill pretty quick.

I added the 2 parts from the parts manual for your Hartford style head

Perfect Brent, thank you!

I'm thinking the brake is worn out. Too bad though. So far, there isn't much else wrong with that machine! I really like it! It might be nice to have a genuine Bridgeport, but it sure has a lot wrong with it.

I gotta keep in mind that I'm no skilled machinist. I do ok considering my lack of training but I doubt I'll ever run either machine anywhere near their limits.
 

Susquatch

Ultra Member
Administrator
Moderator
Premium Member
It is in great condition! Nice find!

Very very happy with it.

And THANK YOU for all the advice and giving me the courage to buy it! It's in WWAAYY better condition than the Bridgeport. I gotta watch out that I don't get blinded by the Bridgeport name. As I said in another post, I'm no machinist pro. Either machine will likely do everything I need. And frankly, I doubt I would ever use either machine to their full capability.
 

Dabbler

ersatz engineer
@Susquatch I really think you found a great machine, and I'm glad it didn't have any 'hidden red flags'.

on the VFD thing:

Doing a 220 volt motor with a VFD is very easy nowadays. I can point you to 2 great videos when the time comes if you need it. I've installed 2 for myself, and (un) helped Janger with his.

Advantages: I love my belt change BP clone now that I have a VFD. I change belts around once every 20 times I use the machine. The rest of the time it is in the 'middle' range and I use the VFD to use a motor speed of 200 RPM to 2000 RPM. The motor is safe to 3800 RPM, but if you are serious about VFDs I can explain why I don't use the entire range.
There is enough torque that I don't use the back gear any more - it is not even installed right now. If I need 60-500 RPM is change belts to low range and use the VFD.

Disadvantages: To get a TECO 510 with remote in 2HP (a nice size for a hobby machine) is just north of 300$, and then you need a 2HP 3ph 220V motor, which new is going for around 300 bucks. Getting a used 3PH motor used to be in the 20 buck range, and you might still get one in ON, I don't know. You will need around 150$ in enclosures and cabling - and I use connectors from the FVD to the motor, which adds a little, You really need a 2HP line filter. I got mine used for 50 bucks, but your price might vary. -- So price might be a factor

I'm building a 'little sander' and collecting parts for it right now. It will include a 3/4 HP totally enclosed motor wiht a cheap VFD. I haven't even considered going any other way.
 

Susquatch

Ultra Member
Administrator
Moderator
Premium Member
@Susquatch I really think you found a great machine, and I'm glad it didn't have any 'hidden red flags'.

on the VFD thing:

Doing a 220 volt motor with a VFD is very easy nowadays. I can point you to 2 great videos when the time comes if you need it. I've installed 2 for myself, and (un) helped Janger with his.

Advantages: I love my belt change BP clone now that I have a VFD. I change belts around once every 20 times I use the machine. The rest of the time it is in the 'middle' range and I use the VFD to use a motor speed of 200 RPM to 2000 RPM. The motor is safe to 3800 RPM, but if you are serious about VFDs I can explain why I don't use the entire range.
There is enough torque that I don't use the back gear any more - it is not even installed right now. If I need 60-500 RPM is change belts to low range and use the VFD.

Disadvantages: To get a TECO 510 with remote in 2HP (a nice size for a hobby machine) is just north of 300$, and then you need a 2HP 3ph 220V motor, which new is going for around 300 bucks. Getting a used 3PH motor used to be in the 20 buck range, and you might still get one in ON, I don't know. You will need around 150$ in enclosures and cabling - and I use connectors from the FVD to the motor, which adds a little, You really need a 2HP line filter. I got mine used for 50 bucks, but your price might vary. -- So price might be a factor

I'm building a 'little sander' and collecting parts for it right now. It will include a 3/4 HP totally enclosed motor wiht a cheap VFD. I haven't even considered going any other way.

OK, you have talked me into doing the required research - and learning something all-new to me. I guess my biggest issue is my own accilles heel. I never do anything so radical without getting a good understanding of it first......

I understand swapping motors. I also understand transformers. I don't understand VFD at all.

Looks like boning up on VFDs is as good a place as any to start.
 

RobinHood

Ultra Member
Premium Member
This is how I pictured a VFD in my mind when I first started learning about them (yes, I am a visual learning guy):

The VFD as pool of water. It is fed by a single garden hose (240V, AC, single phase). The pool feeds a waterwheel that only works when it has three little lines of water hooked up to it (240V, AC, 3 phase motor). The water (electric energy) comes into the pool (VFD) and is available for the waterwheel ( AC gets converted to DC through the magic of electronics inside the VFD). The three pool outlets have valves that can be open, closed, or pulsing the water to the waterwheel (electronics convert DC energy into three separate streams of AC, the parameters of which is controlled by the magic electronics inside the VFD). These valves are monitored and controlled by a computer that looks to see if the waterwheel is keeping up with the amount and quality of water it is fed, if there is a line break, if there is still enough water in the pool to supply the three lines, if the water is too hot, or if the garden hose is still supplying water to the pool, etc. Electronically that equates to frequency control, wire faults/short circuit, DC bus power control, overheating, input voltage control.

The control parameters are displayed on the VFD. Some smart person said that it would be very nice to be able to adjust those parameters, because after all, running at the same speed is just plain boring. So electronics were invented that allows frequency control ==> speed control of the motor. Then people got bored of having to adjust the parameters at the VFD box itself (like having to get up off the couch to change the TV channels); remotes were invented: in most VFDs today, the remotes are wired to the box (like on the early game consoles). Parameters that can be controlled range from On/Off, FWD/REV, Jog, Speed control, etc.

And this is how I picture the magic of a VFD...
 

Susquatch

Ultra Member
Administrator
Moderator
Premium Member
This is how I pictured a VFD in my mind when I first started learning about them (yes, I am a visual learning guy):

The VFD as pool of water. It is fed by a single garden hose (240V, AC, single phase). The pool feeds a waterwheel that only works when it has three little lines of water hooked up to it (240V, AC, 3 phase motor). The water (electric energy) comes into the pool (VFD) and is available for the waterwheel ( AC gets converted to DC through the magic of electronics inside the VFD). The three pool outlets have valves that can be open, closed, or pulsing the water to the waterwheel (electronics convert DC energy into three separate streams of AC, the parameters of which is controlled by the magic electronics inside the VFD). These valves are monitored and controlled by a computer that looks to see if the waterwheel is keeping up with the amount and quality of water it is fed, if there is a line break, if there is still enough water in the pool to supply the three lines, if the water is too hot, or if the garden hose is still supplying water to the pool, etc. Electronically that equates to frequency control, wire faults/short circuit, DC bus power control, overheating, input voltage control.

The control parameters are displayed on the VFD. Some smart person said that it would be very nice to be able to adjust those parameters, because after all, running at the same speed is just plain boring. So electronics were invented that allows frequency control ==> speed control of the motor. Then people got bored of having to adjust the parameters at the VFD box itself (like having to get up off the couch to change the TV channels); remotes were invented: in most VFDs today, the remotes are wired to the box (like on the early game consoles). Parameters that can be controlled range from On/Off, FWD/REV, Jog, Speed control, etc.

And this is how I picture the magic of a VFD...

Too funny! The water analogy is EXACTLY how I like to think about electricity too. I have even used your water analogy to teach basic electricity. It's a pretty good model for most electrical things.

But there is an old saying that I like. "The more you know, the more you know you don't know". That's pretty much how the story goes with me and high voltage. I understand low voltage stuff really well. I suppose you could even say I was an expert. I did extensive electronic design, sensor design, control systems, and programming for a large part of my career. But I stayed away from high voltage multiphase stuff for a reason. It's different, it's tricky, and it's dangerous. High voltage is a whole different field of expertise from low voltage.

The reason I am anxious to understand VFDs a lot better is rooted in my perception that a VFD does things to an electric motor that regular motors don't really like. In reading some of what folks here have referenced and the videos they linked, it appears that there are motors out there that are designed to be VFD tolerant. But if I have to buy a new motor, then I don't know why I wouldn't go straight to a replacement 220V motor. Or better yet a brushless Variable Speed DC motor.

Basically, I think I should be cautious about jumping in to the VFD water without first gaining an understanding of how they work and what their limitations are.

I'm also mindful that the optimum solution for the J2 Bridgeport might not be optimum for the pulley based Hartford. But it would be nice if it were so I could get them both working well enough to make a more informed decision about which one to sell and which one to keep.
 

Susquatch

Ultra Member
Administrator
Moderator
Premium Member
Too funny, I was just looking at that!


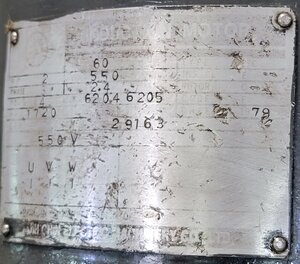
Hartford Motor Plate.jpg

This is the Hartford Motor. I expect that it is original.

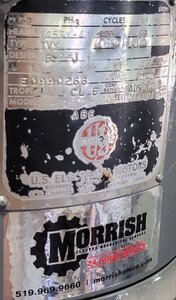
Bridgeport Motor Plate.jpg

This is the Bridgeport motor. It used to be 575 V. Now it is 430. The label under the motor tag is the company that rewound it.
 

Brent H

Ultra Member
@Susquatch : that label on the Bridgeport almost looks like it says 230 (which would also make sense) 5.75 Amps

2Hp = 746W x 2 = 1492 W V= 1492W/(1.732 X5.75 x .75) = 199 V/ 0.85% efficiency = 234 volts

A 430 Volt machine drawing 5.75 amps = 1.732 x 430 x 5.75 x 0.75 x 0.85 = 2730/746 = 3.69 Hp

So with the Bridgeport you could probably hook it up to a VFD right now out of the box and give it a go :)
 

Susquatch

Ultra Member
Administrator
Moderator
Premium Member
@Susquatch : that label on the Bridgeport almost looks like it says 230 (which would also make sense) 5.75 Amps

2Hp = 746W x 2 = 1492 W V= 1492W/(1.732 X5.75 x .75) = 199 V/ 0.85% efficiency = 234 volts

A 430 Volt machine drawing 5.75 amps = 1.732 x 430 x 5.75 x 0.75 x 0.85 = 2730/746 = 3.69 Hp

So with the Bridgeport you could probably hook it up to a VFD right now out of the box and give it a go :)

Good deductive reasoning.

But the seller said it was 430. I actually thought it said 230 too, but my bride convinced me otherwise. The seller said they had, and could get me, the rewind certification sheet from when it was done. I'll ask for a photo of it.

I agree that would be a huge time saver!
 

Susquatch

Ultra Member
Administrator
Moderator
Premium Member
You can try putting the spindle in high and rotating it clock wise - if the belt follows the pulleys it will gradually get stiffer to turn - not overly stiff though and the speed lever will tighten up as the belt comes into the position it should be at. You can check on things

HI Brent,

When you say clockwise, can I assume as viewed from the tool end - which is opposite of the direction a tool normally turns?

Or do you mean to turn it in the normal cutting direction - clockwise as viewed from above the Spindle.
 
Top