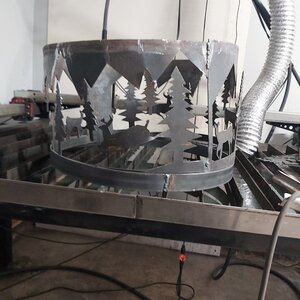
After doing the work that I have done with my plasma table, I've been trying to take it to the next level by shaping the cut plates as well. I managed to roll this 1/8" fire ring simply with a ring roller, and hammer; but how is it exactly that hemispheres are rolled? I'm feeling determined to learn how to properly shape fractions of a hemisphere so I can weld them together into a full sphere to use for a fire sphere or other purposes.
-
Spring 2024 meetup in Calgary - date Saturday, April 20/2024. discussion Please RSVP Here to confirm and get your invitation and the location details. RSVP NOW so organizers can plan to get sufficient food etc. One week to go! More info and agenda
-
We are having email/registration problems again. Diagnosis is underway. New users sorry if you are having trouble getting registered. We are exploring different options to get registered. Contact the forum via another member or on facebook if you're stuck. Update -> we think it is fixed. Let us know if not.
You are using an out of date browser. It may not display this or other websites correctly.
You should upgrade or use an alternative browser.
You should upgrade or use an alternative browser.
manual shaping machines
- Thread starter Chris Cramer
- Start date
I think the press would be better than a English wheel because going over cut edges like those shown would mark the wheels leaving impressions on the piece. I think I would try putting your desired shape under the plate and pressing it down using rubber between a top plate. Another option would be a planish hammer I built a head from scratch after looking at some cutaways on the web, printing them then measuring to establish a build scale.
I know it's been a while since this post Chris, but for some reason it's been bugging me. I've been up all night with insomnia anyways, and I started thinking about this again. I guess because in the absence of any of us here having a 200 ton stamping press and 24" die, there must be other options.After doing the work that I have done with my plasma table, I've been trying to take it to the next level by shaping the cut plates as well. I managed to roll this 1/8" fire ring simply with a ring roller, and hammer; but how is it exactly that hemispheres are rolled? I'm feeling determined to learn how to properly shape fractions of a hemisphere so I can weld them together into a full sphere to use for a fire sphere or other purposes.
The planishing hammer @Tom O suggests is a great way. In fact it seems everyone who learns how to use one has as his first project a dome that is smaller, but very similar to the hemisphere you want. I've made lots of them for artistic projects, but never that big. It's a fun and easy project, often finished off at an English Wheel...although you can do this all on a planishing hammer and it will look great. BTW, lots of fabricators who buy an English Wheel for the nostalgic and flex factor find that even though it looks great on the shop floor, they can do almost everything on the hammer faster and almost as nice. Most "affordable" hammers tap out at 18 gauge steel. The issue I find is that as the dome size increases in diameter, it gets harder to control the symmetry of the dome. If you've ever hand hammered a dome on a shot bag, you'll know what I mean. Below is a video that shows Ron Cavell in a planishing class making a dome.
A second method I thought of is using a bead roller to run lines towards the center of the disk (see pic) like spokes in a wheel. This will stretch the disk along the lines, doming the circle towards the shape you want. Personally, I would stop the spokes before they intersect in the centre; this will leave a flat spot ideal for attaching a handle. This method can be done with a hammer and section of round rod like coppersmiths used to do. You hammer the round rod on top; underneath you use a piece of angle iron welded to some flat bar. You weld the angle iron so its opening is facing upright on the flat bar and it forms a "V" shape. You'll achieve the same result, but it will be a hand hammered version of a rolled bead...if that makes sense. Using this method will put a series of lines in your dome, which you may or may not like depending on how artistic you prefer your projects. Using a shrinker/stretcher tool on the edges will help bend the dome even more. Lastly, although I haven't tried it, a tipping die on the edge will add a nice lip and strengthen the dome considerably if you have access to one.
Two final considerations for either the planishing or bead rolling method:
1) Order of operations. Something I learned years ago the hard way was that with hand fabrication it's a journey to a result rather than a process to the product. By that I mean unless you are very lucky, you'll probably not get the exact dimensions and look you originally intended. For that reason I make lids and domes first, so I can tweak the diameter of the cylinder it mates with on the slip roll or ring roller last. That's because it is easier to get it right on the slip roll than predict exactly how the metal lid will stretch on the bead roller or planishing hammer. When slip rolling you can creep up on the exact shape and can hand form small mistakes; but it's hard to go back when planishing to an exact size.
2) There are limits to the radius you can get. With planishing, if you tilt the sheet too far on a curved anvil, you'll get creases that need more and more work to planish out. A planishing hammer really only stretches—not shrinks—so you'll be constantly swapping from a radius anvil to just planishing (flat hammer and anvil) to make it look good. On the other hand, a bead roller can easily stretch so aggressively that you'll tear the metal trying to achieve the strong radius. In other words, with either of these methods you will get a nice dome, but it may not be as dramatic and uniform as you'll get with the 200 ton industrial press and die before to tear the metal.

Last edited:
They are fun machines aren't they? I'm no pro, but even making something passable isn't too hard to learn, and it's amazing to see the material transformed.Years ago I built a planish head by researching them to see how they worked using exploded diagrams that were measured then scaled to fit, machining only took a morning to do. I belive I brought it to the last meetup.
I think that all makes sense. if I use my bead roller with dies that have the correct radius, and roll the beads in layers surrounding the center then then I would end up with a dome that has an inner radius equivalent to the outer edge of the die. The only problem I see with that, is how much more stress it would put on the metal, most likely causing it to crack, unless its annealed perhaps.
I've been working with my new English wheel learned to shape curves out of sheet metal. With that I plan on shaping several plates that each make up 1/8 of the dome's circumference around the x axis and cover the top and bottom with bowls that complete the y axis.
I've been working with my new English wheel learned to shape curves out of sheet metal. With that I plan on shaping several plates that each make up 1/8 of the dome's circumference around the x axis and cover the top and bottom with bowls that complete the y axis.
Johnwa
Ultra Member
Here’s a video where they woks
https://fb.watch/2sIXshxKoX/
https://fb.watch/2sIXshxKoX/
What I was speaking about Chris was rolling beads towards the center, not surrounding it...like the spokes in a bike tire. The metal then forms a dome, similar to how the stars dome in this thread: https://canadianhobbymetalworkers.com/threads/garden-art-for-wife.2385/#post-28870I think that all makes sense. if I use my bead roller with dies that have the correct radius, and roll the beads in layers surrounding the center then then I would end up with a dome that has an inner radius equivalent to the outer edge of the die. The only problem I see with that, is how much more stress it would put on the metal, most likely causing it to crack, unless its annealed perhaps.
I've been working with my new English wheel learned to shape curves out of sheet metal. With that I plan on shaping several plates that each make up 1/8 of the dome's circumference around the x axis and cover the top and bottom with bowls that complete the y axis.
Either way, unless you have a high throat beat roller, you're limited to a dome depth of about 2" or whatever your machine is. For your BBQ project, I think you'd want a minimum of 6" likely. You wouldn't have this restriction with a planishing hammer as long as it allows full retraction of the bottom anvil. A 12" radius die would do a decent job.
yeah, sorry, I didn't word that correctly. I know what you meant, the thing is I would want to make a complete dome made up of beads all running towards the center, so they would need to be very close together to combine with one another and form an even circular dome.
Gotcha. I bet you'll figure something outyeah, sorry, I didn't word that correctly. I know what you meant, the thing is I would want to make a complete dome made up of beads all running towards the center, so they would need to be very close together to combine with one another and form an even circular dome.
")