• Spring 2024 meetup in Calgary - date Saturday, April 20/2024. discussion Please RSVP Here to confirm and get your invitation and the location details. RSVP NOW so organizers can plan to get sufficient food etc. One week to go! More info and agenda
  • We are having email/registration problems again. Diagnosis is underway. New users sorry if you are having trouble getting registered. We are exploring different options to get registered. Contact the forum via another member or on facebook if you're stuck. Update -> we think it is fixed. Let us know if not.
  • Spring meet up in Ontario, April 6/2024. NEW LOCATION See Post #31 Discussion AND THE NEW LOCATION

Little one day projects

BMW Rider

Super User
A lot of the things I use my lathe and mill for are quick little jobs to make something that I need or want. Not usually worthy of a full thread so I thought it would be good to have a thread to drop these project in from time to time as they are done.

With that, the first post being my most recent task to make some special fasteners for one of my motorcycles. I have a tank bag that uses an attachment base that fastens onto the filler cap using longer bolts with spacers under the ring. The issue is, the plastic tank cover panel that should be an easy job to remove for servicing the air filter now requires removal of the base ring as the panel will not come off over it. That leaves the fuel tank open while servicing the bike and my concern is things such as those little spacers could wind up in the tank.

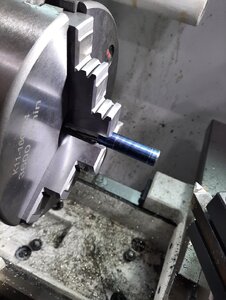
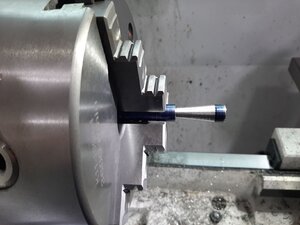
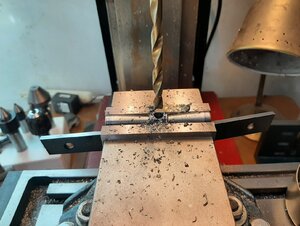
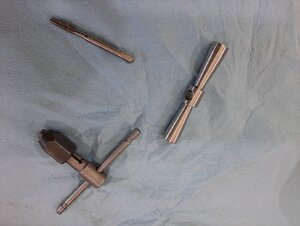
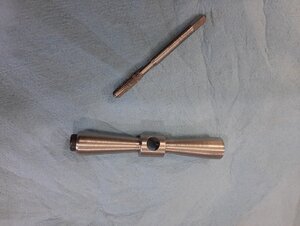
My solution was to make some new screws with a tapped head style that the ring can be fastened to and removed leaving the fuel cap secure. I started with some 8mm stainless hex bar and made the four required screws. I reused the original supplied screws by threading them to the head and cutting them shorter to suit. It also serves to raise the base ring, and thus the tank bag, up a bit higher which is good since the whole reason for this design is to keep it off the painted parts.

bolts1.jpg bolts2.jpg bolts3.jpg
 

combustable herbage

Ultra Member
Premium Member
Here is one I was working on yesterday, a little starter project which turned into a lesson learned I was getting so close to finishing and getting so excited so worried about a nice finish I didn't tighten down the tool post and well it dug in and seconds later it was all over such a stupid mistake.
I was seething yesterday but I am better now I'm keeping it in my shop coat for a while to remind me every day to make sure everything is tight.
The bottom one was my first attempt it was better but I took down too much and the threads were starting to show on the outside but they have been great learning experiences.


IMG_4811.JPG
 

BMW Rider

Super User
This project was for my Mustang. I changed the drive pulleys on the engine and wanted to change the belt tension from the old style slide to a turnbuckle type for easier tensioning. Since nothing is standard on this car, I chose to make it myself. I bought the two end links and had to get a left hand thread tap. The center barrel is the shop made part. Pretty simple machining on the lathe mostly, used the rotary table on the mill to do the hex.

Hardest part was getting the Canadian Tire parts guy to find the new size belt.

PXL_20210528_182118977.jpg PXL_20210528_205052629.jpg
 

turner

Active Member
Worth every moment, the best part will be when the car guys ask were you bought it.
One of a kind, the little things is what makes it yours.
I get it, Todd T.
 

ShawnR

Ultra Member
Premium Member
Finished a little project this morning. Would have been a one day project if I stayed with it...:rolleyes:

Joe P did a small tap holder that I thought would be handy to have. My main Tap and Die set is just a Mastercraft set, although I did end up with another tap holder somewhere. The M/C one leaves a bit to be desired but has gotten me by for years.

Material is stainless, .480" for some reason. Joe made his from 3/8 stock and I think I started going there, starting with 1/2" stock, then decided to upsize a bit. I don't use #4-#6 taps much but do use 1/4-5/16 lots so this should be ok for that.

As usual, it was an exercise in basic skill development for me..... The piece was so narrow that to drill the center to the final dimension, I would have drilled into my parallels so after drilling a small diameter pilot hole, I used the parallels at either end (looking precariously perched in the photo) to support the piece while I drilled the final dimension. My fixed jaw does not have a groove to support round pieces. That would be another good project, or use a machined sacrificial piece of aluminum or probably any number of other ways to do it but this worked out this time.

For scale, that is an M5 tap in the photo. I used it to tap the threads for the lock screw.


Attachments

  • 20210620_174527.jpg
    20210620_174527.jpg
    586.4 KB · Views: 16
  • 20210620_174402.jpg
    20210620_174402.jpg
    2.8 MB · Views: 18
  • 20210621_095418.jpg
    20210621_095418.jpg
    613 KB · Views: 19
  • 20210621_101005.jpg
    20210621_101005.jpg
    682 KB · Views: 19
  • 20210621_101037.jpg
    20210621_101037.jpg
    715.5 KB · Views: 21

BMW Rider

Super User
Pretty much zero machining content in this project. This was my Dad's fishing knife that he used from the earliest I can recall. Its a Premier Life Time H79 made in Solingen Germany, just 5 3/4" long overall with a 2 3/4" blade. It was always in his tackle box and when Mom sold the house and moved I found it and kept it. The leather handle had deteriorated badly and the blade was rusted. It sat on a shelf like that since. I recently became motivated to pick it up again and decided to clean it up and repair the handle. I disassembled the handle layer by layer and saved the hard phenolic and brass pieces to reuse. I had a piece of leather on hand and cut the new stacked layers and fitted them to the cleaned and polished blade. Once it was all assembled and the epoxy set, I shaped the new leather discs to form. Having the original layers book-ending the leather gave me a reference to determine the profile. I quick bit of sharpening put a very keen edge on it.

Now I need to fashion a sheath for it and put it back to work as my own fishing knife.

PXL_20210812_020930665.jpg
 

BMW Rider

Super User
This one ended up being a bit more than one day due to some re-engineering required of the ratchet strap. Its a lifting device to help pick up a toppled motorcycle, specifically my BMW F850GSA. Sometimes road conditions lead to the bike taking a nap and lifting it back up can be a bit of an effort. Basically, the strap gets looped under the bike and hooked on somewhere secure like the foot peg, then the ratchet strap is cranked up lifting the bike back to vertical or close enough to it to be easily finished manually. There are some ready made versions available to purchase, but cost far more than what it did to make my own, and even so, why buy what I can build. PXL_20210915_182817341.jpg PXL_20210915_182855243.jpg PXL_20210915_190248346.jpg
 

Tom O

Ultra Member
I thought that was why the crash bars were put on them to get the rocking action to get it back up.
 

BMW Rider

Super User
The crash bars protect the vulnerable bits and do offer some lifting points, but a 500Lb bike is a lot to lift alone.
 

Tom O

Ultra Member
I was told that by rocking it on the crash bars protecting the opposed cyl heads it made it easier to get it upright not like the Harleys that lay flat and is a dead lift I still sport the resulting vertebrae protruding from mid back.
 

BMW Rider

Super User
The R1250GSA has the boxer engine but it's a vertical twin engine in the F850GSA. It lays down pretty flat. I can lift it in ideal conditions, but it's never ideal conditions when it naps. There are techniques that can make the dead lift easier, but again, in ideal conditions. My last trip to BC I ended up dropping it in a drainage ditch across a deactivated road. I could get the bike up about 3/4 to vertical, but would run out of lift range as I was standing in a low spot. I couldn't get a low enough grip to get it all the way up. with this device I would be able to get it most of the way up and get the lower grip to finish the job. I was pretty tired and my back was sore by the time I finally managed to get the bike righted.
 

kevin.decelles

Jack of all trades -- Master of none
Premium Member
Great idea! I’ll be throwing a ratchet strap into my hard bags for sure. Lifting a downed bike is easy — when it is flat ground, you are 25 and you have 6’ of clearance around the bike on all sides.... I’ve yet to have all those conditions met


Sent from my iPad using Tapatalk
 

BMW Rider

Super User
Todays job was one of necessity. I was wrapping up a valve clearance check on my F850GSA and was reinstalling the crankshaft access plug when I discovered it was made of cheap plastic and could withstand almost no effort to tighten it in place. The flange broke off completely. A replacement would probably be weeks away and cost more than any piece of crappy plastic could be worth, so I made a new one myself. It was a bit tricky doing the threads, M24-1.5. They are only about four full threads on the shallow plug so I just ended up turning the lathe manually to cut them in. Took a bit of time but it all worked out. I used a piece of allen key to broach the socket in the cap for tightening it in place.

PXL_20211105_200848076.jpg PXL_20211105_200910790.jpg
 

YYCHM

(Craig)
Premium Member
Sounds like a good 3D Printer project. What material did you use?
 
Last edited:

BMW Rider

Super User
Looks good. Do you have a rotary broach?
No, I just ground the end of a piece of 12mm alley key to have sharp edges and used my press to broach it. Took a couple runs to get it loose enough for a slip fit of the key. Not ideal, but also not a high use part, just once every 20,000 kms for valve checks. I hardly have ever needed to do any broaching, but a rotary broach would be nice to have someday.
 
Top