• Spring 2024 meetup in Calgary - date Saturday, April 20/2024. discussion Please RSVP Here to confirm and get your invitation and the location details. RSVP NOW so organizers can plan to get sufficient food etc. One week to go! More info and agenda
  • We are having email/registration problems again. Diagnosis is underway. New users sorry if you are having trouble getting registered. We are exploring different options to get registered. Contact the forum via another member or on facebook if you're stuck. Update -> we think it is fixed. Let us know if not.
  • Spring meet up in Ontario, April 6/2024. NEW LOCATION See Post #31 Discussion AND THE NEW LOCATION

Help with threading on a cx709

Marknb

Member
I’ve been trying to single point thread on my cx709. I picked a 16tpi thread to practice with because that’s what I plan to cut in the future.

I keep running into the issue of the threads moving for lack of a better term.

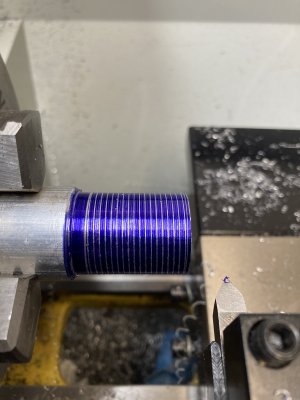
The first pass is fine, matches the thread pitch gauge. 12A347B3-7B9E-4E44-A9DF-AAED7F08BD7E.jpeg

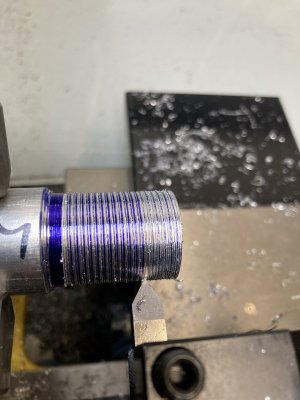
2nd pass is usually good too. FCF8692F-6F0B-4774-8BB8-C75736A57E26.jpeg

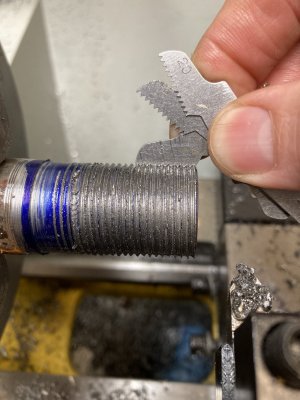
Third pass is where the wheels fall off. E0D3C7EB-B23B-4D0F-BDEB-68D9ECE81AD2.jpeg
and then it gets worse. B83931BF-566E-4BBE-9427-1C0FE9C102C6.jpeg

I’ve tried both carbide inserts and hss threading tools. I’ve fed with the compound, I’ve tried using just the cross slide.

Ive left the half nut engaged and reversed out, Ive disengaged the half nut and picked up the threading dial. I get the same results no matter what I try.

im trying to figure out if it’s completely me, or an issue with the lathe.

thanks

edit - I’ve been practicing on aluminum, i’ll try it on steel after supper.
 

DavidR8

Scrap maker
Administrator
Moderator
Premium Member
Are your change gears on nice and snug?
Edit: in the second pic it looks like the thread was picked up in the wrong place.
@Marknb was that pic taken after having reversed back to the start or after having picked up on the thread dial?
 
Last edited:

Marknb

Member
Those pictures are all from reversing out.

I think the gears are tight, I’ll double check when I go back out to the garage.
 

DavidR8

Scrap maker
Administrator
Moderator
Premium Member
It seems to me (and I'm no expert) that that kind of mis-match would stem from lash in the drive train somewhere. Either gears or lead screw.
That said, once the lash from reversing is taken up it would seem that the lash would be a non-factor.
@PaulL perhaps can chime in.
 

Susquatch

Ultra Member
Administrator
Moderator
Premium Member
I've seen that happen when the part isn't chucked firmly enough.

I've also seen guys reverse the lathe without retracting the tool first.

Usually, the gears are keyed, so it isn't too likely that they are slipping. But it's worth checking to see if the key is missing. No key is required on the intermediate shaft/spool/bearing. Only on the spindle output gear and the lead screw input gear.

Check to see if your shear pin on the leade screw is broken. Same thing if you have a saddle gear drive system that is pinned.

Check to see if your threading tool and tool holder are moving.

But first check the part itself.

Not sure about your lathe. Some lathes have a lever for parting vs feeding. Make sure your lathe is set properly for threading.
 

combustable herbage

Ultra Member
Premium Member
My 2 cents would be perhaps tooo much backlash and he is starting the threading again too soon before the backlash is taken up if not disengaging or possibly the threading dial is loose or slipping.
 

DavidR8

Scrap maker
Administrator
Moderator
Premium Member
This is a long shot because you said that the pics were taken after reversing. (Assuming you meant running the lathe in reverse and not running the lead screw in reverse.) Are you using the half nut lever to move the carriage back toward the headstock?
Because if you are it change the position of the threading dial and its position relative to the lead screw which would cause the kind of issues the pics show.
It's essential that the half nut lever is only engaged at the correct dial position.
 

Marknb

Member
Thanks to everyone, especially David_r8. As with most problems, it was user error.

I was reversing the lead screw to back out, instead of reversing the machine. I knew I was inducing back lash, but I thought that’s how it was done. Things get overlooked between you tube and actually doing it at the lathe. I even read the manual, it tells me how to do it properly, and I still did it backwards.

They’re not pretty, and there’s plenty of room for improvement, but for now I’m calling them threads.

9D3F6C4D-F50E-4C03-940C-D7BBF5B48AF0.jpeg


thanks again
 

Susquatch

Ultra Member
Administrator
Moderator
Premium Member
Awesome!
Happy to help :)

Wow. How the heck did you pull that one out of your hat? It wasn't even on my radar screen!

I am thinking maybe you deserve honourary "Walks on Water" status for that white rabbit you just produced......
 

DavidR8

Scrap maker
Administrator
Moderator
Premium Member
Wow. How the heck did you pull that one out of your hat? It wasn't even on my radar screen!

I am thinking maybe you deserve honourary "Walks on Water" status for that white rabbit you just produced......
I’ll chalk it up to experience.
I did exactly the same thing as the OP the first time I single pointed.
 

PeterT

Ultra Member
Premium Member
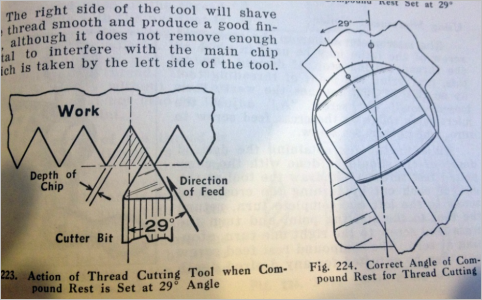
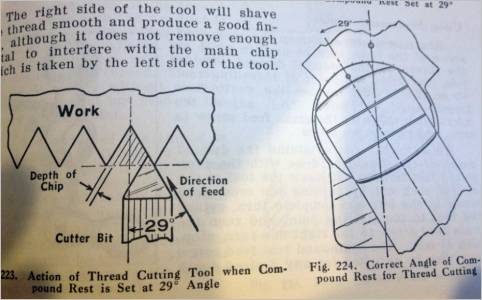
Have you set your compound at 29.5-deg with the operator side kicked out to the right like so? (which BTW may not match what your compound degree increment says, for example it may show 60-deg).

1683170232652.png
 

Susquatch

Ultra Member
Administrator
Moderator
Premium Member
Have you set your compound at 29.5-deg with the operator side kicked out to the right like so? (which BTW may not match what your compound degree increment says, for example it may show 60-deg).

It might not be obvious to @Marknb why you are asking.

Peter is looking at how rough your threads are. The 29.5 is designed to help make better threads by providing successive skim passes. If you accidentally set it at 30.5 it gets even worse.

I also wish lathe manufacturers put two way 360° scales on all compounds.
 

PaulL

Technologist at Large
Premium Member
I’ve been trying to single point thread on my cx709. I picked a 16tpi thread to practice with because that’s what I plan to cut in the future.

I keep running into the issue of the threads moving for lack of a better term.

The first pass is fine, matches the thread pitch gauge. View attachment 34146
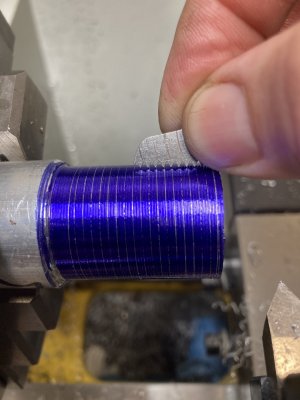
2nd pass is usually good too. View attachment 34147

Third pass is where the wheels fall off. View attachment 34148
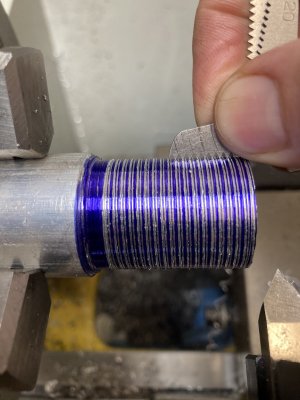
and then it gets worse. View attachment 34149

I’ve tried both carbide inserts and hss threading tools. I’ve fed with the compound, I’ve tried using just the cross slide.

Ive left the half nut engaged and reversed out, Ive disengaged the half nut and picked up the threading dial. I get the same results no matter what I try.

im trying to figure out if it’s completely me, or an issue with the lathe.

thanks

edit - I’ve been practicing on aluminum, i’ll try it on steel after supper.
Are you reversing with the motor or with the gearbox? The gearbox is *not* repeatable. You must reverse with the motor.
 

Susquatch

Ultra Member
Administrator
Moderator
Premium Member
Are you reversing with the motor or with the gearbox? The gearbox is *not* repeatable. You must reverse with the motor.

Our forum magician @David_R8 already figured it out...... LOL!

Edit - didn't see your last note till after I posted.
 

PeterT

Ultra Member
Premium Member
Peter is looking at how rough your threads are. The 29.5 is designed to help make better threads by providing successive skim passes. If you accidentally set it at 30.5 it gets even worse.
Yes I should have clarified. A bigger potential problem is if your compound position was inadvertently set at ~60-deg based on what the compound angle scale reads (but it typically reads relative to a different lathe reference angle). This would show up as weird geometry, shallow angle, truncated, asymmetrical threads and bad finish. Your pics look like the thread form is basically there but yes, a bit rough finish. A nominal 30-deg compound set would initially seem to make sense because its half of 60-deg included thread angle. But cutting predominantly on the leading edge each pass improves finish so that's the reason for backing it off 0.5-1.0 deg (29.5 - 29.0) and it usually helps. Exceeding 30-deg as @Susquatch says works against you. Now this angle business is only relevant assuming the cutting tool is accurately 60-deg & positioned square to the work. We all start with scrap steel practicing threading but the reality is some alloys cut like sh*t so don't feel bad about first attempts. Get the hang of it & then spoil yourself on something like 12L14 which will cut much smoother all things equal. There's lots of goof threading posts & info on the forum, just do a search. Good luck.
 

Marknb

Member
The compounds around 30 degrees. I don’t really Trust the scale on it and don’t have a decent angle finder. I’ll adjust it slightly and see if things improve.

I had initially set The scale at 30°, but eventually realized it needs to read 60° on my scale to put the compound at the right orientation.
 

Susquatch

Ultra Member
Administrator
Moderator
Premium Member
The compounds around 30 degrees. I don’t really Trust the scale on it and don’t have a decent angle finder. I’ll adjust it slightly and see if things improve.

I had initially set The scale at 30°, but eventually realized it needs to read 60° on my scale to put the compound at the right orientation.

I'll try not to over complicate here but yet still add some insights that I don't think you get on YouTube.

Lots of folks cut threads without using the 30 degree thing. They just plunge in deeper and deeper using the cross-slide. There are good reasons for that. But that's another discussion.

For those who use the compound, a pure 30 degree advance only cuts the metal on the left edge of the tool bit. Each successive cut removes a wider slice. So the load on the tool increases with each cut. That can make the tool bounce a bit as the thread advances.

This can be compensated for by reducing the amount of the advance with each cut. That adds math errors. Another way to compensate is to add a little load by cutting on the right trailing edge a bit too. A nice half degree on the trailing edge acts like a clean up cut on that edge and also dampens the chatter from the main left cutting edge. The result is cleaner looking threads on both faces. That's the theory as I know it anyway.

If you look at the whole process as mostly cutting on the left side of the tool cutting in at 30 degrees, and then shift the compound another 1/2 to 1 degree to shave a bit on the right side too, then the whole process becomes visually obvious and you will never need to figure out whether it's 30 or 60 or 29.5 or 30.5 or 59.5 or 60.5.

It's all just a straight slide down the right face of the thread cutting on the left, and a half degree shift to the right for clean-up and chatter smoothing. Peter's drawing (copied again below) showed the left edge cutting process quite well. What it doesn't show is the slight cleanup / rigidity improvement that happens on the right edge that results from the 1/2 to 1 degree shift.

1683170232652.png
 
Top