• Spring 2024 meetup in Calgary - date Saturday, April 20/2024. discussion Please RSVP Here to confirm and get your invitation and the location details. RSVP NOW so organizers can plan to get sufficient food etc. It's Tomorrow Saturday! you can still RSVP until I stop checking my phone tomorrow More info and agenda
  • We are having email/registration problems again. Diagnosis is underway. New users sorry if you are having trouble getting registered. We are exploring different options to get registered. Contact the forum via another member or on facebook if you're stuck. Update -> we think it is fixed. Let us know if not.
  • Spring meet up in Ontario, April 6/2024. NEW LOCATION See Post #31 Discussion AND THE NEW LOCATION

CMT Ursus 250 Repair: 1) Clutch

RobinHood

Ultra Member
Premium Member
Wave Spring Washers

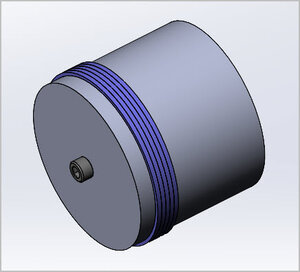
Working on my new to me lathe. I knew the clutch would need some work. Plain bearings in it are shot (knew that). But now I found 4 broken wave spring washers. They keep the plates separated when the clutch is not engaged. One side is always free wheeling when the other is transmitting power. Both could be free wheeling as well - lathe running, but spindle stopped. They can never be engaged at the same time. Some pictures of what I am talking about.

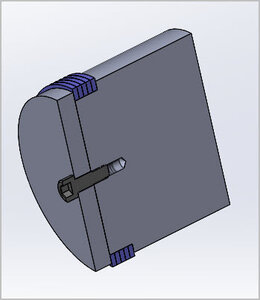
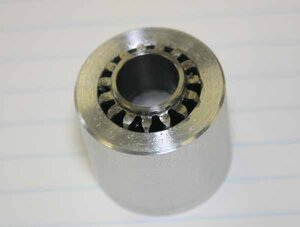
Clutch pack: one side is FWD other is REV (does not matter which way the cartridge inside is installed as it is symmetrical - baskets are specific to direction of operation, however).
85F3A3E6-3160-4EBC-953F-F0F2FCD87403.jpeg


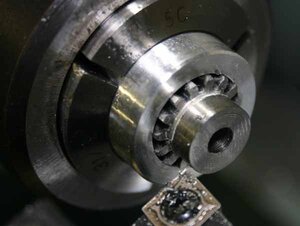
You can see the broken wave washers in the bottom left. The two whole looking ones have a crack each.
0BD46120-793E-4CDC-9E52-ECF1A2DB0DE9.jpeg

The washer nests inside each of the 7 driven plates. Like so. There are 9 drive plates (Including the end and compression plate).
0B6F077F-7F99-48F0-A1E4-2CED7E82ADCD.jpeg

One side of the cartridge cleaned and assembled. You can see the plate stack. The wave washer keeps the drivers spaced away from the driven to open the clutch —> normal position.
BF4B6762-048F-4C71-AC79-1272690B1E6F.jpeg

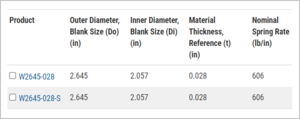
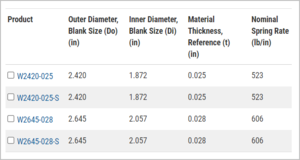
Here are the specs of each washer.
2514FC07-5843-44F4-9775-0F558872C644.jpeg

4A66B403-D55B-457E-BF02-0BC96E9AFF96.jpeg

Pretty sure they were custom made in the factory by Baruffaldi in Italy - the clutch manufacturer. Baruffaldi still exist today, but don’t seem to make these clutches any more. They now make precision CNC tool changers for live/dead tooling. https://www.baruffaldi.it

I will try Baruffaldi to see if they still have some NOS.

McMasterCarr has something similar; it would need modification of ID/OD.
https://www.mcmaster.com/wave-washers/wave-disc-springs-7/id~2-2/.
1621898785435.png
The ID would need opening and the OD reducing. I would do that with the TPG on the lathe.
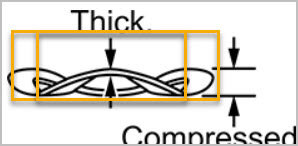
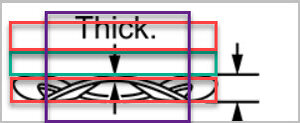
The thickness is either too thin or too thick - not by much, just a few thou. That I would not be able to modify on a formed washer. Only on raw stock as I could surface grind it to size.

Have any of you ever made wave washers from annealed spring steel?
How easy would it be to harden it afterwards?
Would two washers on either end of a stack of 7 cause any problems if they are a little stiffer, if I use the ones from McMaster (0.0234” required vs 0.025” as purchased)?

Open to any ideas/suggestions.
 
Last edited:

PeterT

Ultra Member
Premium Member
That's an interesting problem. I have been searching for catalogs where one might find a series of spring washers of the same nominal OD & ID dimensions, but varying the thickness. In hopes that one could interpolate to your thickness & get a feel for the difference in force. But seems like there are very few to choose from as you are probably finding out.

When I clicked on the MCM link details it shows the deflection & working load. I'm assuming it works similar to springs so 57 lb /.094" =606 lb/in spring rate. So if you apply your total compressed deflection & number of washers I'm guessing you can calculate total force?
https://www.mcmaster.com/9714K75/
1621909286857.png

This site allows you to pick certain washers & it builds a results table. Unfortunately now its apples & oranges with different OD, ID & THK but maybe you can somewhat eyeball the nominal spring rate variation. Your 0.6mm = 0.024" is low end of table.
https://www.asraymond.com/wave-spring-washers.html?filter=outer_diameter_blank_size:2:2.645#cds-attribute-outer_diameter_blank_size
1621910034922.png

When I was researching making valve springs for my radial I concluded that even with perfectly formed (annealed state) shapes, heat treat temp window is pretty narrow to get proper results. temps were in the range were HT oven was required. For the price of the spring washers I would be inclined to buy the closest ones, TPG grind them to OD & ID & try to adjust the stack (count) to get the force required. If most of th old springs are in good shape (or better yet a bit worn/softer) than maybe a few new ones at higher force & thickness may get blended in & might operate the same. If you think more breakage is eminent & considering replacing the whole stack with new springs it will likely be trial &error because they are higher spring rate, thicker (therefore more constrained = more force). But maybe by reducing count by one & shimming out the ends you might end up where you want to be?

This site has info & engineering resources but it keeps coming up with popups my PC doesn't like.
https://www.globalspec.com/learnmore/mechanical_components/springs/wave_washers
 

Attachments

  • 1621909389650.png
    1621909389650.png
    23.4 KB · Views: 2
  • 1621909601059.png
    1621909601059.png
    32.4 KB · Views: 2

RobinHood

Ultra Member
Premium Member
Thanks Peter for all the research!

The heat treat process is not without its challenges, and I am still not properly set-up with a HT oven... Therefore, I will most likely stay away from making them from stock spring steel.

If I get the slightly thicker ones off the shelf (0.025” vs the 0.0234 [0.6mm]), I can grind the OD/ID slightly undersized/oversized to try and match the OEM springs as far as spring force is concerned. I will have to experiment a bit, but should be able to measure the force. The off the shelf washer has the same uncompressed height as the OEM - so i am ahead on that front.

Each washer is constrained between two driver plates axially and inside the driven plate radially. The OEMs are a loose fit, so the new ID/OD are not that critical as long as it fits in the available space.

The total force to keep the stack open is only critical insofar as the clutch closing force available is concerned. I think there is enough mechanical advantage through the lever system to not make the clutch too hard to engage.

On Ortlinghaus and Matrix clutches they don’t even have “plate spreader” springs. They just rely on the absence of the closing force to keep the plates from rubbing too hard while open (much like on a disc brake in a car). But then again, they use frictions and steels, not just steels like on this Baruffaldi clutch. Graziano SAG 14s also use steel on steel but with separator coil springs; I believe each side contains 21 of them; those clutches were also made by Baruffaldi.
 

PeterT

Ultra Member
Premium Member
The trick when the time comes will be how to hold those buggers for OD & ID alteration. They are thin, compressible, un-flat & just a tangent of contact area to a stepped mandrel with an end clamp plate for example. You might want to buy some extra washers just so they will nestle together & present a thicker overall sandwich. Actually shallow DOC TPG might be beneficial in this case because maybe a single point tool on this hard material might be enough cutting force to make them want to spin?
 

Attachments

  • EDT-2021-05-24 003.jpg
    EDT-2021-05-24 003.jpg
    12.1 KB · Views: 1

PeterT

Ultra Member
Premium Member
Or maybe instead of stacking multiple spring washers, alternate them with a plain filler washer blank so the end cap can squeeze the sandwich assembly together slightly?
 

Attachments

  • EDT-2021-05-24 004.jpg
    EDT-2021-05-24 004.jpg
    12.2 KB · Views: 1

RobinHood

Ultra Member
Premium Member
Thanks @Dabbler for the link to the Belleville washers. A quick browse reveals that the material thickness for a ~65 mm OD washer will be too much at 2.xx mm. This is what I have been finding looking for alternatives to the OEM wave spring washers.

I basically have come to the conclusion that I either need to make the replacements from stock - potentially very difficult without a punch press and the appropriate dies, or get something close off-the-shelf and modify it.

At the moment I am going down path #2 until it either works or I hit an insurmountable snag.
 

RobinHood

Ultra Member
Premium Member
@PeterT , thanks for giving me some ideas on work holding. I have been scratching my head about that as well.

F2DF20DA-4C9A-4630-B96A-F58F7EE4F05B.jpeg

First off, in the above image you can clearly see the crack in the washer and how it has worn two contact points - one on each side of the crack - as opposed to a single, light coloured area for the three other contacts. (Yellow arrows).

The blue arrows are the points in contact at the back. They are presently the contact surfaces the washer is sitting on on the table.

For work holding, I thought about making an arbor with a step shoulder to fit the ID. Then use a plate with four push pins (small ball bearings?) to engage the contact area on the facing side. IOW, clamp the washer to the shoulder in the area of the blue arrows as seen above. This should allow for OD grinding.

Next I would need another arbour with a stepped shoulder bore. The new OD of the washer would register against the OD of the bore. Use a similar 4 pin/ball bearing ring pushing on the face of the four contact areas and grind the ID.

Stacking all four new washers and grinding them at the same time might be an option to speed up the process. I will make my arbors long enough so that I can lengthen the register to accommodate a washer stack after trying it with a single specimen first.
 

RobinHood

Ultra Member
Premium Member
@Brent H that could be an option as well. In the past, while speaking to manufactures, it always came down to how many items are their minimum production runs. So, unfortunately, it has never worked out so far as I did not need 5000 springs (that was the last time I needed something special: a few specific springs for a bow string making jig).
 

RobinHood

Ultra Member
Premium Member
Just realized that the off-the-shelf washers from MMC only have 3 contact points per side (if I interpret their drawing correctly). The OEM has four.... hmmm.
 

RobinHood

Ultra Member
Premium Member
They might!

They show their single turn washers as a split washer. I suppose I could TIG the ends together.

All good stuff - at least worth exploring...
 

YYCHM

(Craig)
Premium Member
They might!

They show their single turn washers as a split washer. I suppose I could TIG the ends together.

All good stuff - at least worth exploring...

I was wondering if they were split. Looks to have more than 3 waves though.
 
Last edited:

RobinHood

Ultra Member
Premium Member
Yes, that is great observation Craig.

Was discussing things with Dabbler earlier. I need to take some measurement to calculate the spring force/constant. That might give me better search criteria for what I need to replace the springs. If the dimension and the properties are the same as the OE (or the dimensions made to be the same) then number of waves may not be as critical as I thought. The more points of contact, the more evenly the force is distributed between the driver plates.
Might just have to replace springs more often if the # of waves differs.
Or it may last my lifetime as I think these are the original springs and the machine has seen some hard use since it was born in the ’70s.
 

PeterT

Ultra Member
Premium Member
Regarding holding fixture, I was visualizing something like this assuming step1 is holding on stock ID & grinding OD to spec. The spring washers are just shown as discs for simplicity. A stack would nestle one another, hill to hill, valley to valley so the sandwich would have stability. Then trim the stub length of ID boss so that the end cap compresses them sufficiently & that force hopefully keeps them retained radially in position during grinding. Alternatively machine the cap with the ID as the boss kind of like a slitting saw arbor. But a bit more work to have matching bore in chucking fixture & kind of skinny remaining material in main fixture.

Then step 2 with OD established, another female/cup fixture to hold the stack OD so ID can be ground.
 

Attachments

  • SNAG-2021-05-25 000.jpg
    SNAG-2021-05-25 000.jpg
    25.3 KB · Views: 1
  • SNAG-2021-05-25 001.jpg
    SNAG-2021-05-25 001.jpg
    17.8 KB · Views: 1
  • SNAG-2021-05-25 002.jpg
    SNAG-2021-05-25 002.jpg
    13.7 KB · Views: 1
Last edited:

YYCHM

(Craig)
Premium Member
Maybe a place that sells friction clutches would have parts for them? I found one site selling friction clutches but it didn't offer parts.
 

PeterT

Ultra Member
Premium Member
How I held my gear in a machined cup to re-bore ID. Light press fit with a few drops of CA then heat to remove. But I can visualize holding skinny wavy washers might be a bit more challenging. Maybe there is better way.
 

Attachments

  • IMG_6805_edited-1.jpg
    IMG_6805_edited-1.jpg
    39.6 KB · Views: 2
  • IMG_6808_edited-1.jpg
    IMG_6808_edited-1.jpg
    29.5 KB · Views: 2

Dabbler

ersatz engineer
@PeterT The wavy washers cannot be fully compressed during grinding, as they change shape when they decompress. (generally it is 'less than good' to fully compress a wavy washer in any event. It is like ovextending or overcompressing a coil spring, and can lead to premature failure)

The way I have seen is to use a plate with the appropriate # of knobs on it and that cinches it against the shoulder of the arbor. The grinding forces are very small, and the wavy washers flex under grinding less than you might imagine. The same plate can be used for the ID grinding as well.
 
Top